Inbound Connections
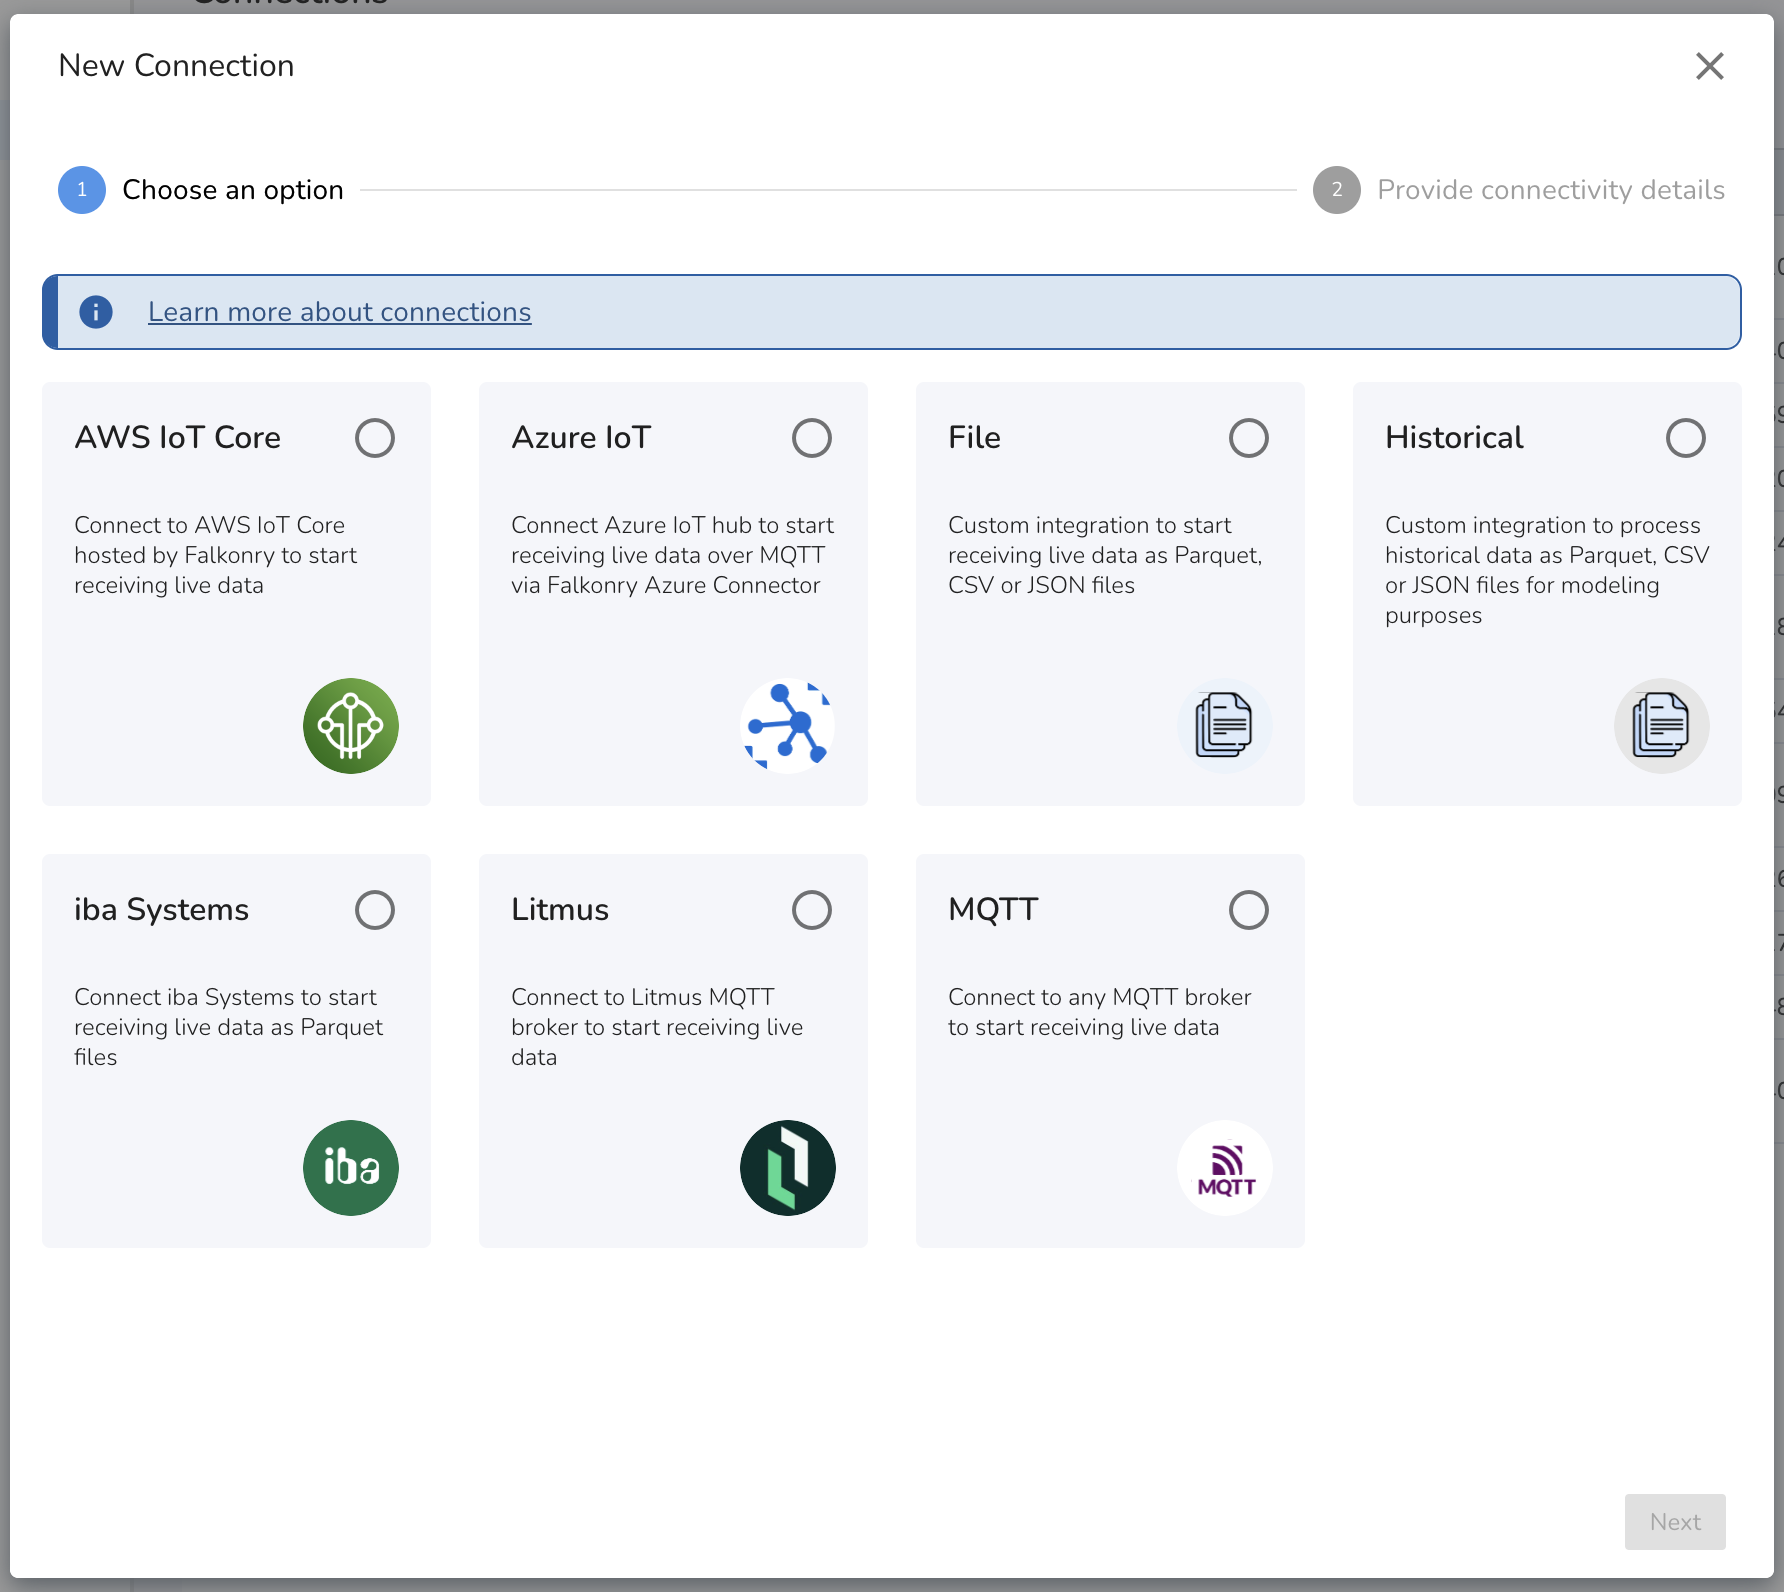
Inbound Connections bring data into TSI from external data acquisition and storage systems. Several types of data acquisition systems can be connected to TSI for the data transfer via iba Systems, Litmus, AWS IoT, Azure IoT, Files, MQTT, and Historical Connections.
The data received over a connection gets processed in the order it
arrives. For real time data processing, a connection must be in
PRODUCTION. You can read more about Connection Settings
Warning
A signal may only be associated with one connection in PRODUCTION. Additionally, it is recommended to use separate connections for processing live and historical data.
Connection Types
The types of Inbound Connections available are either file-based or streaming-based.
File-based Connection
Connection Status
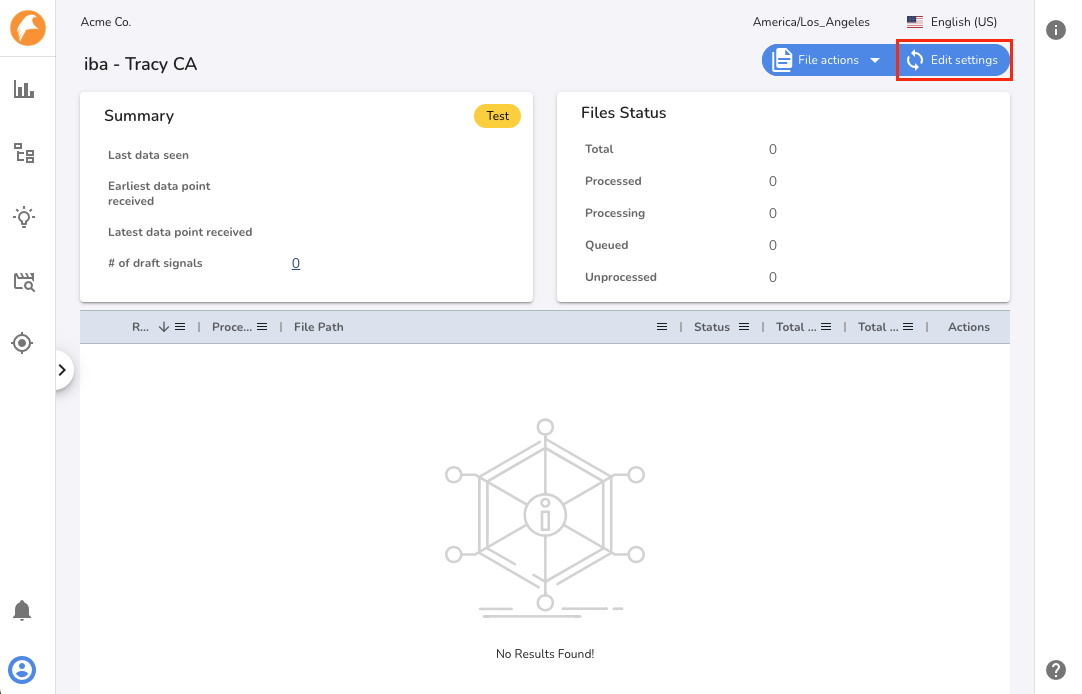
The File Connection has list of all the files sent to TSI for processing. Each file has a status information to track it's status in the data infrastructure.
Following are the statuses with their meaning:
| Status | Meaning |
|---|---|
| QUEUED | The file is waiting in the data processing queue. The data infrastructure processes files in the order they are received by TSI. |
| PROCESSING | The file is getting processed in TSI. |
| PROCESSED | The file is processed and data is available for the Approved Signals in TSI. |
| FAILED | The file failed to get processed in TSI. The error message can be seen under File Info section. |
| UNPROCESSED | The file is not yet processed since the connection is in Test mode. Change the connection mode to PRODUCTION to get these files processed. |
| UNAVAILABLE | The file has been deleted from TSI and is no longer available for processing. The connection waits for enough time to review the data before deleting the file. This does not affect the signal data already extracted from these files. |
Note
The data files with any status other than UNAVAILABLE remain available in the system for reprocessing. To reprocess the files, use Extract Data action via TSI UI.
1. iba Systems
| Connection Type | Details |
|---|---|
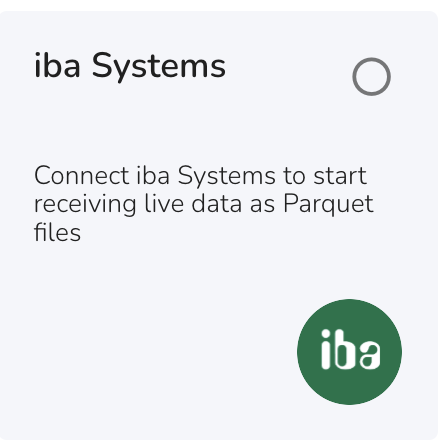 |
This type of Inbound Connection is used to bring real-time data into TSI from iba Systems in the form of parquet files generated by ibaDatCoordinator v3 or higher. This data transfer option uses an AWS S3 bucket as the storage medium to transfer files. Data files received by this connection type are processed in the order of their arrival. File processing is tracked via Status tags. While the files get processed, they get tagged with a status. To process files with historic data, it is recommended to use a separate Historical Connection. This will avoid delays in live data processing. Authentication and Security The iba Systems Connection uses ibaDatCoordinator and an AWS S3 bucket as an integration component. This S3 bucket is hosted by Falkonry. As files are transferred into the S3 bucket, TSI starts processing the files in order of their arrival. Secure credentials are generated during the connection creation process and are downloadable from the connections section in the TSI UI. You can use these credentials to configure ibaDatCoordinator to transfer data files into the targeted S3 bucket. |
2. ReST API
| Connection Type | Details |
|---|---|
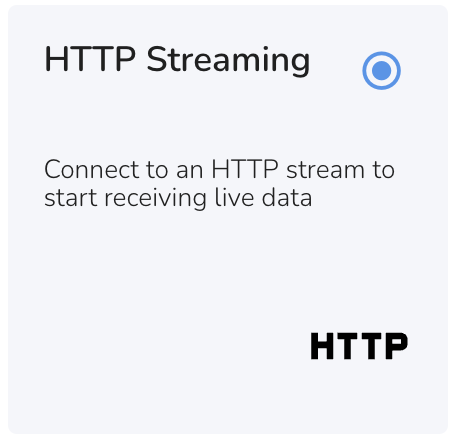 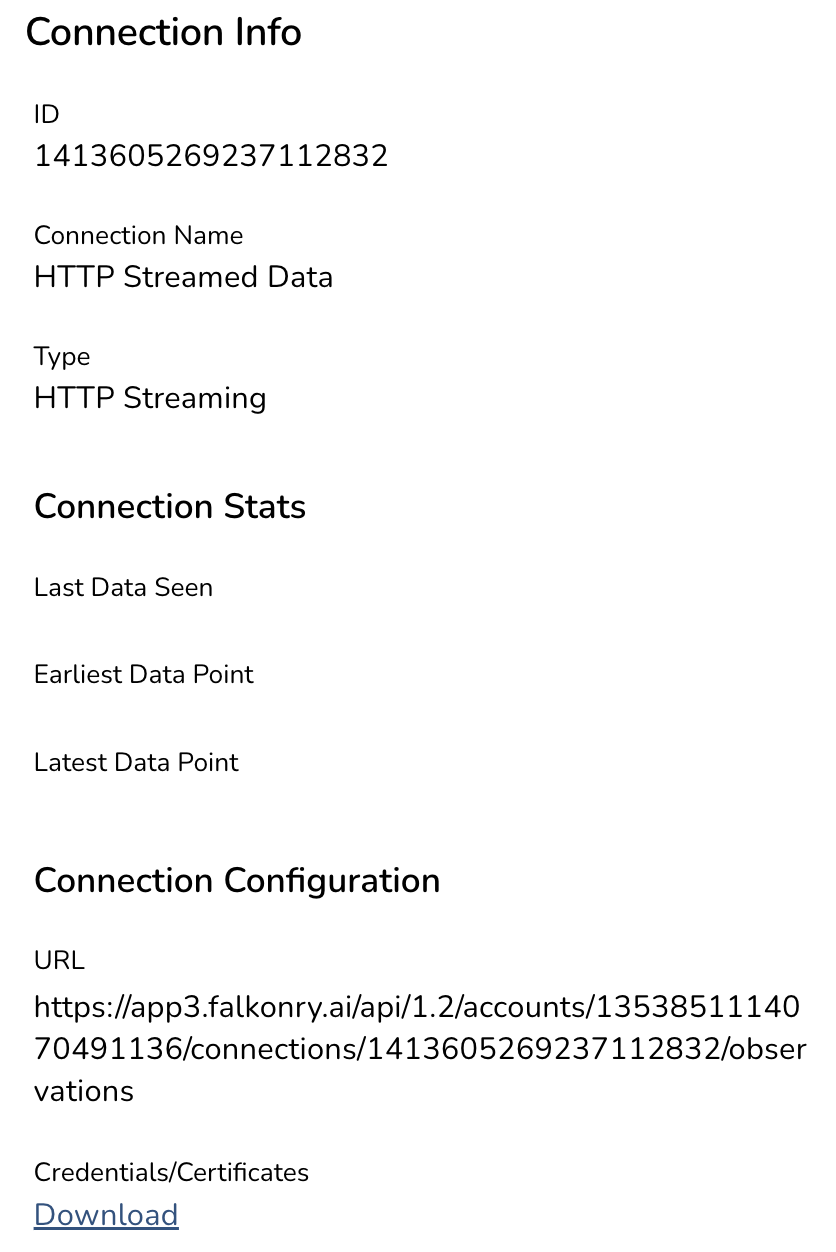 |
This type of Inbound Connection allows you to send data to TSI over HTTP requests. This data trasfer option allows you to build custom integration for sending data to TSI. The JSON formatted payloads are received and processed by TSI to detect draft signals and process data for approved signals. Every connection of this type will have a dedicated URL for streaming data. Be sure to download the required credentials or certificates to ensure the security of data in transit. Supported Time Format The JSON key representing time in the data must have one of the following time formats. The key representing time and the time format must stay the same for all the HTTP requests. Use Nanoseconds e.g. 1643707264380000000 Authentication and Security This connection is secured by the API token. To generate an API token, see here. For rotating API token, generate a new one and delete the old one. |
Sample Data Payload
[
  { "time" : 1643707264380000000, "value": 45.3, "signal_id": "{{signal1_id}}" },
  { "time" : 1643707264580000000, "value": "alarm-on", "signal_id": "{{signal2_id}}" }
]
cURL Request
$ curl --location --request POST 'https://app3.falkonry.ai/api/1.2/accounts/xxxxxxxxxxxxxxx/observations' \
  --header 'Authorization: Bearer <token>' \
  --header 'Content-Type: application/json' \
  --data-raw '[
                  { "time" : 1643707264380000000,
                  "value": 45.3,
                  "signal_id":"yyyyyyyyyyy" },
                  { "time" : 1643707264580000000,
                  "value": "alarm-on",
                  "signal_id": "zzzzzzzzzzz" }
              ]'
Python
import requests import json

URL = 'https://app3.falkonry.ai/api/1.2/accounts/xxxxxxxxxxxxxxx/observations'
TOKEN = '<token>'
HEADERS = {'Authorization': f'Bearer {TOKEN}'}
PAYLOAD = [{ "time" : 1643707264380000000, "value": 45.3, "signal_id": "yyyyyyyyyyy" },
           { "time" :1643707264580000000, "value": "alarm-on", "signal_id": "zzzzzzzzzzz" }]

response = requests.post(URL, headers=HEADERS, data=json.dumps(PAYLOAD))
print(response.json())
Note
The above API can also be used to send events data to TSI. Each event can be JSON formatted and set as the value in the HTTP request payload.
Example:
{
    "time" : 1643707264380000000,
    "value": {
        "status": "maintenance",
        "end_time": "2024-05-07T12:00:00Z"
    },
    "signal_id": "<json_signal_id>"
}
3. AWS IoT Core
| Connection Type | Details |
|---|---|
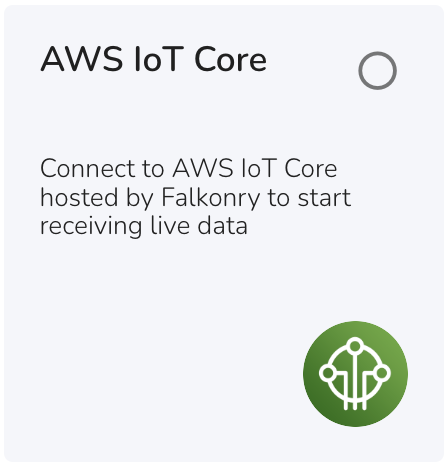 |
This type of Inbound Connection allows you to bring real-time data into TSI from IoT gateway via MQTT. This data transfer option uses Falkonry hosted AWS IoT Core as a MQTT broker. The JSON formatted messages are sent to the broker via IoT gateways or user-managed MQTT publisher. The publisher must comply with MQTT v3.1.1 specifications. To connect to this Falkonry-hosted MQTT broker, use host as iot.falkonry.ai and port as [8883]. MQTT client ID, topic and TLS certificates get generated when creating this connection from TSI UI. For client ID prefix, use [connection ID] and for topic prefix use [connection ID]. Authentication and Security This connection uses AWS IoT as an integration component. This IoT gateway is hosted by Falkonry and data is streamed to the gateway from an MQTT publisher that supports the MQTT v3.1.1 protocol. The connection details i.e. the endpoint, port, secure certificate, public key, topic, and client id are provided by Falkonry. The data transfer is secured by certificate-based authentication by creating a unique X.509 certificate for each connection. Data is delivered over port 443. The certification and MQTT specific connection details are generated during the connection creation process. |
Note
If any of the following conditions is true, please let the Falkonry team know before transferring the data:
- Have signals producing data at microseconds or faster.
Note
Download the root CA certificate generated by AWS for server authentication from here.
If you experience server certificate validation issue while using the above certificate, use the cross-signed root CA certificate as provided by AWS here.
4. File
Falkonry Hosted S3
| Connection Type | Details |
|---|---|
 |
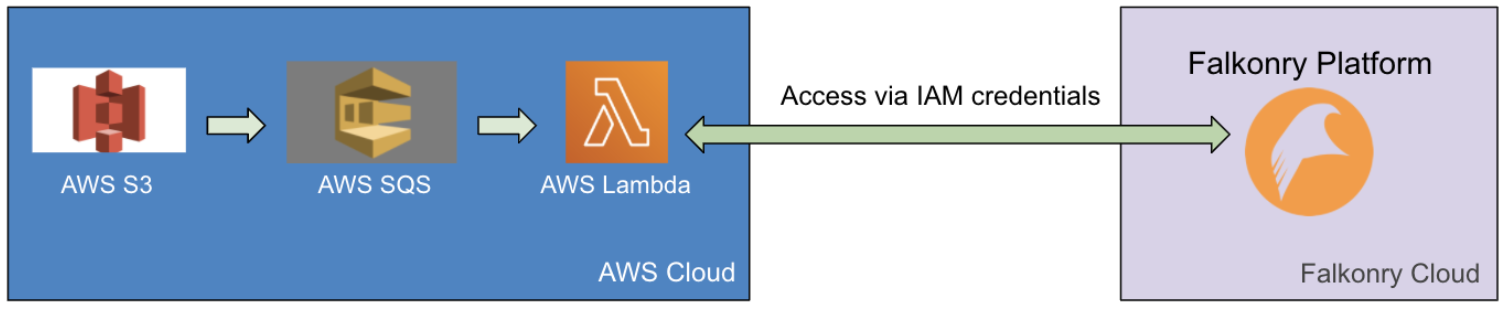
This type of Inbound Connection allows you to build a custom integration to bring real-time data into TSI in the form of files. The supported file types are CSV, Parquet, and JSON. This data transfer option uses an AWS S3 bucket as the storage medium. This S3 bucket can be hosted in Falkonry Cloud as well as a customer-hosted AWS cloud. The data files received by this connection get processed by the system in order they arrive. File processing is tracked via Status tags. While the files get processed, they get tagged with a status. To process files with historic data, it is recommended to use a separate Historical Connection to avoid delays in live data processing. Authentication and Security The File Connection uses an AWS S3 bucket as an integration component. This S3 bucket can either be hosted in Falkonry's or the User's AWS infrastructure. As files are transferred into the S3 bucket, TSI starts processing the files in order of their arrival. When using a Falkonry managed S3 bucket, the secure credentials are generated during the connection creation process and the integration details are made downloadable from within TSI. These credentials are used to transfer data files into the targeted S3 bucket. Users can use AWS SDKs or CLI to perform this action. When using a User managed S3 bucket, a file connector is installed in User's AWS account as an AWS lambda function. This file connector is responsible for communicating the arrival of new data files in the targeted S3 bucket to TSI. The connector uses Lambda \<> S3 binding managed by AWS and uses token-based authentication to communicate with TSI over port 443 (HTTPS). On the other side of the integration, TSI requires AWS credentials to be able to read files from the User managed S3 bucket. These AWS credentials are required during the connection creation process. A Connection in Falkonry Time Series Intelligence is a virtual link between TSI and the external data system. A unique Connection is required to connect each of the external data systems in order to bring signal data into TSI for analysis and real-time monitoring of the assets. The external data systems such as IoT gateways, data historians, SCADA, and OPC systems can be readily integrated with AI Cloud through various types of Connections offered by TSI. One of the Inbound Connection types is :doc: File Connection The File Connection uses the AWS S3 bucket as a way to transfer data files into TSI. As files are transferred into the S3 bucket, AI Cloud starts processing the files in order of their arrival. This S3 bucket could either be hosted in Falkonry's or the User's AWS infrastructure. When using a User-managed S3 bucket, a file-connector is installed in the User's AWS account as an AWS lambda function. This file connector is responsible for communicating the arrival of new data files in the targeted S3 bucket to AI Cloud. The connector uses Lambda <> S3 binding managed by AWS and uses token-based authentication to communicate with AI Cloud over port 443 (HTTPS). On the other side of the integration, AI Cloud requires AWS credentials to be able to read these files from the User managed S3 bucket. These AWS credentials are required during the Connection creation process. The Falkonry-FileConnector-SQS SQS triggers the Falkonry-FileConnector lambda. The Falkonry-FileConnector lambda notifies AI Cloud to process the files. TSI reads the data files from the S3 bucket using the IAM credentials configured for this Connection. |
Note
If any of the following conditions is true, please let the Falkonry team know before establishing the connectivity:
- Files with more than 10,000 columns in CSV or Parquet file type
- Files with periodic signal name changes
- Cannot use Falkonry hosted S3 bucket for the data transfer
Private S3
A Connection in Falkonry Time Series Intelligence is a virtual link between TSI and the external data system. A unique Connection is required to connect each of the external data systems in order to bring signal data into TSI for analysis and real-time monitoring of the assets. The external data systems such as IoT gateways, data historians, SCADA, and OPC systems can be readily integrated with AI Cloud through various types of Connections offered by TSI. One of the Inbound Connection types is File Connection
The File Connection uses the AWS S3 bucket as a way to transfer data files into TSI. As files are transferred into the S3 bucket, AI Cloud starts processing the files in order of their arrival. This S3 bucket could either be hosted in Falkonry's or the User's AWS infrastructure.
When using a User-managed S3 bucket, a file-connector is installed in the User's AWS account as an AWS lambda function. This file connector is responsible for communicating the arrival of new data files in the targeted S3 bucket to AI Cloud. The connector uses Lambda \<> S3 binding managed by AWS and uses token-based authentication to communicate with AI Cloud over port 443 (HTTPS). On the other side of the integration, AI Cloud requires AWS credentials to be able to read these files from the User managed S3 bucket. These AWS credentials are required during the Connection creation process.
The Falkonry-FileConnector-SQS SQS triggers the Falkonry-FileConnector lambda. The Falkonry-FileConnector lambda notifies AI Cloud to process the files. TSI reads the data files from the S3 bucket using the IAM credentials configured for this Connection.
Creating a Secure S3 Bucket in AWS
-
Create a new S3 bucket from your AWS console. Following are recommended settings for the new bucket
- ACLs must be disabled. This is to enforce the IAM policy on all the files within this S3 bucket.
- Public access must be blocked. This is to block all the public access to the files within this S3 bucket.
- All AWS regions are supported
- Bucket versioning is optional. AI Cloud expects all the files within a folder to have unique names. And the files once written should never be modified.
- Encryption is optional. AI Cloud can be integrated with this S3 bucket to read server-side encrypted or unencrypted files. It is recommended to turn ON the server-side encryption.
- Object lock must be disabled. There is no requirement for the files within the S3 bucket to be locked.
-
Create a folder named data inside this new S3 bucket
- Create a new IAM user with programmatic access and attach the following policy
{ "Version": "2012-10-17", "Statement": [ { "Sid": "VisualEditor0", "Effect": "Allow", "Action": [ "s3:GetObject", "s3:ListBucket" ], "Resource": [ "arn:aws:s3:::example-bucket-name", "arn:aws:s3:::example-bucket-name/*" ] } ] } - Generate an access key for this new IAM user from the AWS console
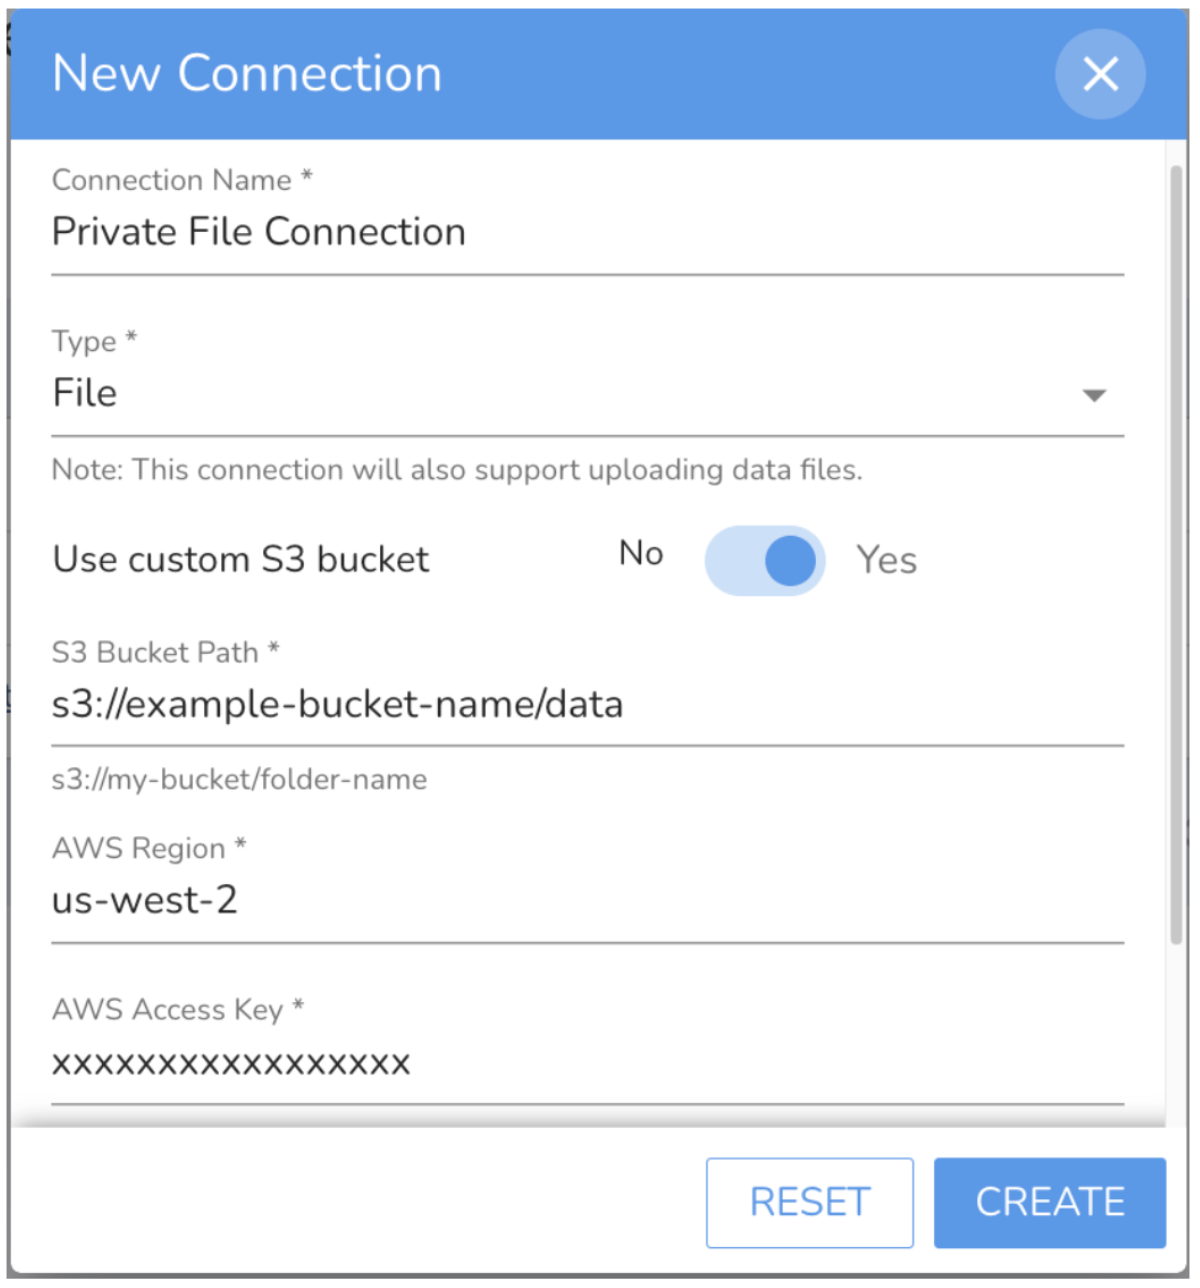
Creating a File Connection
- Go to UI and navigate to the New Connection view
- Use the S3 Bucket name, AWS Region, Access Key, and Access Secret as created in the above section
- The AWS credentials get verified when creating the Connection
- Choose the "Use Custom S3 Bucket" option
- Set S3 Bucket Path as s3://example-bucket-name/data
- Set AWS Region as the region selected while creating the S3 bucket
- Set AWS Access Key as the Access Key generated for the new IAM user
- Set AWS Secret Key as the Access Secret generated for the new IAM user
Installing File Connector in AWS
- Get the link to download the File Connector package zip from Falkonry Team
- Extract the downloaded zip and validate that it contains the folder named lambda and cloudformation_template.yml file
- Upload the falkonry-fileconnector-package folder to the newly created S3 bucket at the root level
- Go to AWS console and navigate to the CloudFormation section and click "Create stack (with new resources)" option
-
Select the "Template is ready" option and upload the cloudformation_template.yml file from the downloaded zip
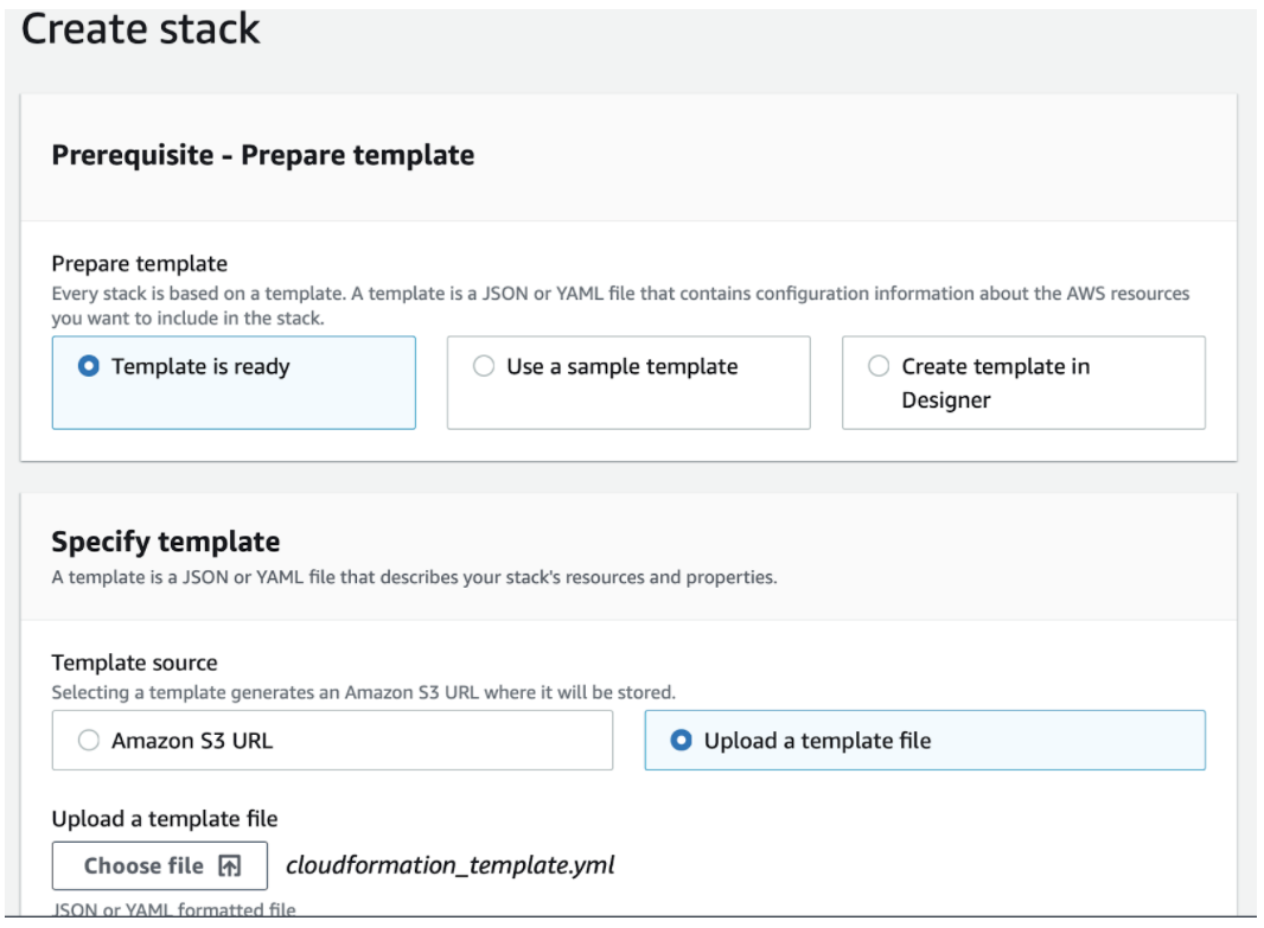
-
Give a Stack Name and provide the parameters on the next screen
- Set AuthorizationToken as API Token generated from AI Cloud UI under Administration section
- Set ConnectionId as the ID of the newly created Connection
- Set DataBucketName as the name of the newly created S3 bucket
- Set TenantId as the account ID in AI Cloud
- Set lambdaBucketName as the name of the newly created S3 bucket
-
Click "Next" and leave the default settings as it is.
- Click "Create Stack" to begin the File Connector installation.
- Once the Stack creation completes, validate that the AWS Lambda function exists with the name Falkonry-FileConnector and AWS SQS queue exists with name Falkonry-FileConnector-SQS.
- Navigate to the newly created S3 bucket and open Properties > Event notifications section.
- Create a new Event Notification using the following settings.
- Give Event a name.
- Select "All object create" events under Event Types.
- Select Destination as SQS queue and select SQS queue with name Falkonry-FileConnector-SQS.
After Installation
Users can now upload data files to the data folder inside the newly created S3 bucket.
5. Historical
| Connection Type | Details |
|---|---|
 |
This type of Inbound Connection is used to bring historical data into TSI for model learning and evaluation purposes. Sending historical data along with the live data to the same connection causes delays and disruptions to the real-time monitoring. To avoid such disruptions, it is recommended to use a Historical Connection. This connection type is also helpful to generate model output for a time period during which live data stopped flowing into TSI. This connection is similar to a File Connection in Test mode. The data files can be uploaded to this connection via the TSI UI, or can be copied over to the AWS S3 bucket designated for this connection. Extracting data from the files 1. Select files to be processed and click on Extract Data action. 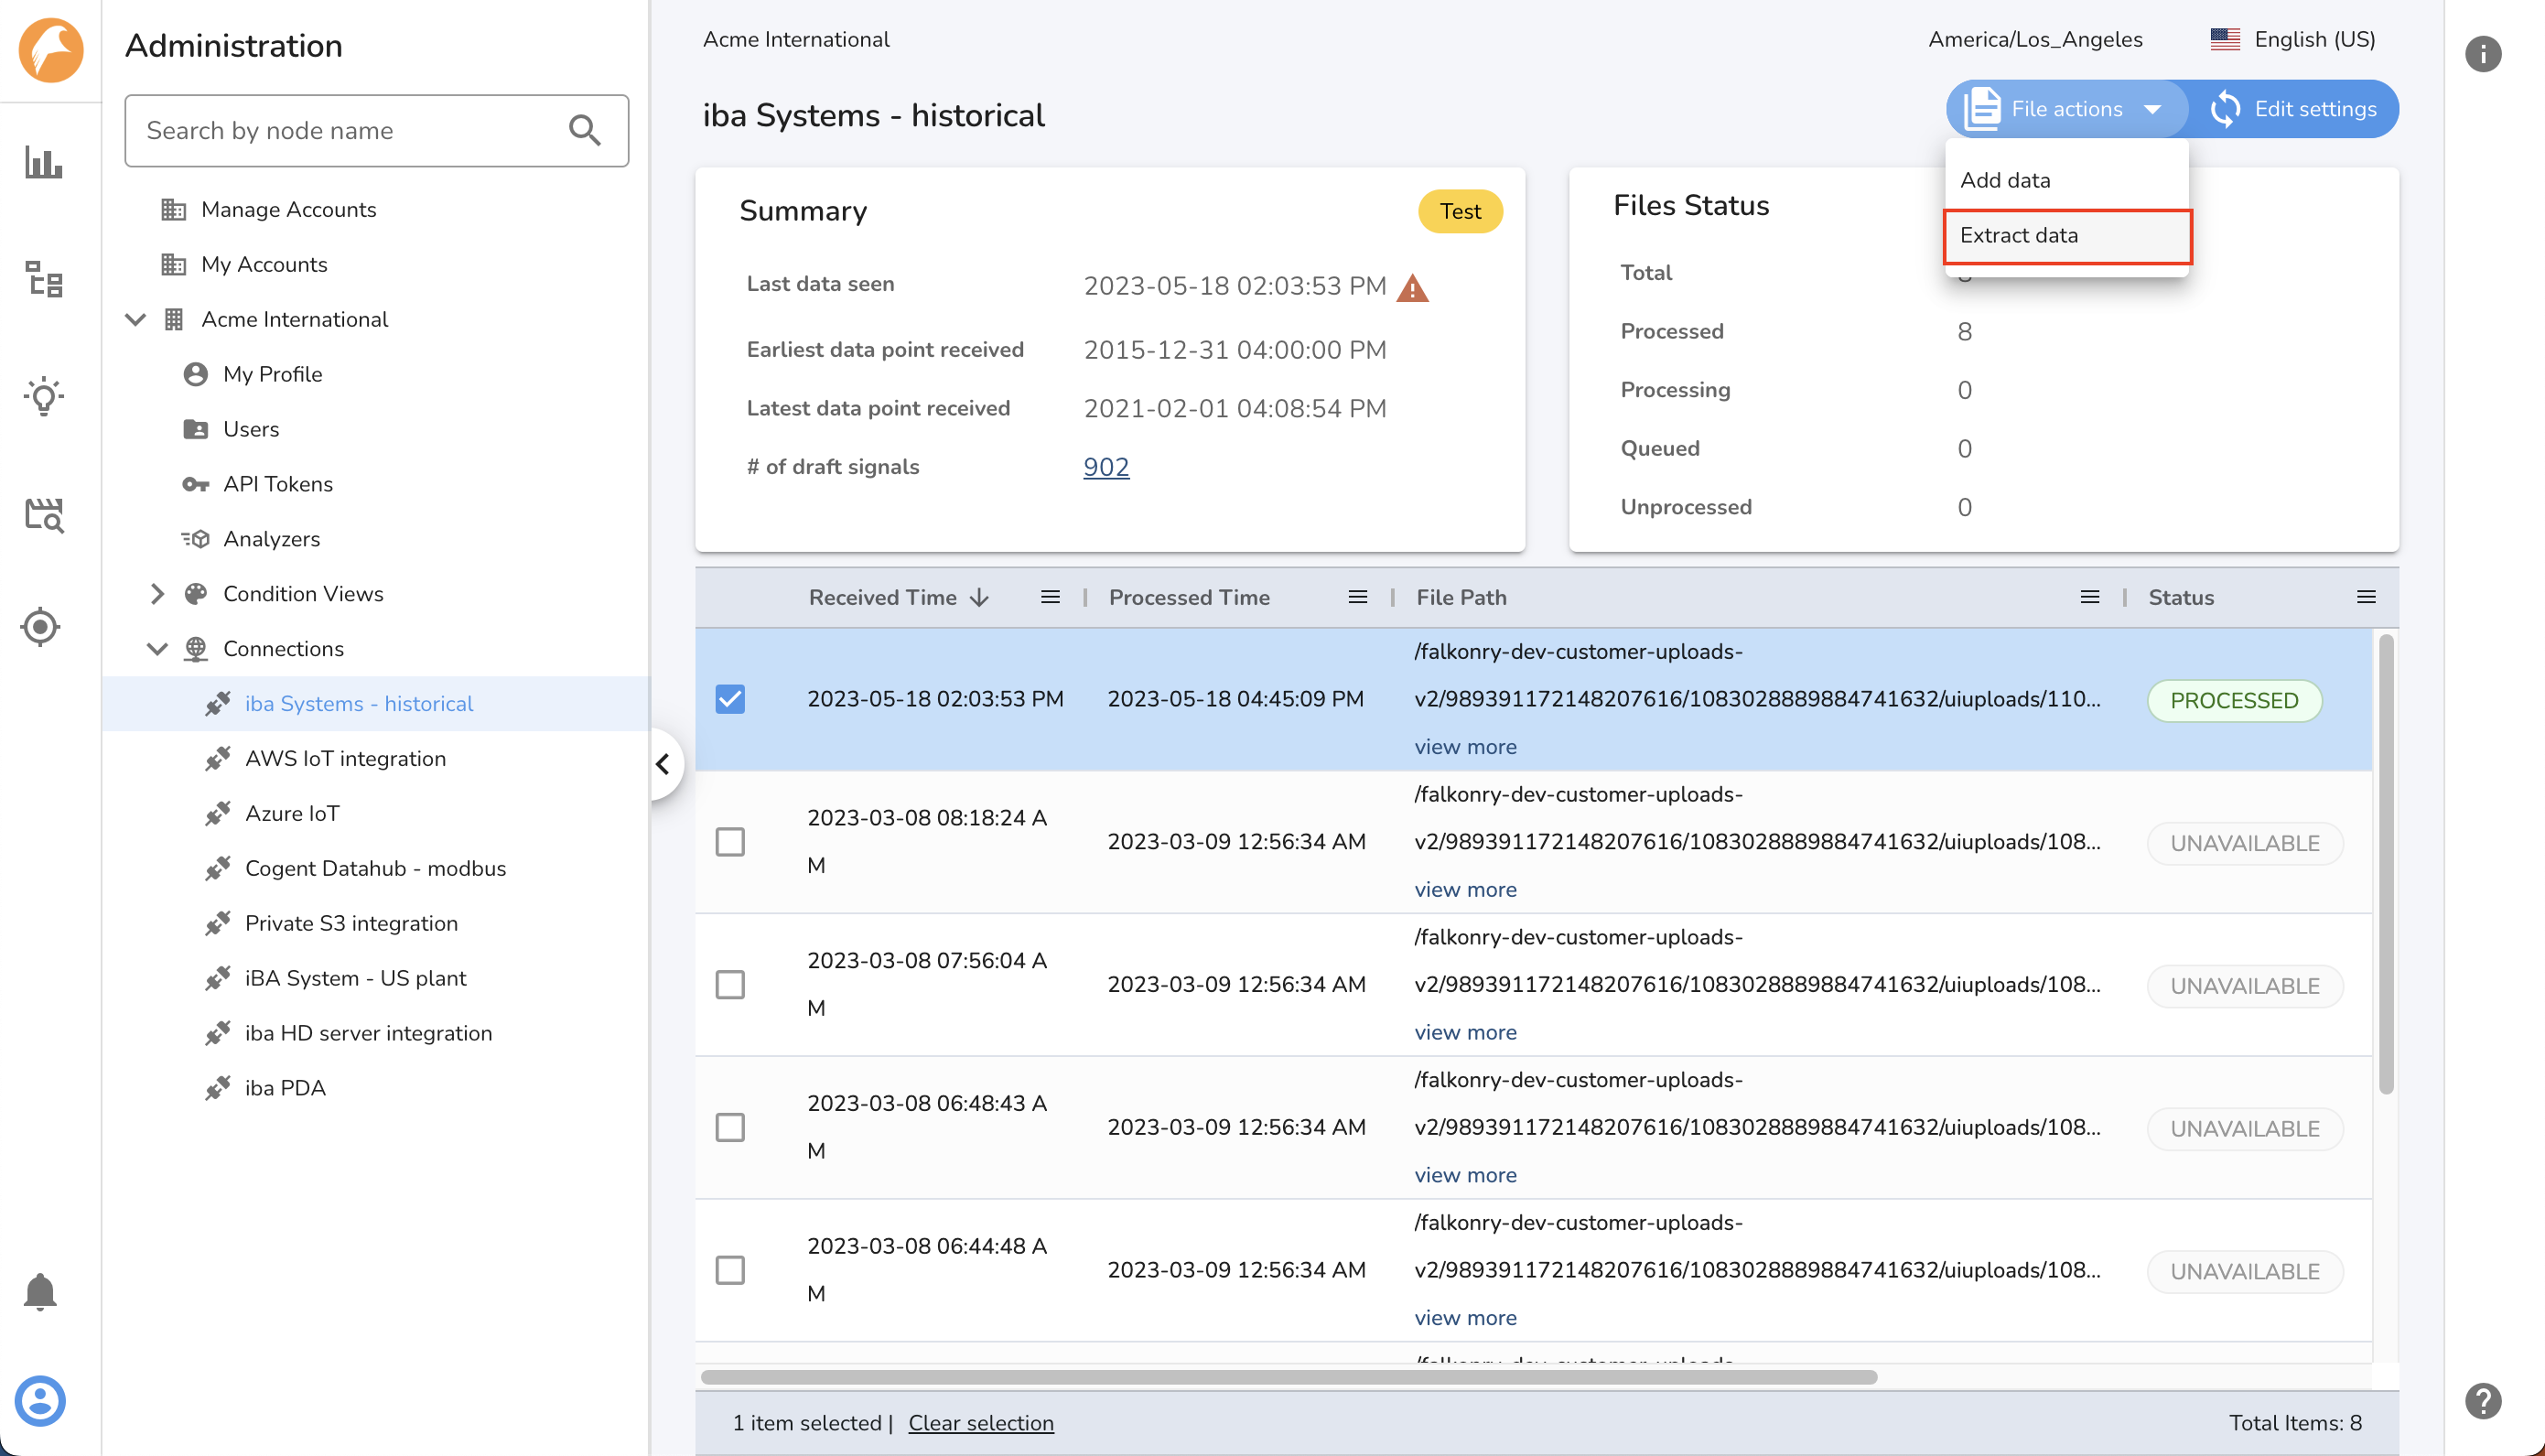 2. Confirm the file selection. To select all files pick All files in the view option. 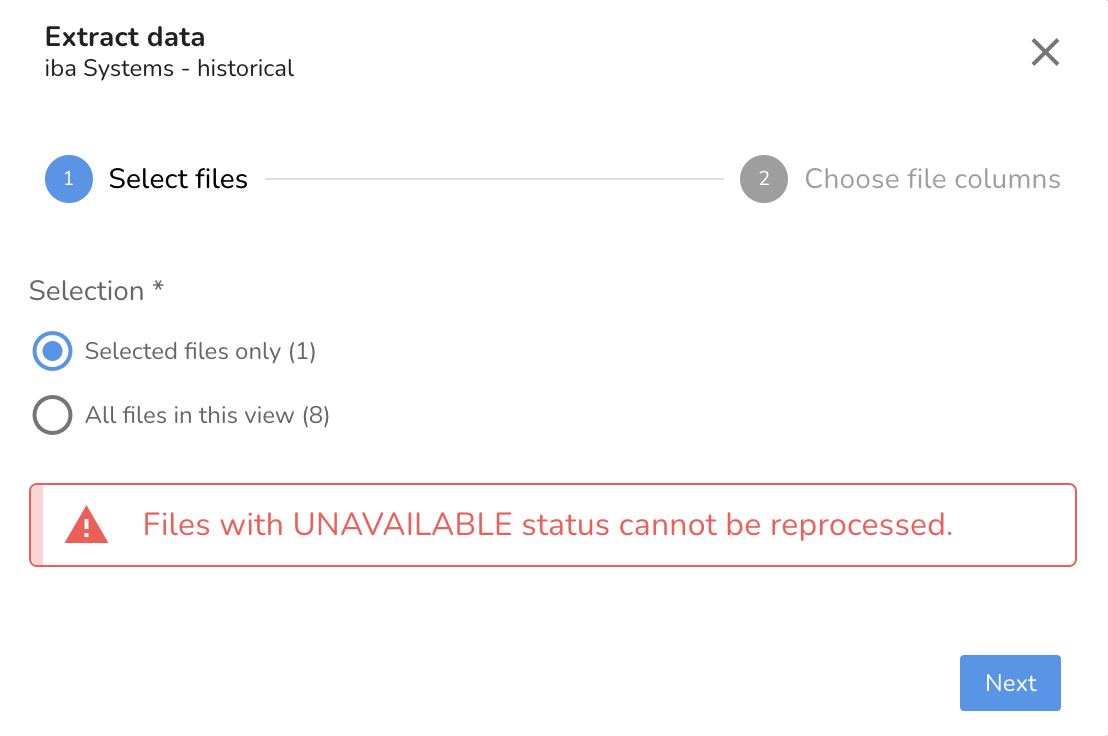 3. Choose the columns to be processed. To process all the columns in the selected files, leave the column selector empty. 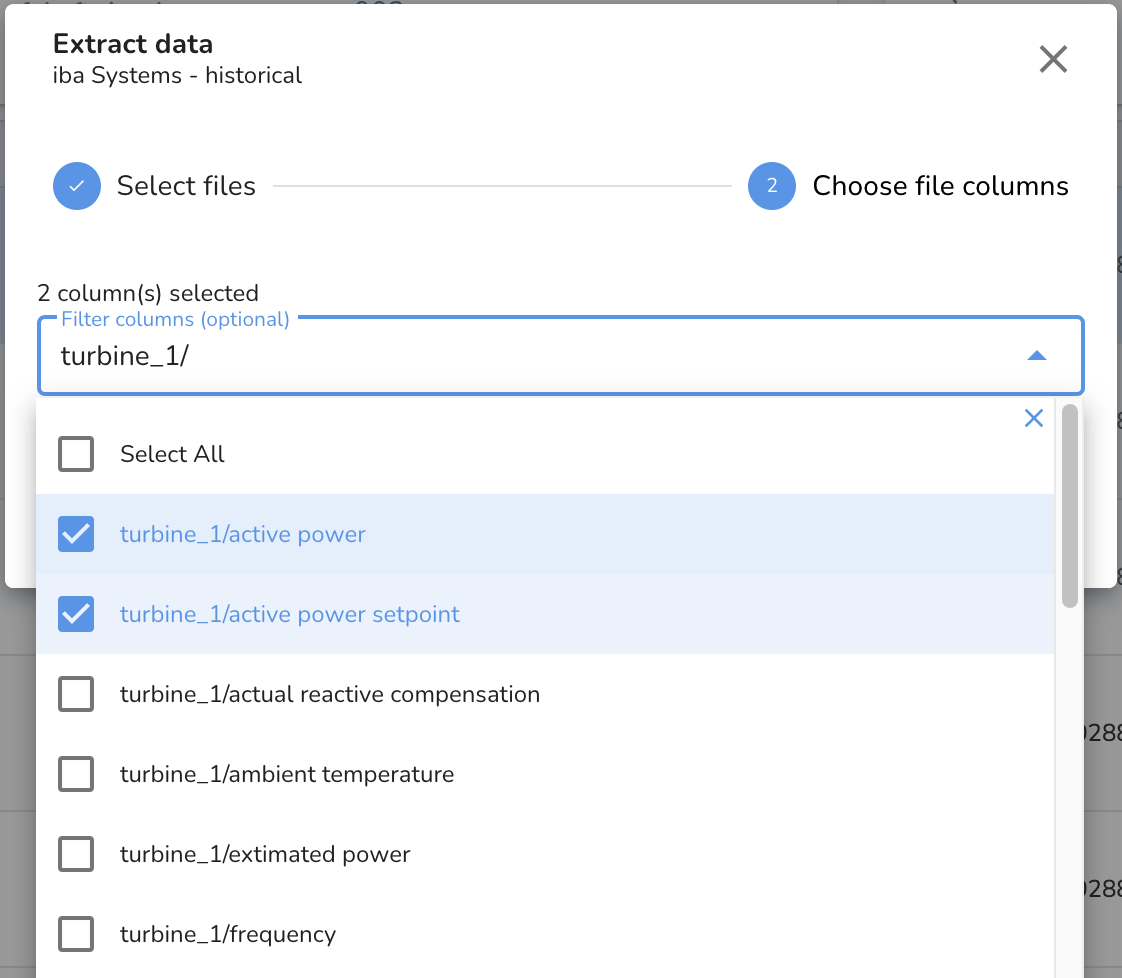 4. Trigger the DATAPROCESSOR activity by clicking the Extract button and track the status of this activity within the Activity view. After the historical data files are processed, the signal data can be used for Patterns modeling and for generating model output using the live model. You can read more about generating the model output and running evaluation activity on historical data here. |
Note
The data files for this connection needs to be processed manually by initiating DATAPROCESSOR activity from the TSI UI. Please validate Connection Settings before triggering Extract Data action.
Note
Wait for the DATAPROCESSOR activity status to be marked as COMPLETED to see the data for the relevant signals.
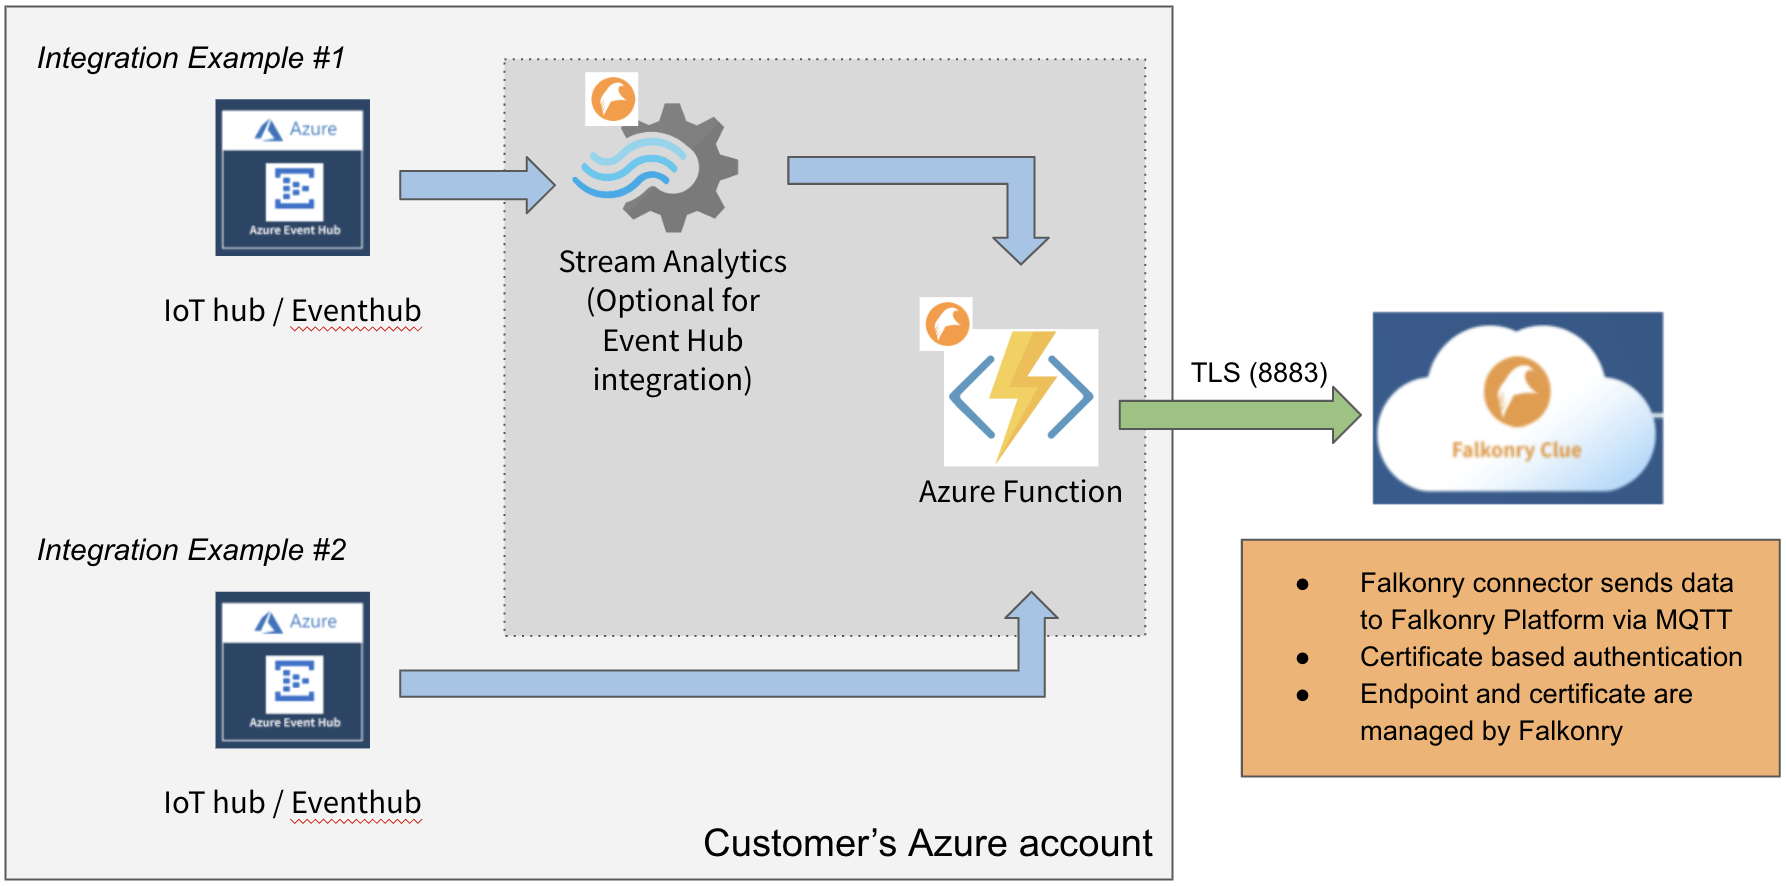
6. Azure IoT
| Connection Type | Details |
|---|---|
 |
This type of Inbound Connection is used to bring real-time data into TSI from the Azure IoT hub and Event hub. A connector is installed in a User's Azure account to send data to Falkonry's IoT Gateway. Authentication and Security The Azure IoT Connection enables integration with Azure IoT Hub and Azure Event Hub. A connector is installed in the User's Azure infrastructure as a Function App. This connector is responsible for receiving data from the Azure IoT Hub or Event Hub and sending the data in real-time to Falkonry's IoT Gateway. The data is sent to TSI over a secure MQTT channel. The Connection details i.e the endpoint, port, topic, and secure certificate are provided by Falkonry. The connector is access controlled via access policy to connect to Azure IoT Hub or Event Hub. The connector also uses X.509 certification-based authentication to connect with the Falkonry hosted IoT Gateway to deliver the data over port 8883. This certificate is generated during the Connection creation process. |
Falkonry Azure Connector
Falkonry Time Series Intelligence accepts real-time data streaming from Azure IoT Hub and Event Hub via an integration agent. Falkonry Azure Connector - the integration agent is built using Azure components such as Azure Stream Analytics and Azure Function, enabling data transmission.
The connector subscribes to sources like Stream Analytics, Azure Event Hub, and Azure IoT Hub and sends the data to AI Cloud in real-time. The connector provides integration management and access control to the users. The communication channel between the connector and AI Cloud is secured via X.509 certificate-based authentication.
The installer creates all the required Azure resources in a user-defined Azure Resource Group. The resources are:
| # | Resource Name | Purpose |
|---|---|---|
| 1. | Azure Function | Creates a secure HTTP connection with Falkonry's IoT Gateway to deliver the data. The function receives data from Event Hub, IoT Hub, or Stream Analytics. |
| 2. | Stream Analytics | Optional to use. Event Hub or IoT Hub integrates with Stream Analytics to forward the data to the Azure Function. |
Before Installation
Get the following details from Falkonry:
| # | Item | Get it from |
|---|---|---|
| 1. | Azure resource template | Download from here. |
| 2. | Falkonry Azure Connector zip URL | Provided by the Falkonry team. |
| 3. | Account ID | Get this from TSI UI. |
| 4. | Connection ID | Get this from TSI UI. |
| 5. | Falkonry Certificate ID | Get this from TSI UI. |
| 6. | Connection credentials | Download these from TSI UI. |
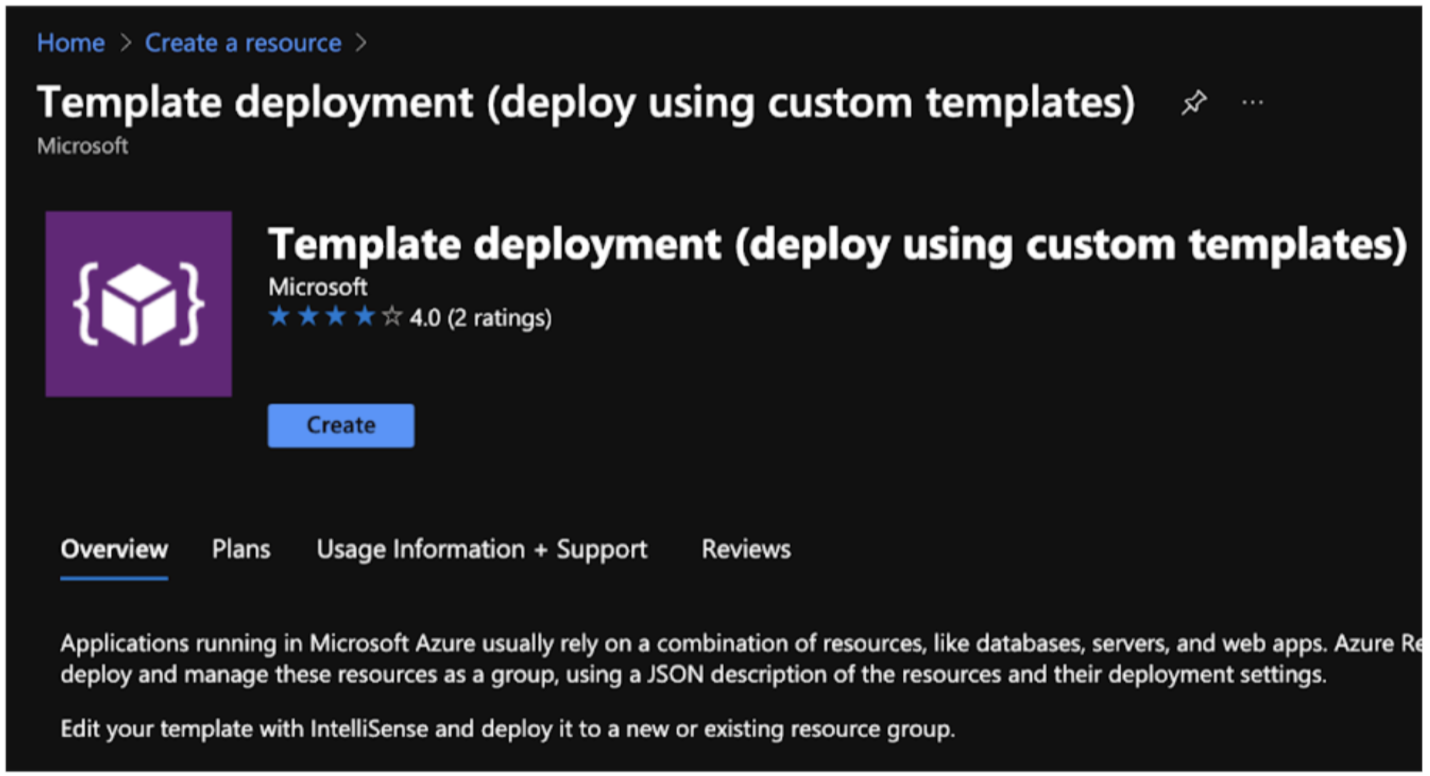
Installing the Connector
-
- Navigate to the Azure portal and search for "Template deployment" in the app store.
-
- Click on "Create" and select "Build your own template in the editor".
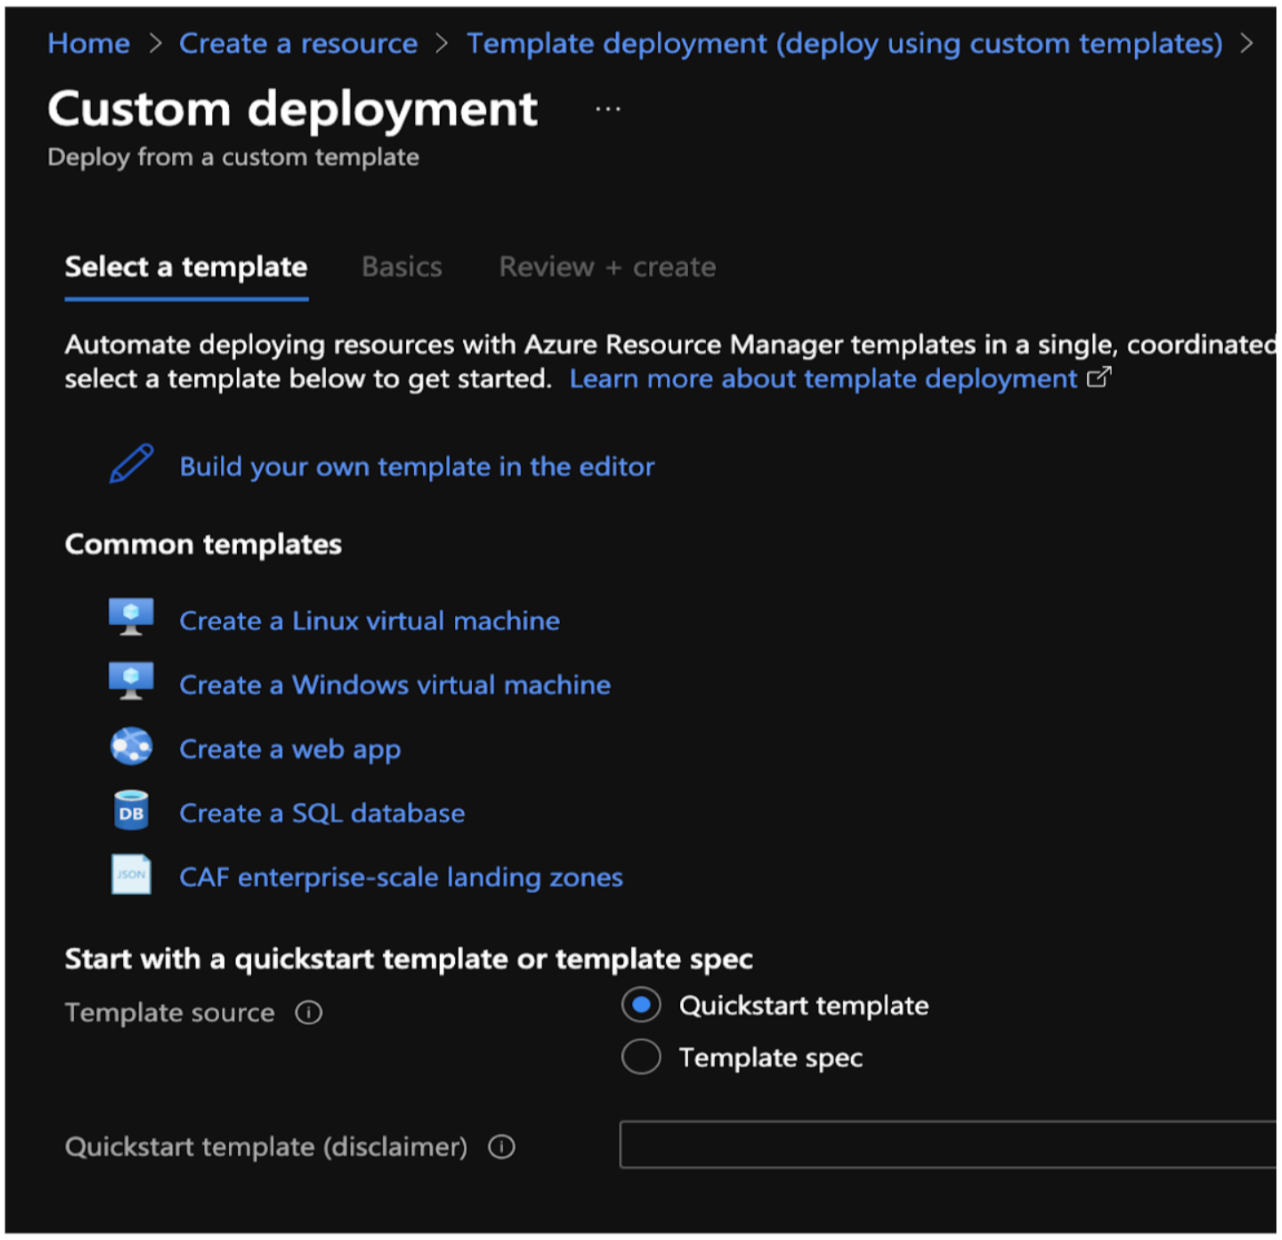
-
- Download the template from here and paste the contents.
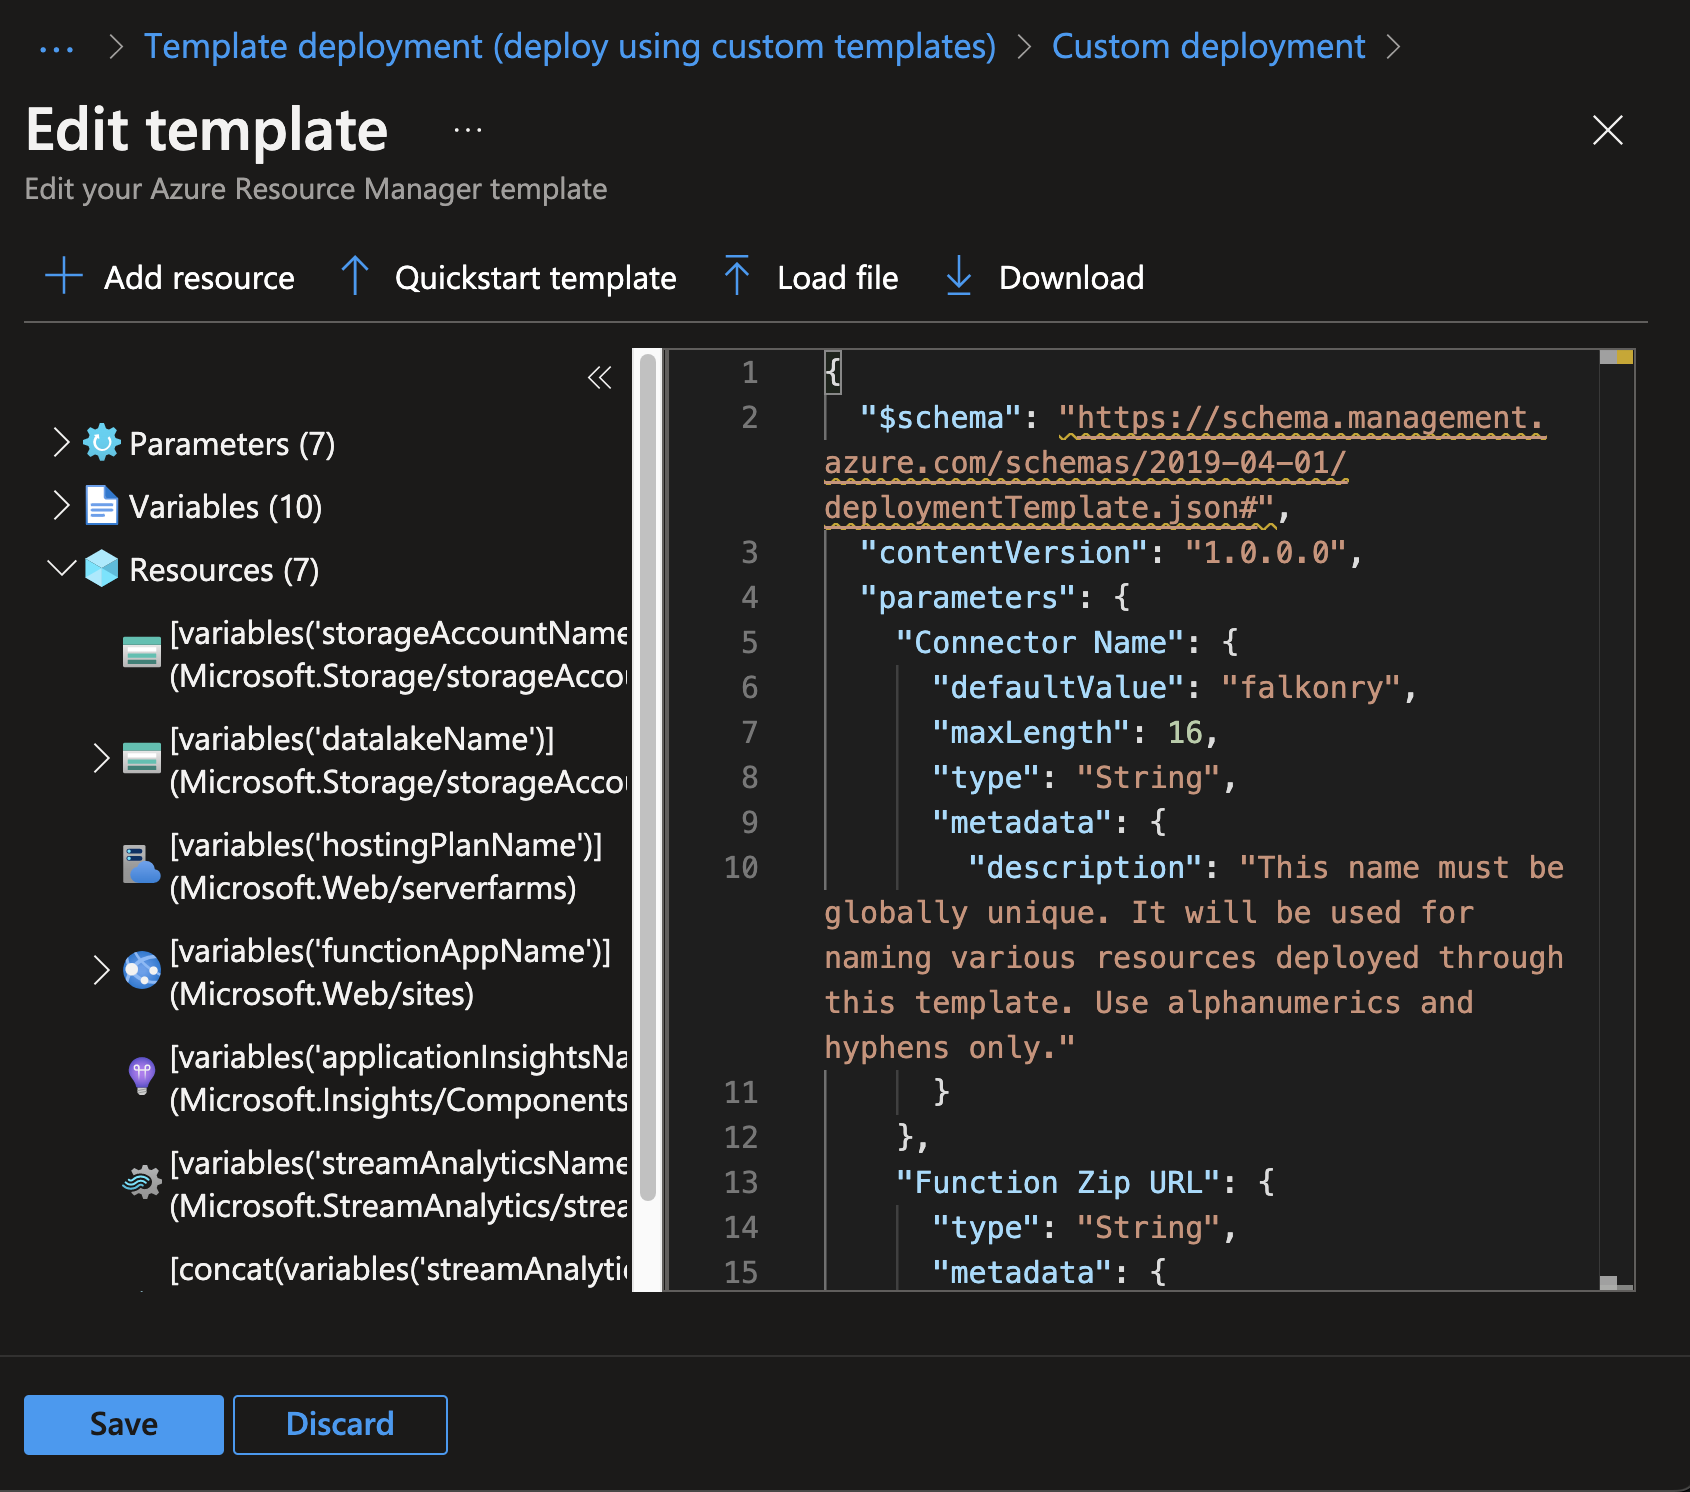
-
- Click "Save" and fill in the details.
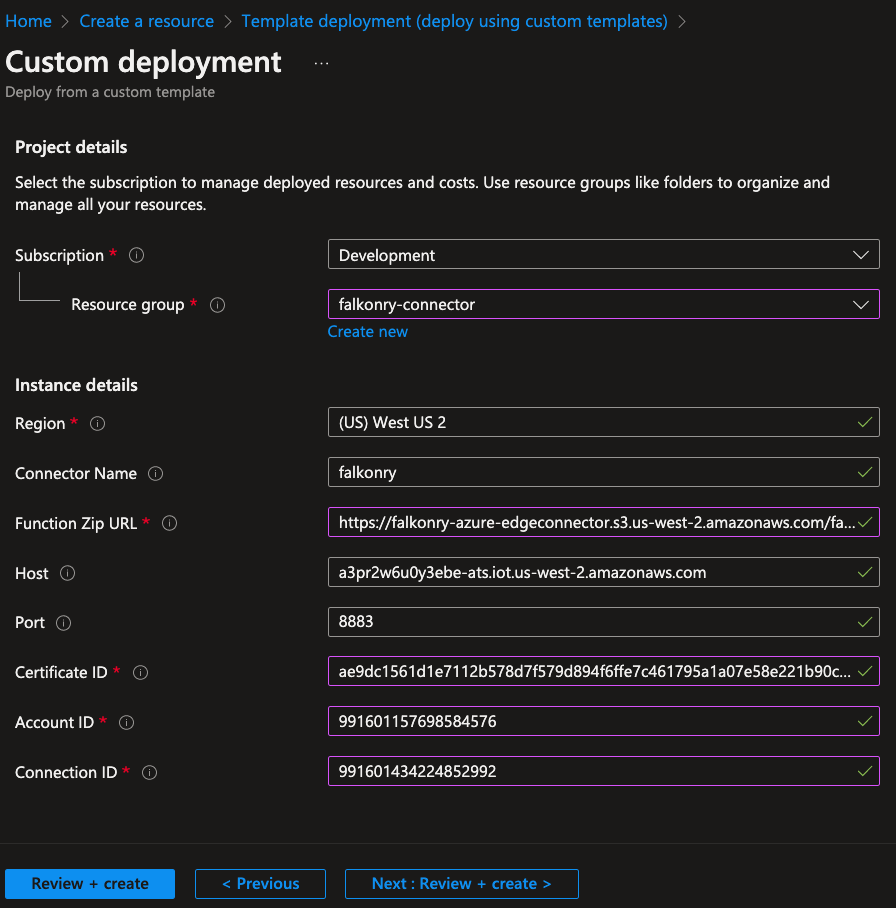
-
Click "Review + create". And let the deployment finish.
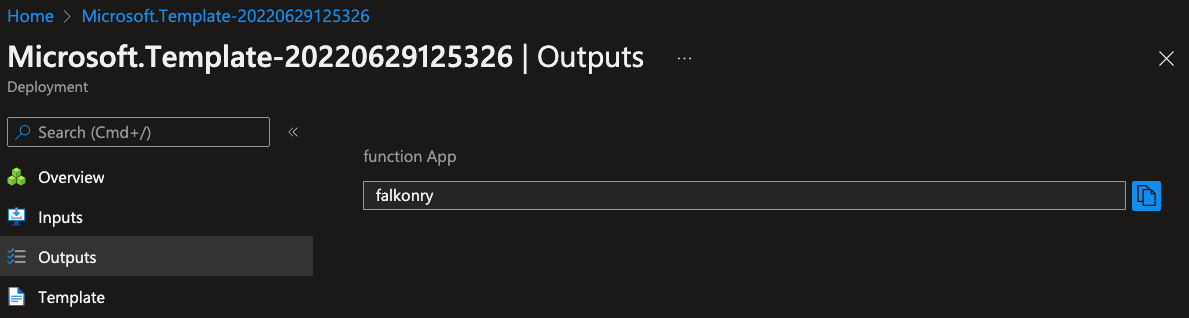
-
- After the deployment finishes, navigate to ResourceGroup > Deployments > Outputs for validation.
After Installation
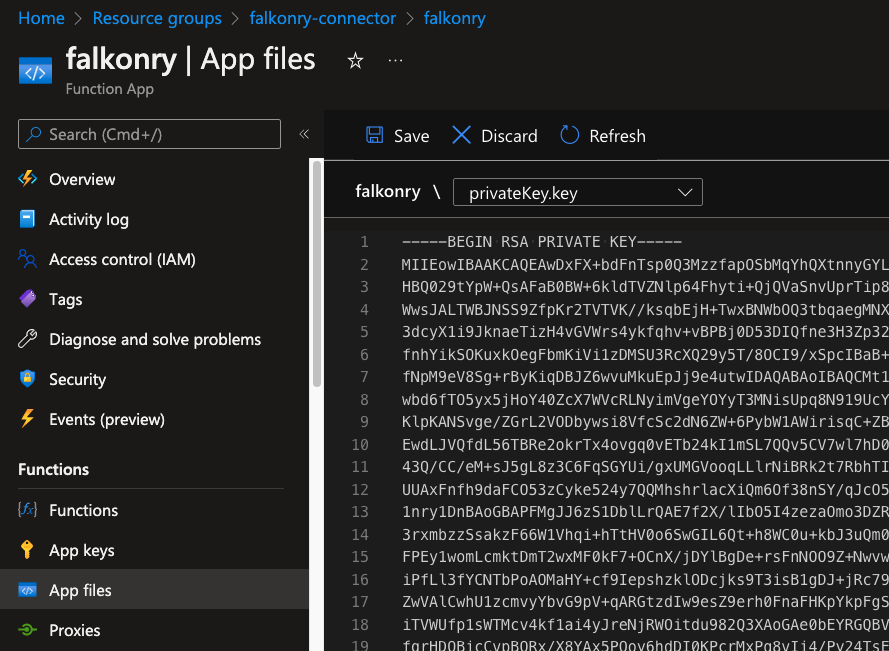
- Navigate to the falkonry (Function App) > App files and replace the content of cert.pem file with the credentials downloaded from AI Cloud. Use the contents of pemEncodedCertificate.pem file.

- Connecting to Event Hub or IoT Hub
- 1. Navigate to the falkonry (Function App) > functions > eventhub > Integration view.

-
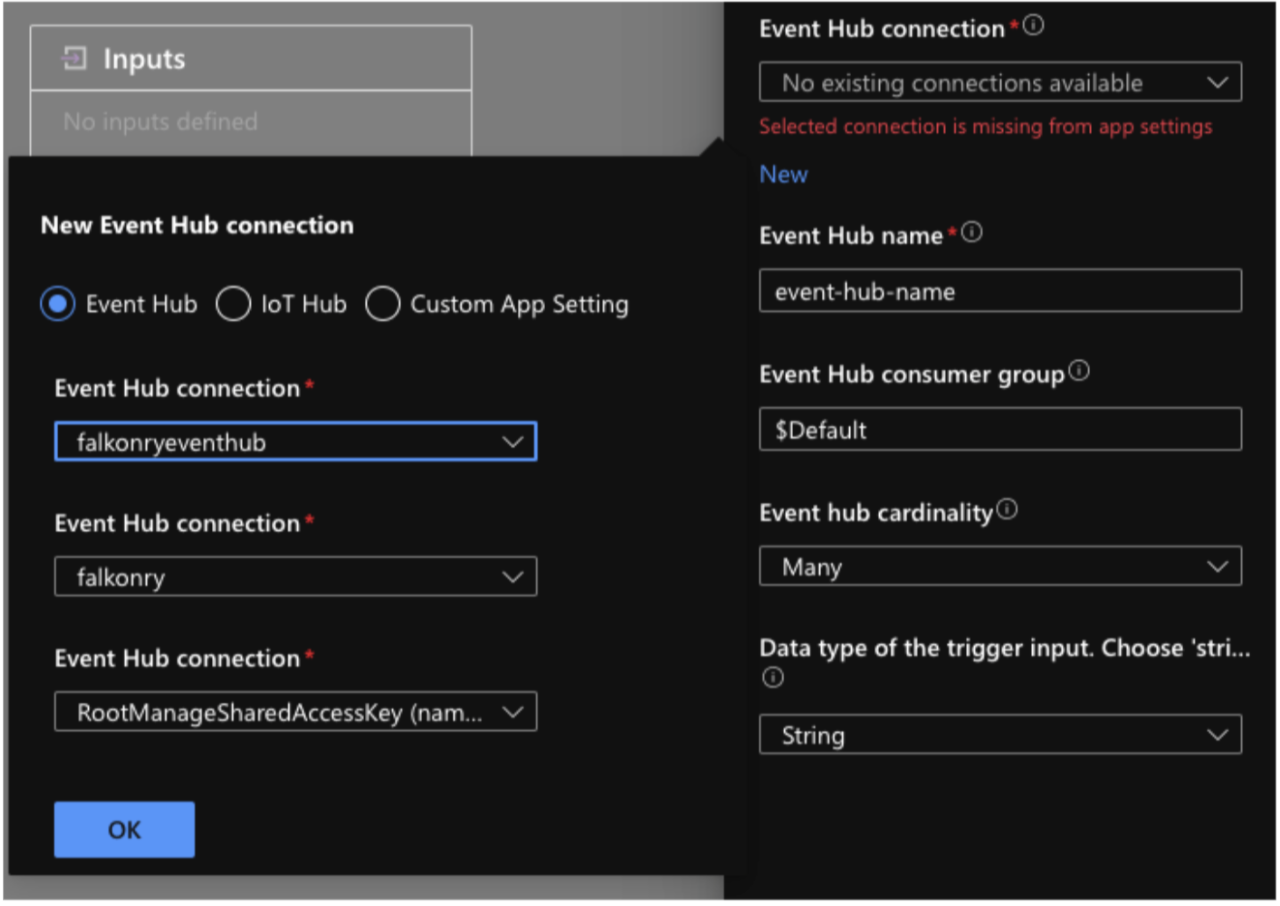
- Click on the "Azure Event Hubs" trigger and click on "New Event Hub Connection" as shown below.
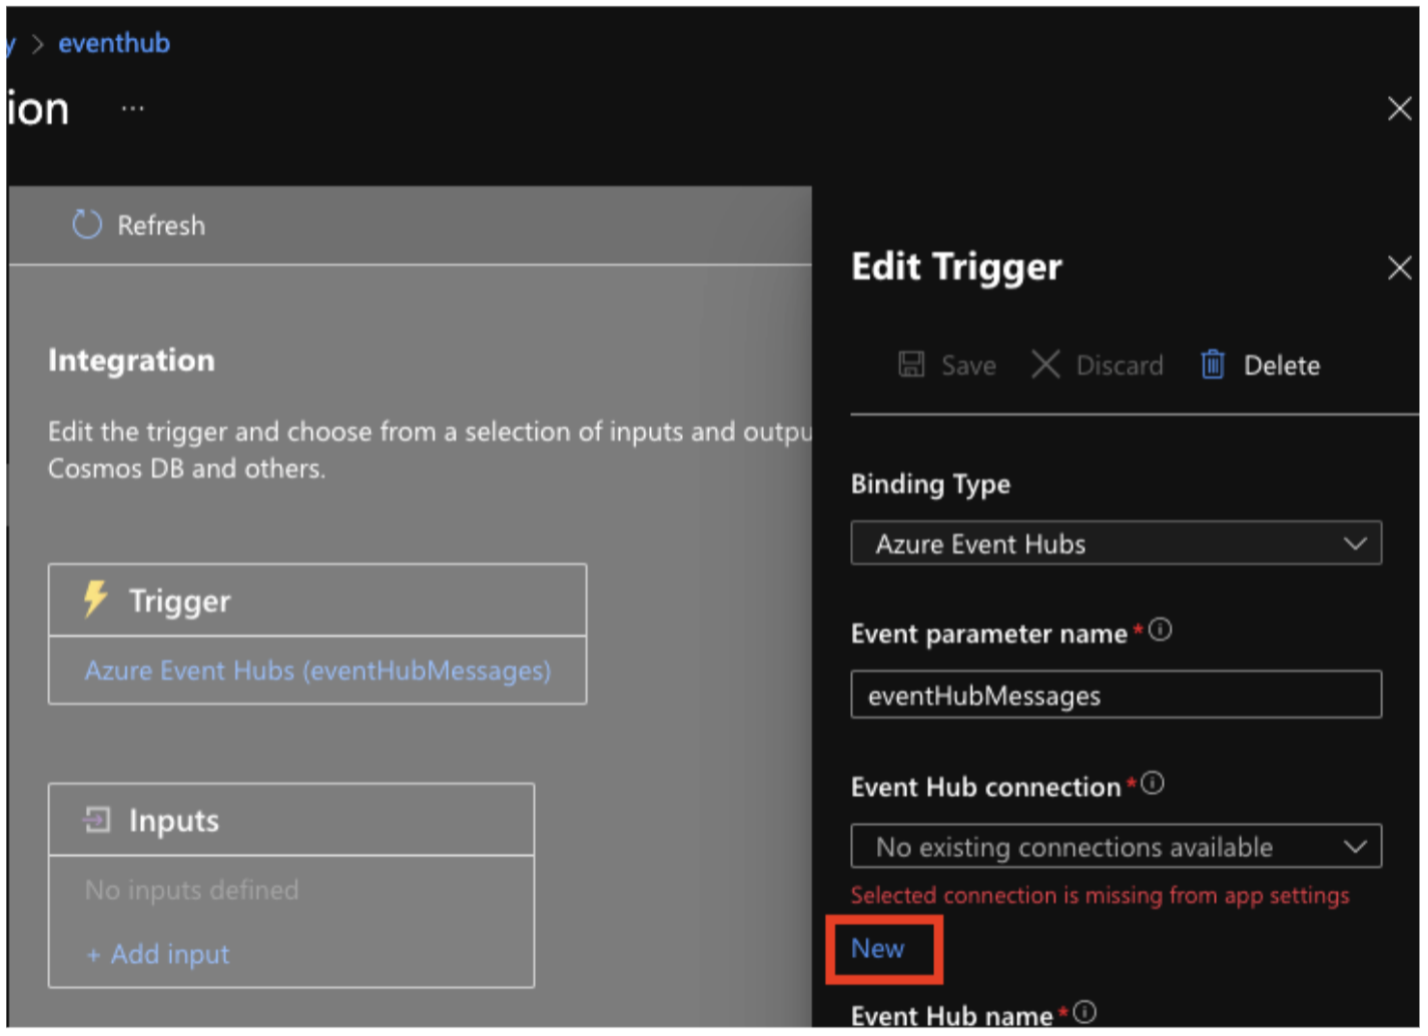
-
- Select the Event Hub or IoT Hub connection settings and click "Save".
Connecting to Stream Analytics 1. Navigate to Stream Analytics Inputs view and link the Event Hub or IoT Hub. The input must be named as inputeventhub. (Else change the query appropriately). 2. Start the Stream Analytics job.
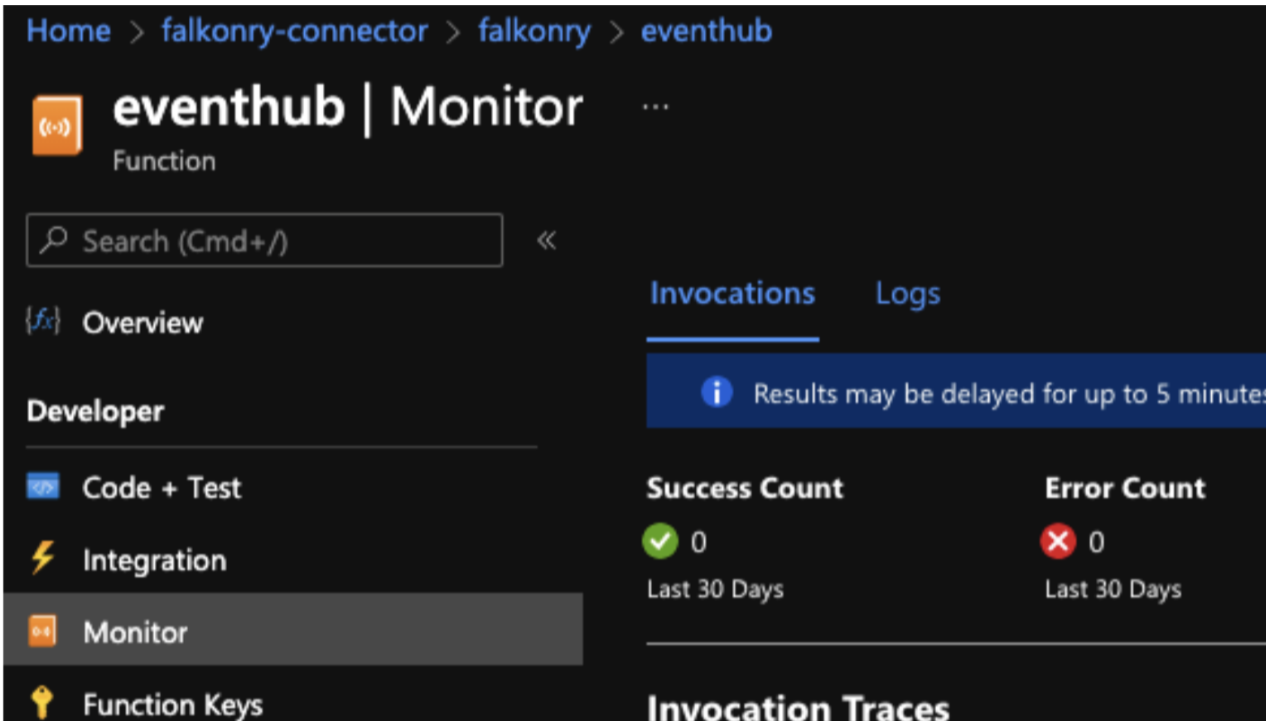
Validating the Connection
To verify whether the Connector is connected to TSI and data flow is working:
- Make sure data is flowing to Event Hub and IoT Hub.
- Navigate to the appropriate function eventhub or streamanalytics based on your preferred integration choice and go to the "Monitor" view.
- Check the Innovations success count or Logs from this view.
Updating the Connector
Warning
The update procedure requires deleting the previous created resources and re-installing the Connector. Please make sure to NOT DELETE the Storage Account that is configured to store Falkonry data.
To update the Azure Connector, follow these instructions: 1. Go to the Resource Group where the Connector is installed. 2. Delete the Function App (falkonry), Application Insights (falkonry-app-insights) and App Service plan (falkonry-hosting-plan). 3. Download the latest ARM template. 4. Get the latest Falkonry Azure Connector zip url. 5. Follow the "Installing the Connector" steps as mentioned above in the same Resource Group. 6. Follow the steps mentioned under "After Installation" section.
7. Litmus Connection
| Connection Type | Details |
|---|---|
 |
This type of Inbound Connection allows you to bring real-time data into TSI from Litmus UNS via MQTT. This data transfer option involves TSI subscribing to Litmus MQTT broker and consuming JSON formatted MQTT messages over the internet. Authentication and Security This connection expects Litmus UNS to be accessible over the internet for TSI to connect to it. This connection needs to be configured with Litmus MQTT broker endpoint, port, topic, client ID and security credentials when creating the connection in TSI. The data flow is secured by username-password, managed in Litmus UNS. For TSI to reliably connect to Litmus over the internet, it is required to configure the network security with a range of whitelisted IP addresses to allow MQTT subscription requests from TSI. |
Note
Please contact Falkonry Support to get the list of IP addresses to allow MQTT connection.
8. MQTT Connection
| Connection Type | Details |
|---|---|
 |
This type of Inbound Connection allows you to bring real-time data into TSI via MQTT. This data transfer option involves TSI subscribing to a managed MQTT broker or UNS platform. The JSON formatted messages are received by TSI as it subscribes to the MQTT broker over the internet. Authentication and Security This connection expects the MQTT broker to be accessible over the internet for TSI to connect to it. This connection needs to be configured with MQTT broker endpoint, port, topic, client ID and security credentials when creating the connection in TSI. The data transfer is secured by certificate-based authentication. For TSI to reliably connect to the MQTT broker over the internet, it is required to configure the network security with a range of whitelisted IP addresses to allow MQTT subscription requests from TSI. |
Note
Please contact Falkonry Support to get the list of IP addresses to allow MQTT connection.
Maange an Inbound Connection
1. Creating a Connection
When creating an Inbound connection in TSI, review the available connection types and select the connection type for the data acquisition system you currently have. For real-time data transfer, select the connection type that can integrate with your data acquisition system. For transferring historical data into TSI for modeling or evaluation purposes, use Historical Connection irrespective of the data acquisition system.
Note
Falkonry recommends using ibaDatCoordinator for connecting iba Systems to TSI and middlewares like Ignition Edge and Cogent Datahub for connecting OPC UA/DA supported systems to TSI. Reach out to your Falkonry team representative for integration documentation, or if you are planning to build your known integration.
2. Setting up a Connection
After creating a Inbound connection in TSI, it is recommended to validate and test the Connection Settings before putting connection to PRODUCTION. For iba Systems, File and Historical Connections, transfer a single file to test the Connection Settings using the Edit Settings section in the TSI UI.
Set connection status to Test to validate and test Connection Settings for AWS IoT Core, Azure IoT, Litmus and MQTT Connections.
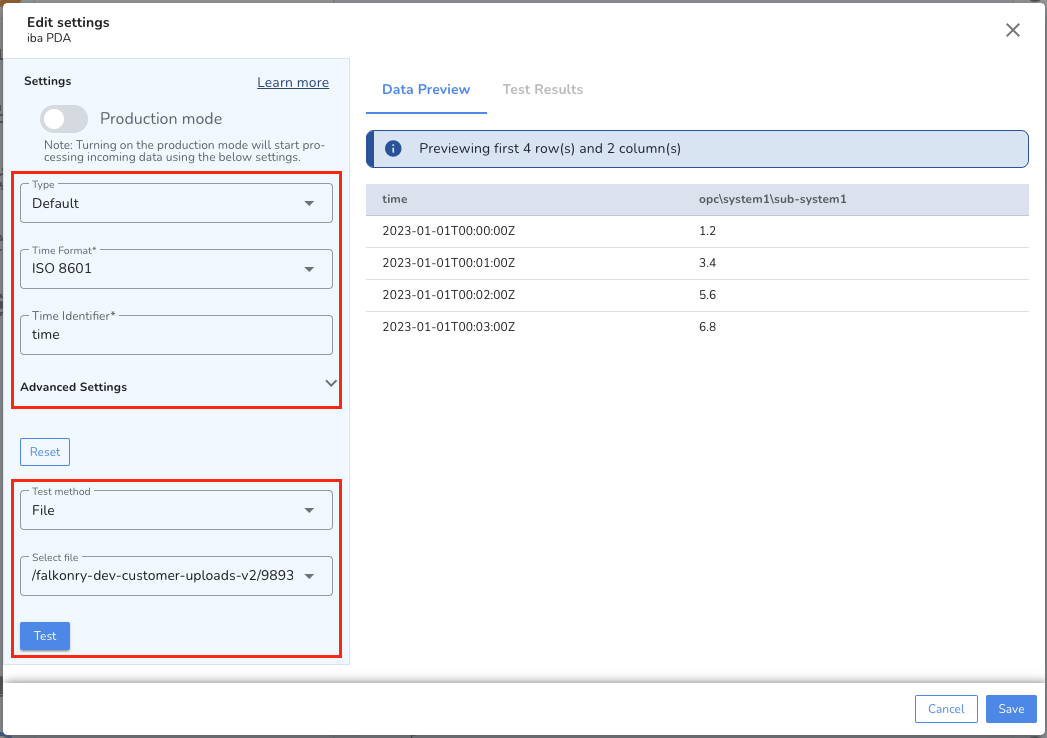
The Inbound Connection supports different data types and formats originating from various data acquisition systems. To be able to accept the data and understand it, it is required to configure the connection once during the setup process. The configuration gets set as Connection Settings and it involves identifying the column or property that represents the timestamp, time format, and organization structure of the signal data. The Connection Settings are capable of understanding a simple CSV columnar structure as well as a complex structure like nested JSON objects.
The supported settings are as below:
| Setting | Description |
|---|---|
| Status | There are three statuses for a connection: |
- Test: Used to validate settings using data preview and auto-detect draft signals. Files collected for iba or file connections can later be processed via Extract Data UI action. |
|
- PRODUCTION: Continuously processes new incoming data for approved signals. |
|
- PAUSED: Stops receiving new incoming data. Data transfer requests will be blocked, resulting in access denied errors. |
|
| Transformation | - Set as Default if the data is in wide or narrow format and doesn’t require preprocessing on names or values. |
| - Set as Template if the data is complex and requires preprocessing. | |
| Time Format | This is a required setting. Set to match the format of the timestamp in the data. Supported formats: ISO 8601, Seconds, Milliseconds, Microseconds, Nanoseconds. |
| Time Identifier | This is a required setting. Set to the column or key name in the data that signifies time. |
| Signal Identifier | This is an optional setting. Set if the data is in narrow format. Specify the column or key name that signifies signal name. |
| Value Identifier | This is an optional setting. Set if the data is in narrow format. Specify the column or key name that signifies signal value. |
| Timezone | This is an optional setting. Set if the timestamp in the data lacks timezone information. Supported only for ISO 8601 time format in parquet files. |
| Signals to be skipped | This is an optional setting. Specify signals to skip in the data file as comma-separated strings. |
| Signal name prefix | This is an optional setting. Add a prefix to signal names in the data to match signals in TSI. Supported only for Default transformation with parquet files. |
| Repeat Threshold | This is an optional setting. Set if signals change values frequently. Data processor skips repeating values until the threshold is met, enabling faster processing. Accepts values in nanoseconds (0–999999999999999). Consult Falkonry before setting this value. Supported only for Default transformation with parquet files. |
| Sampling Rate | This is an optional setting. Set if signals change values frequently and repeat threshold is set. Accepts values in nanoseconds (0–999999999999999). Consult Falkonry before setting this value. Supported only for Default transformation with parquet files. |
Here are a few examples of Connection Settings for different data structures:
| # | Data Sample | Connection Settings for UI |
|---|---|---|
| 1 | Parquet or CSV Timestamp,Signal1,Signal21643781166702,2.3,5.671643781166703,3.2,5.67JSON {"Timestamp": 1643781166702, "Signal1": 2.3, "Signal2": 5.67} |
|
| 2 | Parquet or CSV Timestamp,Signal,Value1643781166702000,Signal1,2.31643781166702000,Signal2,5.67JSON {"Timestamp": 1643781166702000, "Signal": "Signal1", "Value": 2.3} |
|
| 3 | JSON {"Timestamp": "2022-01-31T13:30:00.123456789-07:00", "Signal1": 2.3, "Signal2": 5.67} |
|
| 4 | JSON [ {"Timestamp": 1643781166702000000, "Signal1": 2.3, "Signal2": 5.67}, {"Timestamp": 1643781166702000000, "Signal1": 2.3, "Signal2": 5.67} ] |
|
| 5 | JSON [ {"Timestamp": 1643781166702000000, "Signal": "Signal1", "Value": 2.3, "Quality": 219}, {"Timestamp": 1643781166702000000, ": "Signal2", "Value": 5.67, "Quality": 0} ] |
|
| 6 | JSON [ {"Signal1": [{"Timestamp": 1643781166702, "Value": 2.3}]}, {"Signal2": [{"Timestamp": 1643781166702, "Value": 5.67}]} ] |
[ {% for key,value in dataMap.items() %} {% for reading in value %} { "time": {{ reading.Timestamp }}, "sourceName": "{{key}}", "value": {{reading.Value}} } {% if not loop.last %}, {% endif %} {% endfor %} {% endfor %} ] |
| 7 | Parquet or CSV Timestamp,Machine,Signal1,Signal21643781166702000,Machine1,2.3,5.671643781166702000,Machine2,2.1,5.7 JSON {“Timestamp”: 1643781166702000, “Machine”: “Machine1”, “Signal1”: 2.3, “Signal2”: 5.67} {“Timestamp”: 1643781166702000, “Machine”: “Machine2”, “Signal1”: 2.1, “Signal2”: 5.7} |
|
Note
Parquet file format should be the preferred choice for transferring data via files to TSI. Choosing any other option like CSV or JSON [file format](./overview.md#file-types-and-data-format can cause file processing delays and is recommended for testing purposes only.
3. Understanding the Template Transformation
The Template transformation is built using Jinja template language version 3.0. This provides access to the file name along with the content of the file. The template is applied to the data, line by line or object by object in sequential order.
- To access file name use: {{ contextMap.fileName }}.
- To access data use: {{ dataMap.items() }} and iterate over the keys.
The template must produce an output as shown below:
[
  {"sourceName": "{{ signal1 }}", "time": "{{ time }}", "value": "{{ reading1 }}"},
  {"sourceName": "{{ signal2 }}", "time": "{{ time }}", "value": "{{ reading2 }}"}
]
or
{"sourceName": "{{ signal1 }}", "time": "{{ time }}", "value": "{{ reading1 }}"}
Below are some common operations for reference:
| # | Operation | Syntax |
|---|---|---|
| 1 | Concat two strings with '-' | {{dataMap.line}}-{{dataMap.signal}} |
| 2 | If-else condition | {% if (key > 1000) %} ... {% elif (key > 100) %} ... {% else %} ... {% endif %} |
| 3 | If condition with OR and AND | {% if ((key != 0 or key != 128) and key2 == "value") %} ... {% endif %} |
| 4 | Iterate an array of objects | {% for t in dataMap["signalList"] %} ... {% endfor %} |
| 5 | Iterate an array of values | {% for t in dataMap["valueList"] %} ... {% endfor %} |
| 6 | Iterate keys of an object | {% for key, value in dataMap.items() %} ... {% endfor %} |
| 7 | Convert string to int | {{dataMap.value | int}} |
| 8 | Perform math operation on the signal value | {{(dataMap.value * 1000)/1000}} |
Note
Refer to Jinja2 template documentation for more details on syntax and other supported operations.
4. Signal Extraction
After validating the Connection Settings parses the data correctly, save
the Connection Settings and run the Generate Signals action for the
transferred file. This action starts a SIGNALEXTRACTION activity that
can be tracked in the Activities section in the TSI UI.
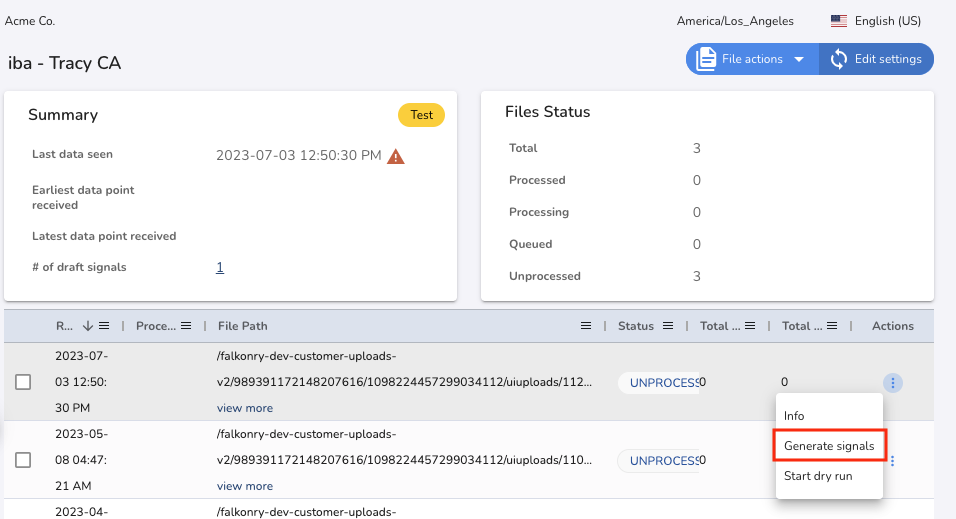
The SIGNALEXTRACTION activity extracts all the signals from the file
and creates Draft Signals for review. For AWS IoT Core, Azure IoT,
Litmus and MQTT Connections, the signal extraction process is automatic.
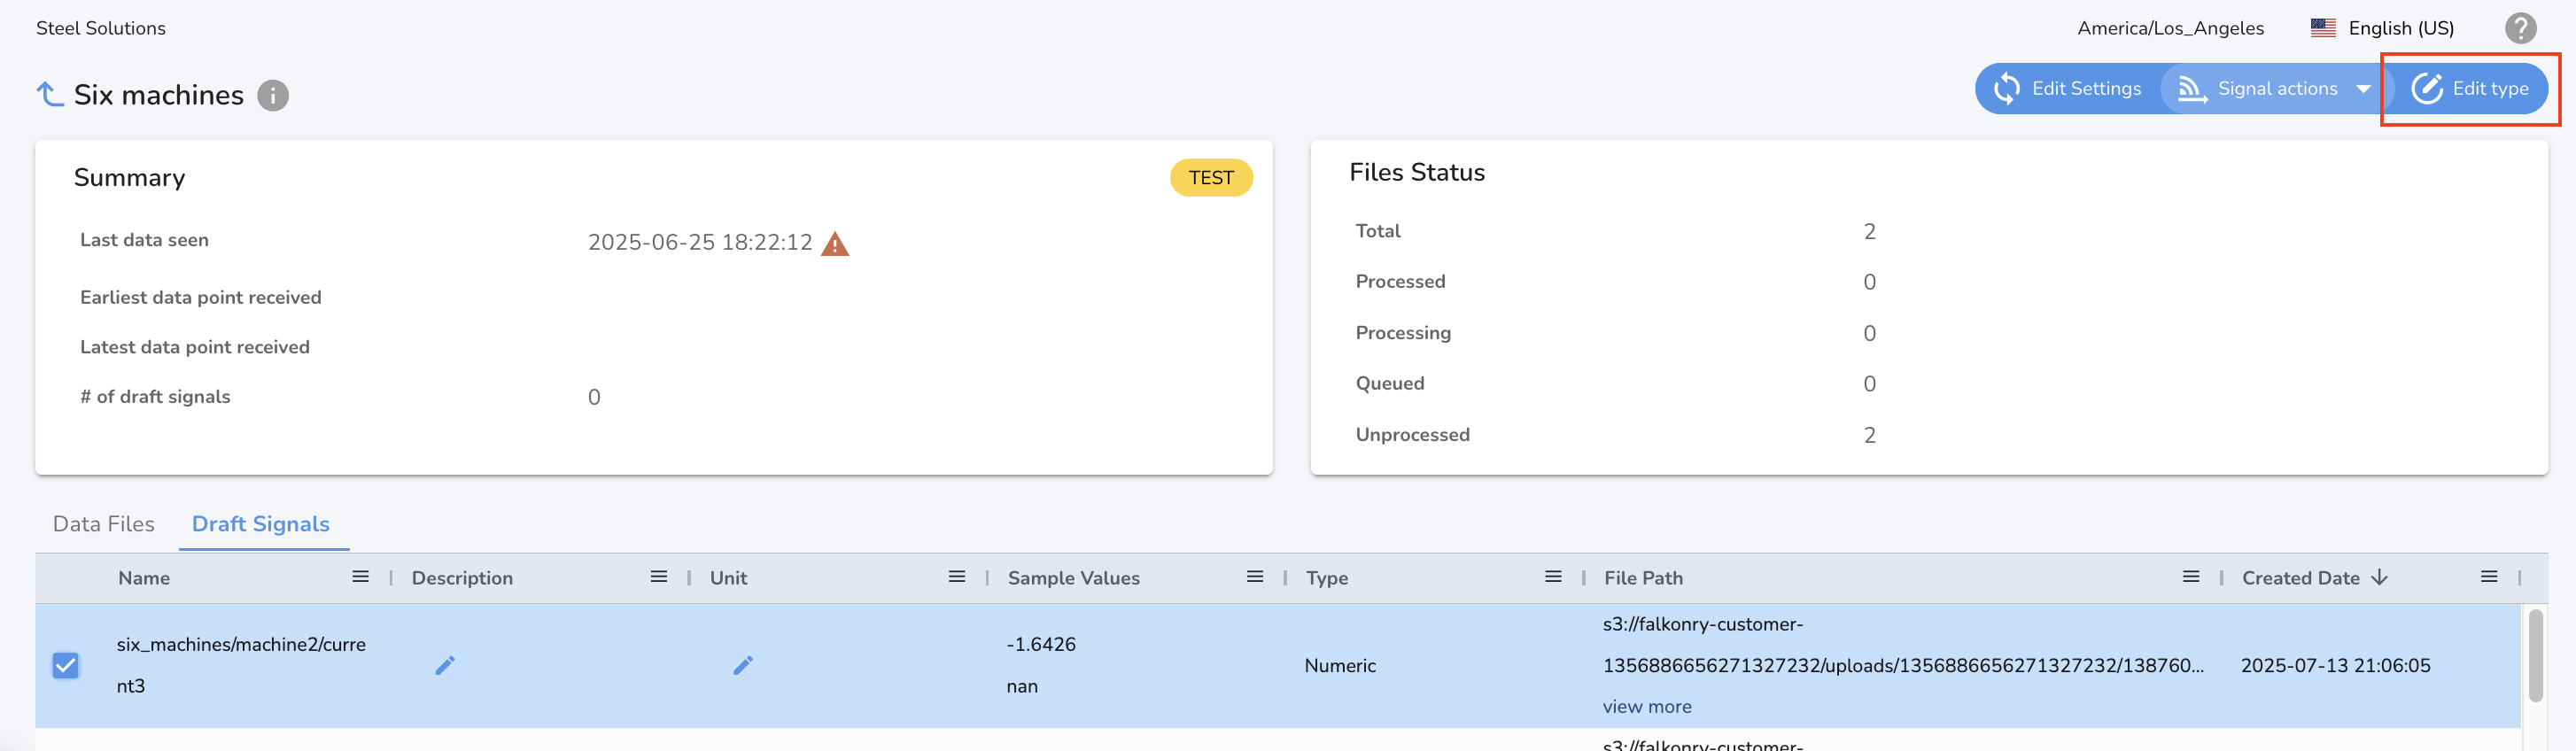
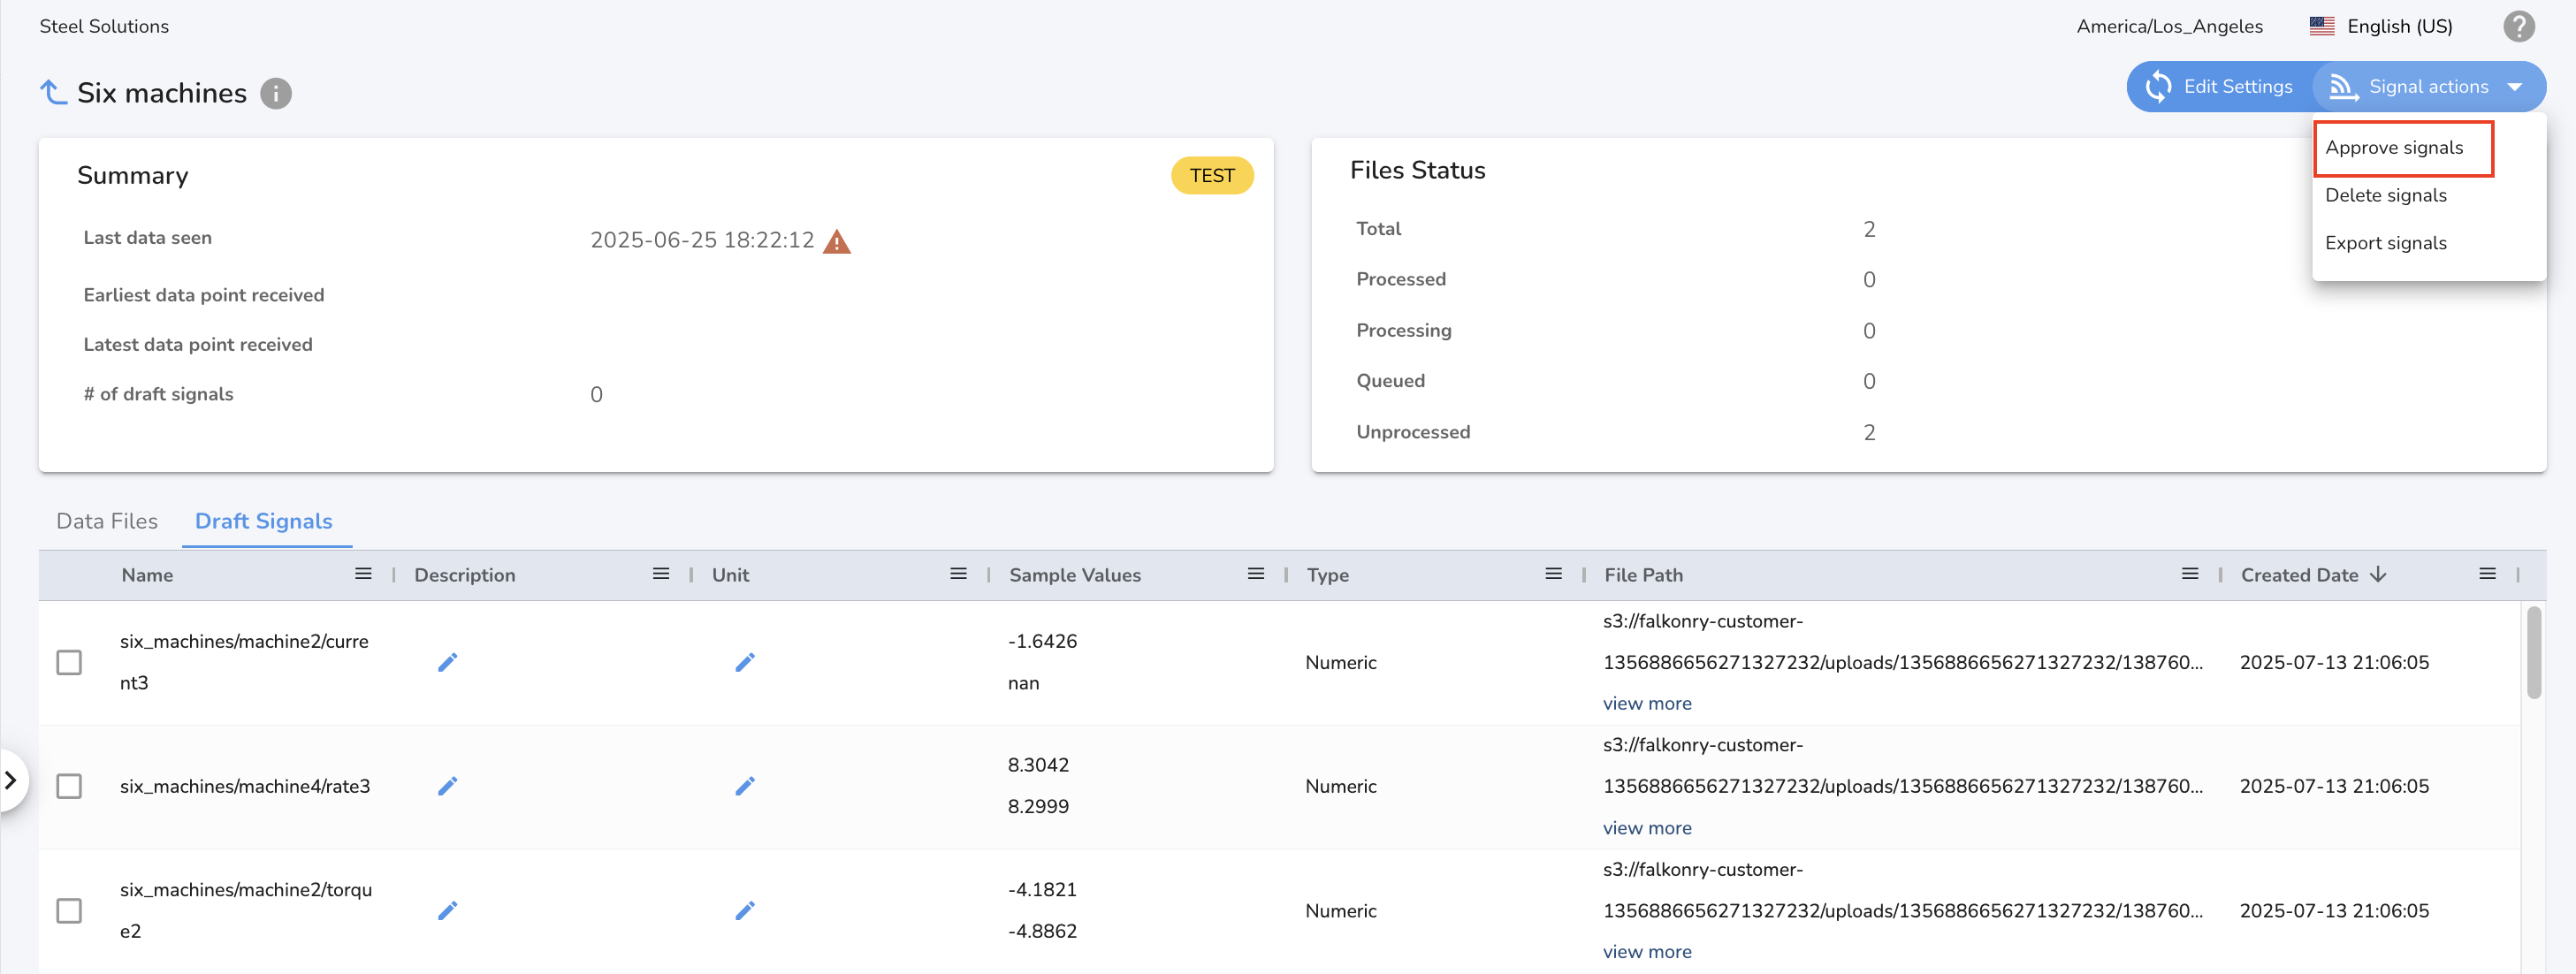
5. Signal Approval
TSI has a concept of Approved and Draft signals to manage the signals. The approved signals are those that are approved by the user with owner/manager role and the time series data gets stored for them. The draft signals are the unapproved signals that are sent to TSI over a connection but no time series data gets stored for them.
It is recommended to review that the signal type of each Draft Signal
matches expectations before approving them. Once Draft Signals are
approved, you can set connection status to PRODUCTION to start the data processing.
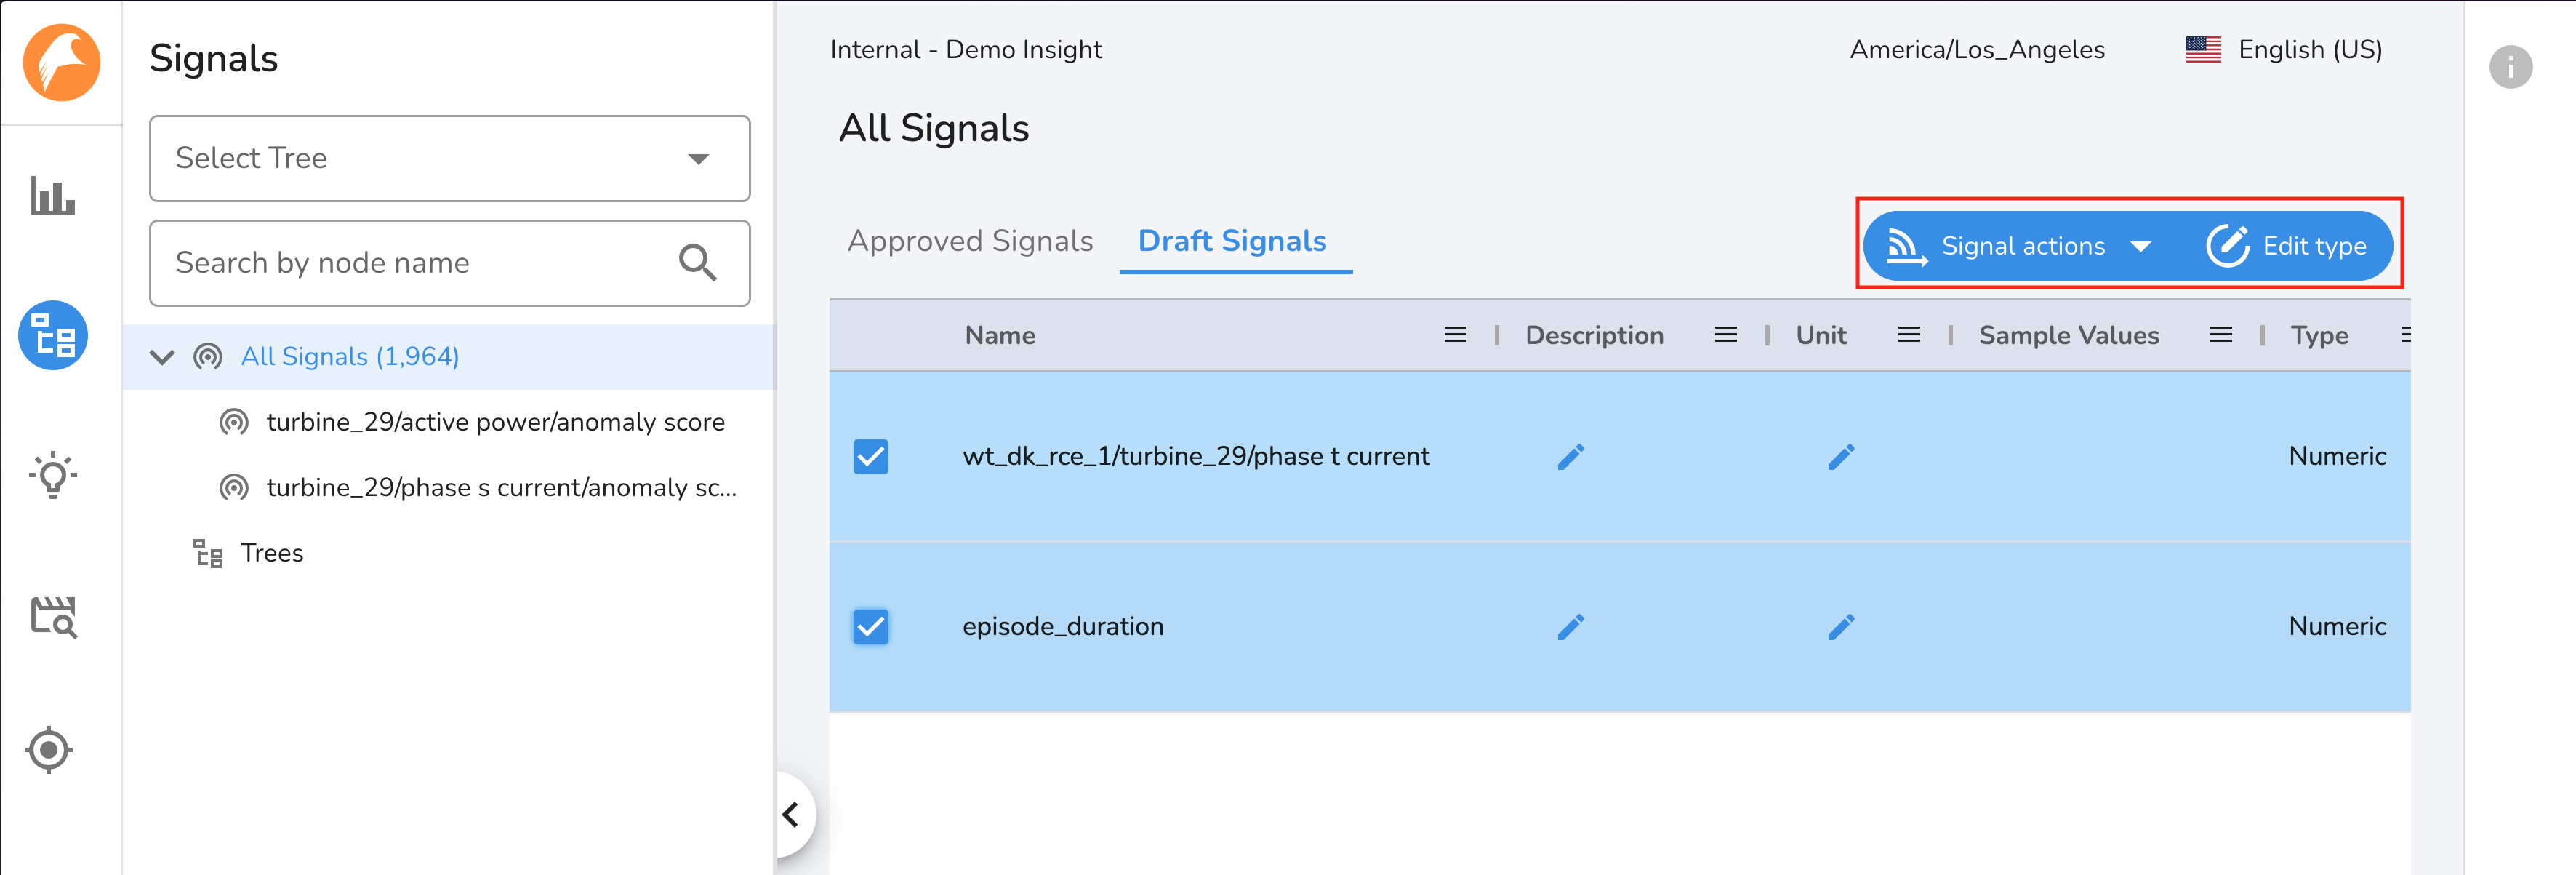
Signal Type cannot be changed
After approving the signal, its type cannot be changed later.
Connections with PRODUCTION status does not generate draft signals automatically
Once data begins flowing for a connection in production mode, the Generate Signals action must be manually performed to generate draft signals for any new signals present in the data file.
To approve signals, validate/change the type using the Edit type action and approve all the signals of interest using the Approve signals action.
Draft Signals
For the initial setup when dealing with thousands of signals, approve signal API can be used to automate the signal approval process.
In PRODUCTION, the time-series data for approved signals get stored
automatically. If new signals are detected in the data, you should be
able to see the count as "New Signals" for File or iba
Connection. You can then trigger Generate Signals UI action to
identify these Draft Signals. After you have reviewed the draft
signals, approve them and trigger Extract Data UI action as documented
here to extract the data
for newly approved signals.
6. Extract Data
After your signals have been approved, you must manually trigger the processing by using the "Extract Data" action from the UI. To do this:
-
Select the files you wish to process and click on the "Extract Data" under File Actions.
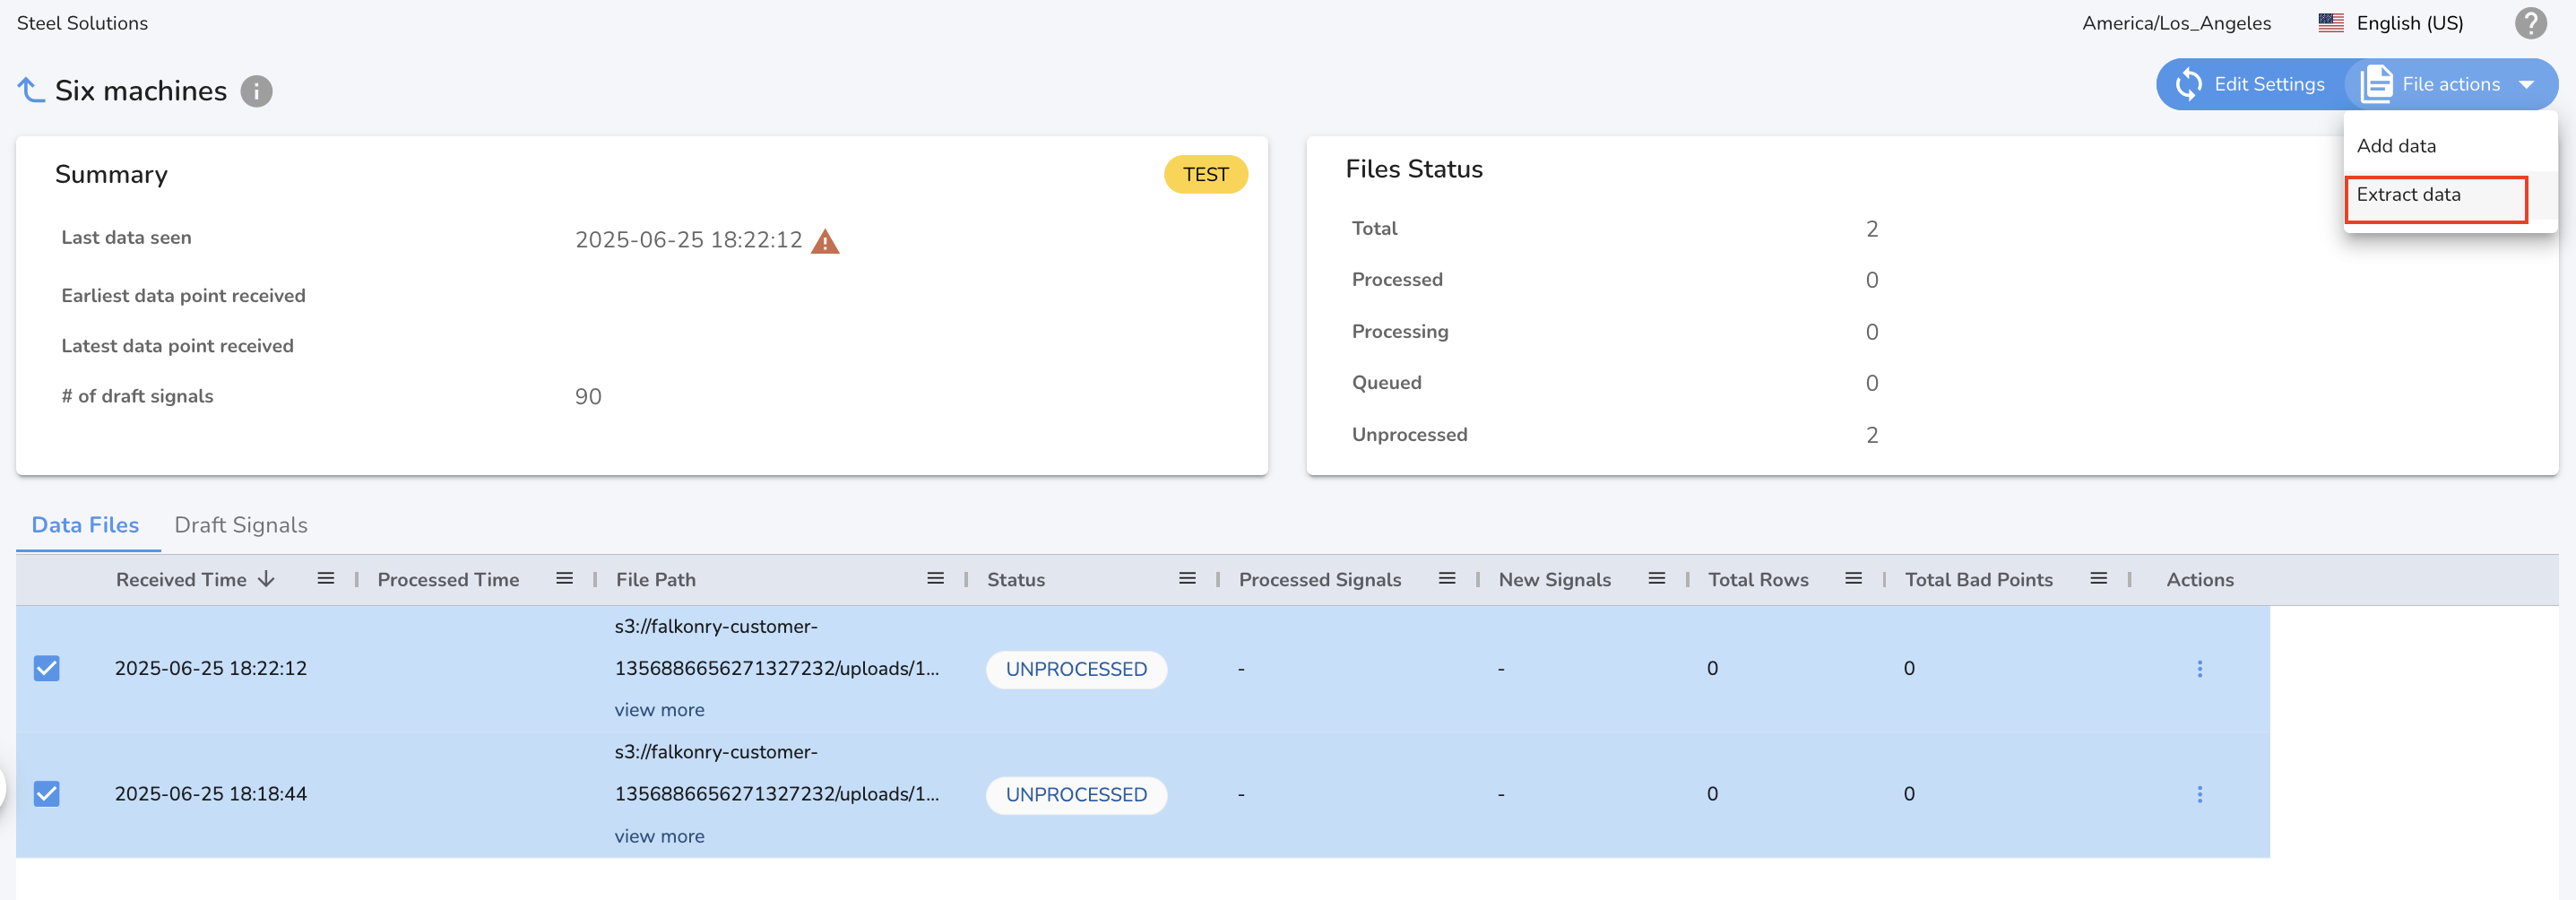
-
Confirm your file selection, choose the columns to be processed (or leave empty to process all columns), and then click "Extract" to trigger a DATAPROCESSOR activity.
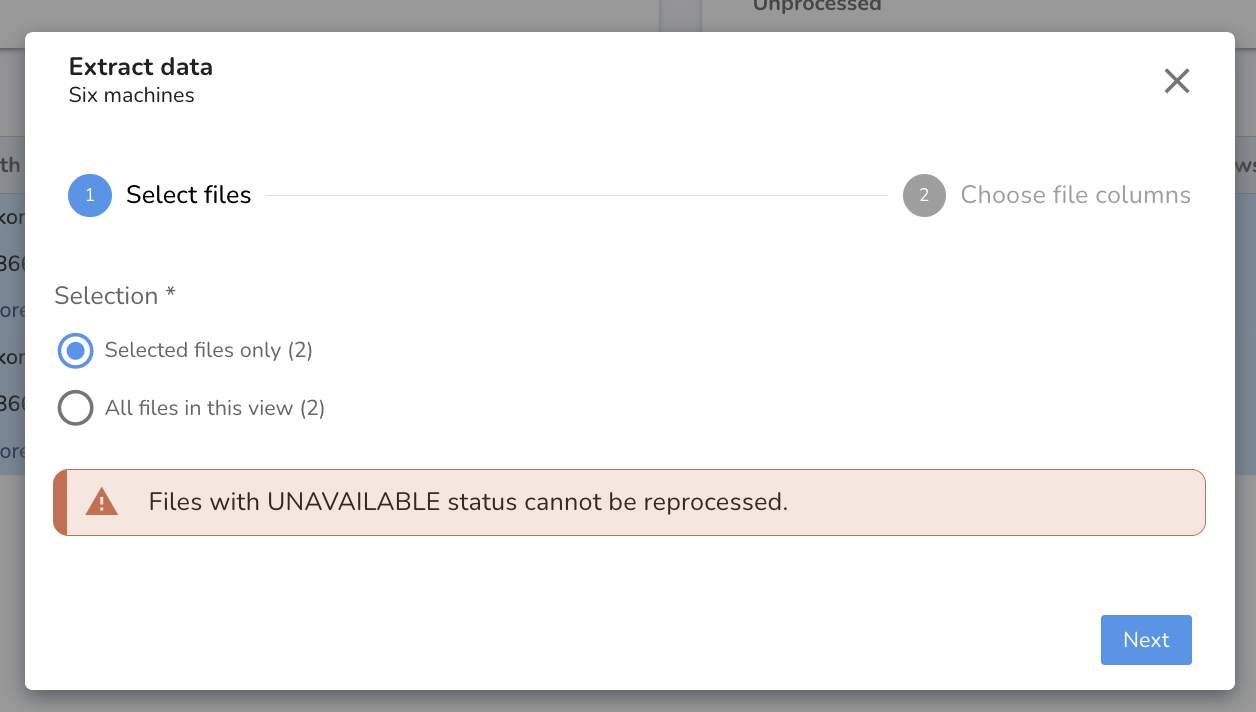
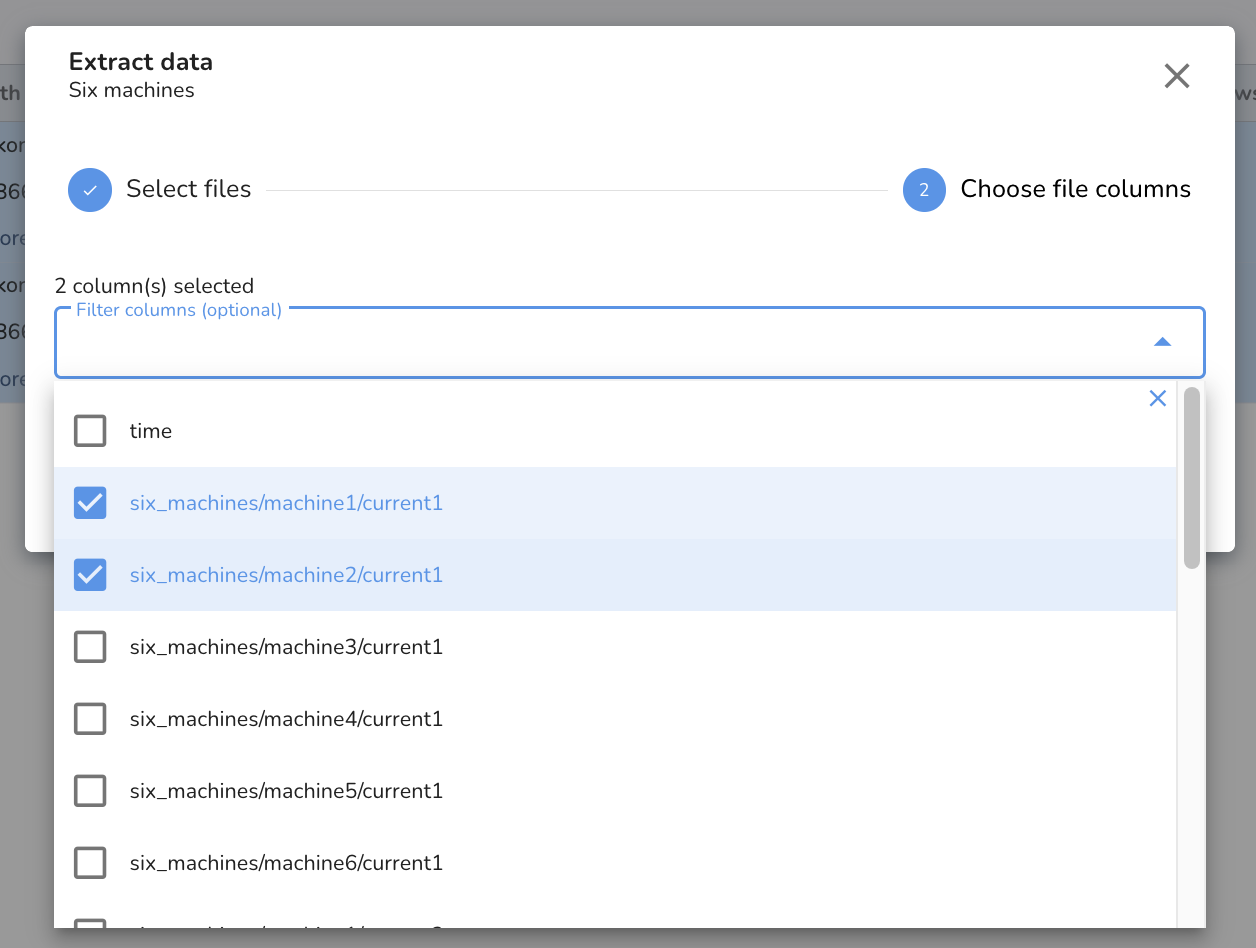
You can track the status of this activity in the Activity view. The data will become available for the relevant signals once the DATAPROCESSOR activity status is "COMPLETED"
Verify Data
After the new signals are approved, all new incoming data will get processed automatically. You may use Historical Connection to add historical data for these newly approved signals.
After approval, review signal charts on the timeline view to ensure the data sent to Falkonry is accurately displayed.
Falkonry provides an intuitive visualization of time-series data, allowing users to view data across multiple parameters, zoom into specific timeframes, and pan. Numeric signals display aggregate information (mean, standard deviation, max, min, missing values) when zoomed out, and raw data when zoomed in. Categorical signals display different labels using color-coded rectangular markers.
The latest point for a signal indicates the last time data was received; if it falls back, data is not being received.