Connections
In order to bring signal data into the Falkonry Time Series Intelligence for multivariate analysis and real-time monitoring of assets a Connection is required. A Connection is a secure link between TSI and an external data system. A unique Connection is required for each external data system. Many types of external data systems, such as IoT gateways, data historians, SCADA, and OPC systems, can be readily integrated with TSI through various types of supported connections. These connections are designed to work with industry-compliant data infrastructures and operational requirements of the users.
A connection can be monitored from the Connection UI. The Connection UI exposes all the relevant information about the incoming data and the data infrastructure. Each connection has a summary view available in the TSI UI to track the clock time when the recent data was received or sent and the timestamp associated with it.
You need a Owner or Manager role to configure the data connectivity between TSI and external systems. For each data source you must create a connection under the Administration > Connections view. There is no limit on the number of connections.
Inbound Connections
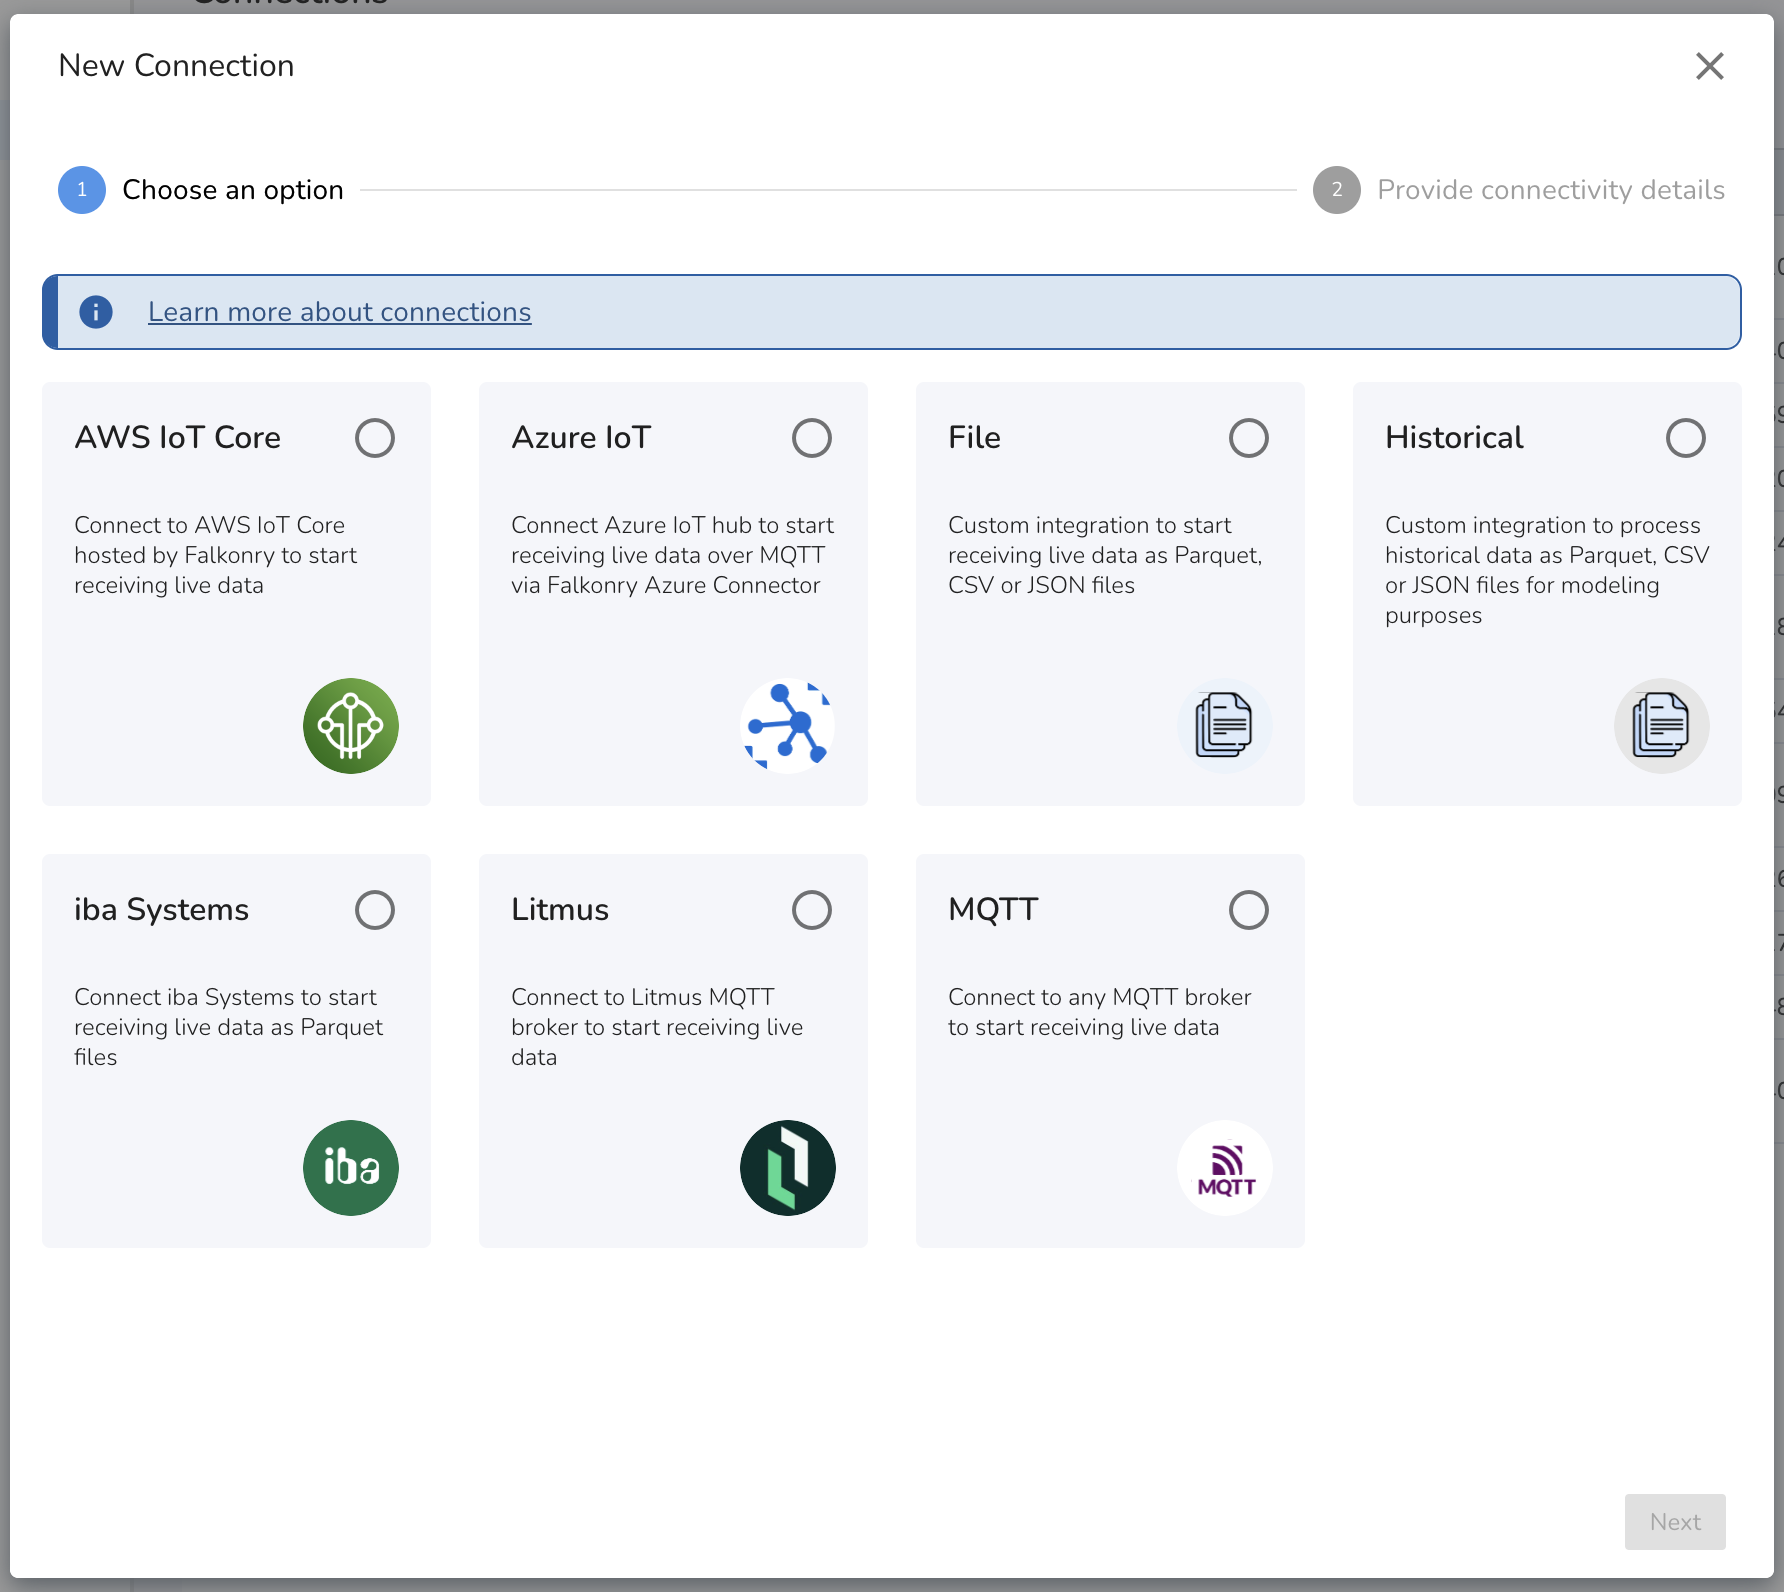
Inbound Connections bring data into TSI from external data acquisition and storage systems. Several types of data acquisition systems can be connected to TSI for the data transfer via iba Systems, Litmus, AWS IoT, Azure IoT, Files, MQTT, and Historical Connections.
The data received over a connection gets processed in the order it
arrives. For real time data processing, a connection must be in
PRODUCTION. You can read more about Connection Settings
here <inbound-connection-settings>.
Warning
A signal may only be associated with one connection in PRODUCTION. Additionally, it is recommended to use separate connections for processing live and historical data.
Creating a Connection
When creating an Inbound connection in TSI, review the available
connection types and select the connection type for the data acquisition
system you currently have. For real-time data transfer, select the
connection type that can integrate with your data acquisition system.
For transferring historical data into TSI for modeling or evaluation
purposes, use
Historical Connection <historical-connection>{.interpreted-text
role="ref"} irrespective of the data acquisition system.
Note
Falkonry recommends using ibaDatCoordinator for connecting iba Systems to TSI and middlewares like Ignition Edge and Cogent Datahub for connecting OPC UA/DA supported systems to TSI. Reach out to your Falkonry team representative for integration documentation, or if you are planning to build your known integration.
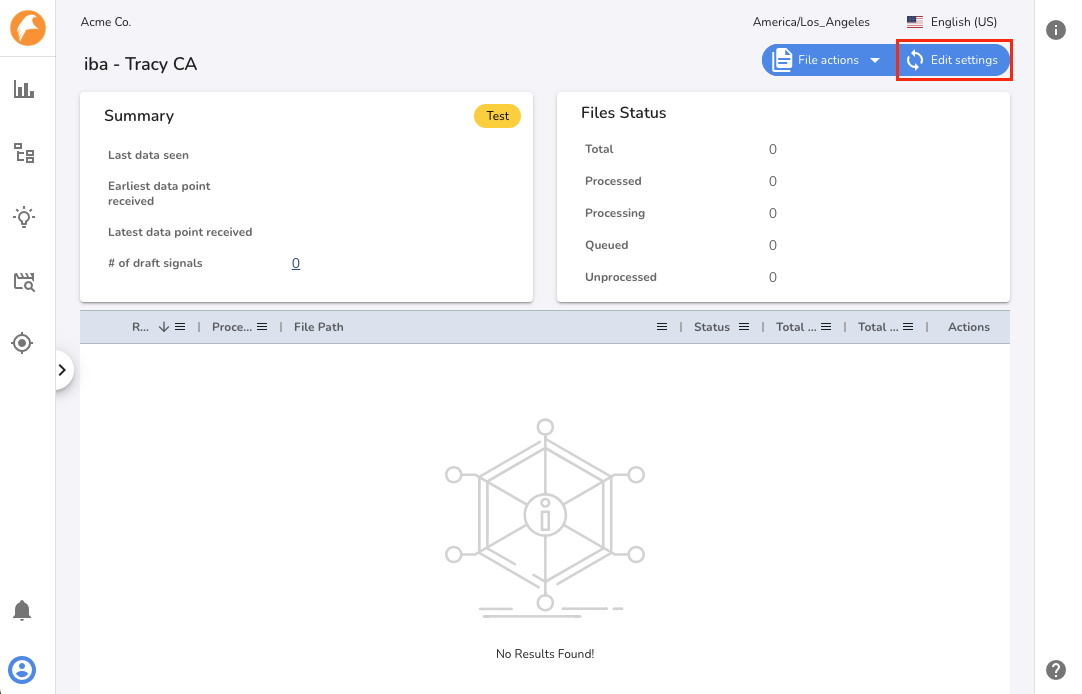
Setting up a Connection
After creating a Inbound connection in TSI, it is recommended to
validate and test the
Connection Settings <inbound-connection-settings>{.interpreted-text
role="ref"} before putting connection to PRODUCTION. For iba
Systems, File and Historical Connections, transfer a single file to
test the Connection Settings using the Edit Settings section in the
TSI UI.
Set connection status to Test to validate and test Connection Settings
for AWS IoT Core, Azure IoT, Litmus and MQTT Connections.
After validating the Connection Settings parses the data correctly, save
the Connection Settings and run the Generate Signals action for the
transferred file. This action starts a SIGNALEXTRACTION activity that
can be tracked in the Activities section in the TSI UI.
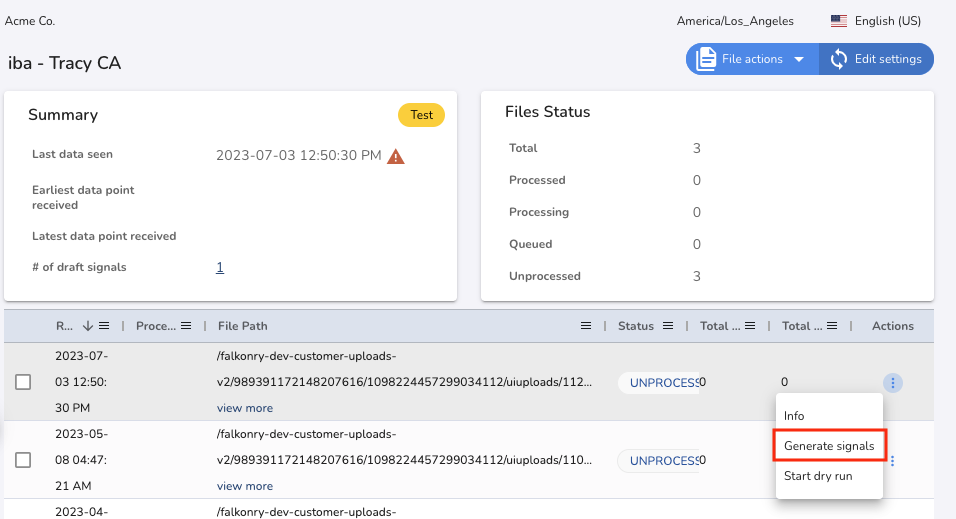
The SIGNALEXTRACTION activity extracts all the signals from the file
and creates Draft Signals for review. For AWS IoT Core, Azure IoT,
Litmus and MQTT Connections, the signal extraction process is automatic.
It is recommended to review that the signal type of each Draft Signal
matches expectations before approving them. Once Draft Signals are
approved, you can set connection status to PRODUCTION to start the
data processing.
Note
You can read more about signal management and the signal approval process here <guide/data/signalManagement>{.interpreted-text
role="doc"}.
In PRODUCTION, the time-series data for approved signals get stored
automatically. If new signals are detected in the data, you should be
able to see the count as [New Signals]{.title-ref} for File or iba
Connection. You can then trigger Generate Signals UI action to
identify these Draft Signals. After you have reviewed the draft
signals, approve them and trigger Extract Data UI action as documented
here <extract-data> to extract the data
for newly approved signals.
Note
In case you are sending data via MQTT, please contact Falkonry Support if you wish to add new signals to the connection in PRODUCTION.
After the new signals are approved, all new incoming data will get
processed automatically. You may use
Historical Connection <historical-connection>{.interpreted-text
role="ref"} to add historical data for these newly approved signals.
The types of Inbound Connections available are as follows:
AWS IoT Core Connection
This type of Inbound Connection allows you to bring real-time data into TSI from IoT gateway via MQTT. This data transfer option uses Falkonry hosted AWS IoT Core as a MQTT broker. The JSON formatted messages are sent to the broker via IoT gateways or user-managed MQTT publisher. The publisher must comply with MQTT v3.1.1 specifications.
Note
If any of the following conditions is true, please let the Falkonry team know before transferring the data:
- Have signals producing data at microseconds or faster.
To connect to this Falkonry-hosted MQTT broker, use host as [iot.falkonry.ai]{.title-ref} and port as [8883]{.title-ref}. MQTT client ID, topic and TLS certificates get generated when creating this connection from TSI UI. For client ID prefix, use [\<connection ID>_]{.title-ref} and for topic prefix use [\<connection ID>/]{.title-ref}.
Supported Data Format
| Data Type | Requirements |
|---|---|
| JSON |
|
Supported Time Format
The JSON key representing time in the data must have one of the time formats as below. The key representing time and the time format must stay the same for all the messages.
| Time Format | Example |
|---|---|
| Seconds | 1643707264 |
| Milliseconds | 1643707264380 |
| Microseconds | 1643707264380000 |
| Nanoseconds | 1643707264380000000 |
| ISO 8601 | 2022-01-31T13:30:00.123456789-07:00 |
Authentication and Security
This connection uses AWS IoT as an integration component. This IoT gateway is hosted by Falkonry and data is streamed to the gateway from an MQTT publisher that supports the MQTT v3.1.1 protocol. The connection details i.e. the endpoint, port, secure certificate, public key, topic, and client id are provided by Falkonry.
The data transfer is secured by certificate-based authentication by creating a unique X.509 certificate for each connection. Data is delivered over port 443. The certification and MQTT specific connection details are generated during the connection creation process.
Note
Download the root CA certificate generated by AWS for server authentication from here.
If you experience server certificate validation issue while using the above certificate, use the cross-signed root CA certificate as provided by AWS here.
Azure IoT Connection
This type of Inbound Connection is used to bring real-time data into TSI from the Azure IoT hub and Event hub. A connector is installed in a User's Azure account to send data to Falkonry's IoT Gateway.
Note
You can read more about the Falkonry Azure Connector here </cloudbase/FalkonryAzureConnector>{.interpreted-text
role="doc"}.
Supported Data Format
| Data Type | Requirements |
|---|---|
| JSON |
|
Supported Time Format
The JSON key representing time in the data must have one of the time formats as below. The key representing time and the time format must stay the same for all the messages.
| Time Format | Example |
|---|---|
| Seconds | 1643707264 |
| Milliseconds | 1643707264380 |
| Microseconds | 1643707264380000 |
| Nanoseconds | 1643707264380000000 |
| ISO 8601 | 2022-01-31T13:30:00.123456789-07:00 |
Authentication and Security
The Azure IoT Connection enables integration with Azure IoT Hub and Azure Event Hub. A connector is installed in the User's Azure infrastructure as a Function App. This connector is responsible for receiving data from the Azure IoT Hub or Event Hub and sending the data in real-time to Falkonry's IoT Gateway. The data is sent to TSI over a secure MQTT channel. The Connection details i.e the endpoint, port, topic, and secure certificate are provided by Falkonry. The connector is access controlled via access policy to connect to Azure IoT Hub or Event Hub. The connector also uses X.509 certification-based authentication to connect with the Falkonry hosted IoT Gateway to deliver the data over port 8883. This certificate is generated during the Connection creation process.
File Connection
This type of Inbound Connection allows you to build a custom integration
to bring real-time data into TSI in the form of files. The supported
file types are CSV, Parquet, and JSON. This data transfer option uses an
AWS S3 bucket as the storage medium. This S3 bucket can be hosted in
Falkonry Cloud as well as a self-hosted AWS cloud. You can refer
here </cloudbase/PrivateFileConnection>
for additional instructions on setting up a User managed S3 bucket. The
data files received by this connection get processed by the system in
order they arrive.
Note
If any of the following conditions is true, please let the Falkonry team know before establishing the connectivity:
- Files with more than 10,000 columns in CSV or Parquet file type.
- Files with periodic signal name changes.
- Cannot use Falkonry hosted S3 bucket for the data transfer.
File processing is tracked via Status tags. While the files get
processed, they get tagged with a status. You can read more about Status
tags here <file-connection-monitoring>.
To process files with historic data, it is recommended to use a separate
Historical Connection to avoid delays in live data processing.
Supported File Types and Data Format
| File Type | Requirements | Examples |
|---|---|---|
| Parquet |
|
Wide format: Timestamp,Signal1,Signal2 1643781166702,2.3,5.67 Narrow format: Timestamp,Signal,Value 1643781166702,signal1,2.3 |
| CSV |
|
Wide format: Timestamp,Signal1,Signal2 1643781166702,2.3,5.67 Narrow format: Timestamp,Signal,Value 1643781166702,signal1,2.3 |
| JSON |
|
Narrow format: [{"Timestamp": 1643781166702, "Signal": "Signal1", "Value": 2.3}, {...}] Wide format: [{"Timestamp": 1643781166702, "Signal1": 2.3, "Signal2": 5.67}, {...}] |
| NDJSON |
|
Narrow format: {"Timestamp": 1643781166702, "Signal": "Signal1", "Value": 2.3} {"Timestamp": 1643781166702, "Signal": "Signal2", "Value": 5.67} Wide format: {"Timestamp": 1643781166702, "Signal1": 2.3, "Signal2": 5.67} |
Note
Parquet file format is the preferred choice for transferring data via files to TSI. Choosing any other option like CSV or JSON file format can cause file processing delays and is recommended for testing purposes only.
The TSI also accepts compressed file formats. Such files are to be uploaded to a connection via TSI UI only. The above formatted files can be compressed using any one of the acceptable formats: .zip, .tar.gz or .gz.
Supported Time Format
The column representing time in the data must have one of the time formats as below. The column name representing time and the time format must stay the same for all the files in this connection.
| Time Format | Example |
|---|---|
| Seconds | 1643707264 |
| Milliseconds | 1643707264380 |
| Microseconds | 1643707264380000 |
| Nanoseconds | 1643707264380000000 |
| ISO 8601 | 2022-01-31T13:30:00.123456789-07:00 |
Authentication and Security
The File Connection uses an AWS S3 bucket as an integration component. This S3 bucket can either be hosted in Falkonry's or the User's AWS infrastructure. As files are transferred into the S3 bucket, TSI starts processing the files in order of their arrival.
When using a Falkonry managed S3 bucket, the secure credentials are generated during the connection creation process and the integration details are made downloadable from within TSI. These credentials are used to transfer data files into the targeted S3 bucket. Users can use AWS SDKs or CLI to perform this action.
When using a User managed S3 bucket, a file connector is installed in
User's AWS account as an AWS lambda function. This file connector is
responsible for communicating the arrival of new data files in the
targeted S3 bucket to TSI. The connector uses Lambda \<> S3 binding
managed by AWS and uses token-based authentication to communicate with
TSI over port 443 (HTTPS). On the other side of the integration, TSI
requires AWS credentials to be able to read files from the User managed
S3 bucket. These AWS credentials are required during the connection
creation process. Learn more about this file connector
here </cloudbase/PrivateFileConnection>.
::: {#file-connection-monitoring} Connection Monitoring :::
The File Connection has list of all the files sent to TSI for processing. Each file has a status information to track it\'s status in the data infrastructure.
Following are the statuses with their meaning:
| Status | Meaning |
|---|---|
| QUEUED | The file is waiting in the data processing queue. The data infrastructure processes files in the order they are received by TSI. |
| PROCESSING | The file is getting processed in TSI. |
| PROCESSED | The file is processed and data is available for the Approved Signals in TSI. All the newly discovered signals can be seen under Draft Signals section and the data summary can be seen under File Info section. |
| FAILED | The file failed to get processed in TSI. The error message can be seen under File Info section. |
| UNPROCESSED | The file is not yet processed since the connection is in Test. Change the connection status to PRODUCTION to get these files processed. |
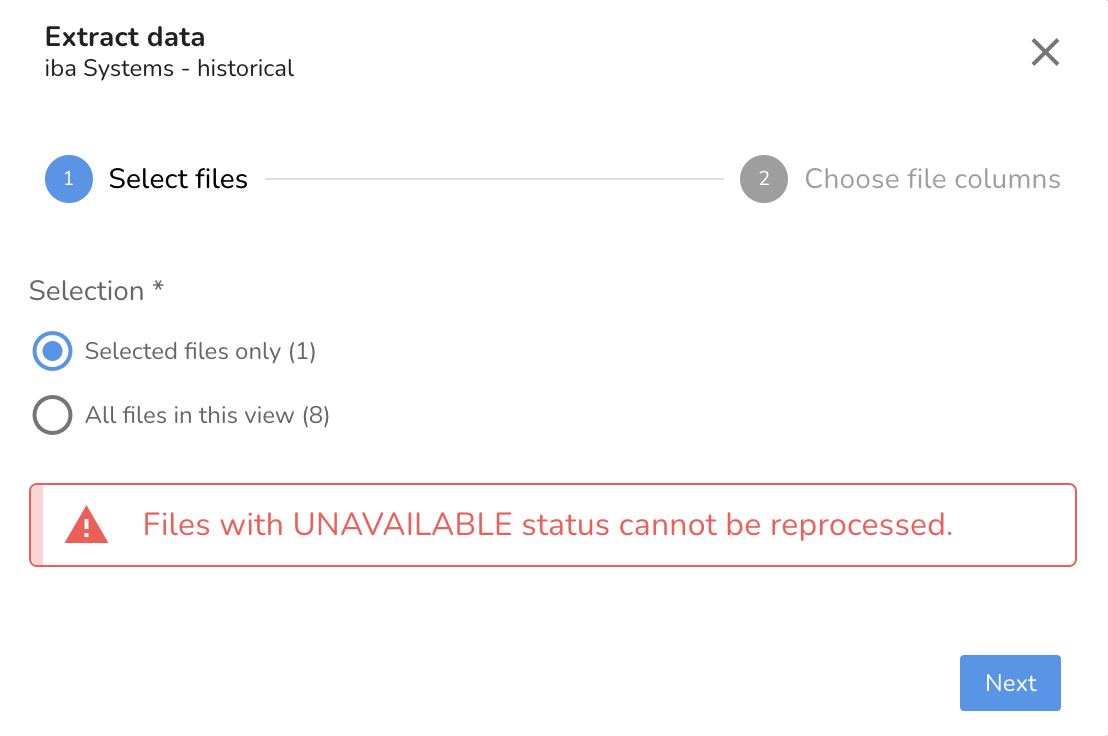
| UNAVAILABLE | The file has been deleted from TSI and is no longer available for processing. The connection waits for enough time to review the data before deleting the file. This does not affect the signal data already extracted from these files. |
Note
The data files with any status other than UNAVAILABLE remain available in the system for reprocessing. To reprocess the files, use ExtractData action via TSI UI.
Historical Connection
This type of Inbound Connection is used to bring historical data into TSI for model learning and evaluation purposes. Sending historical data along with the live data to the same connection causes delays and disruptions to the real-time monitoring. To avoid such disruptions, it is recommended to use a Historical Connection. This connection type is also helpful to generate model output for a time period during which live data stopped flowing into TSI. This connection is similar to a File Connection in Test mode. The data files can be uploaded to this connection via the TSI UI, or can be copied over to the AWS S3 bucket designated for this connection.
Note
The data files for this connection needs to be processed manually by initiating DATAPROCESSOR activity from the TSI UI. Please validate Connection Settings <inbound-connection-settings> before triggering Extract Data action.
Extracting data from the files
- 1. Select files to be processed and click on Extract Data action.
-
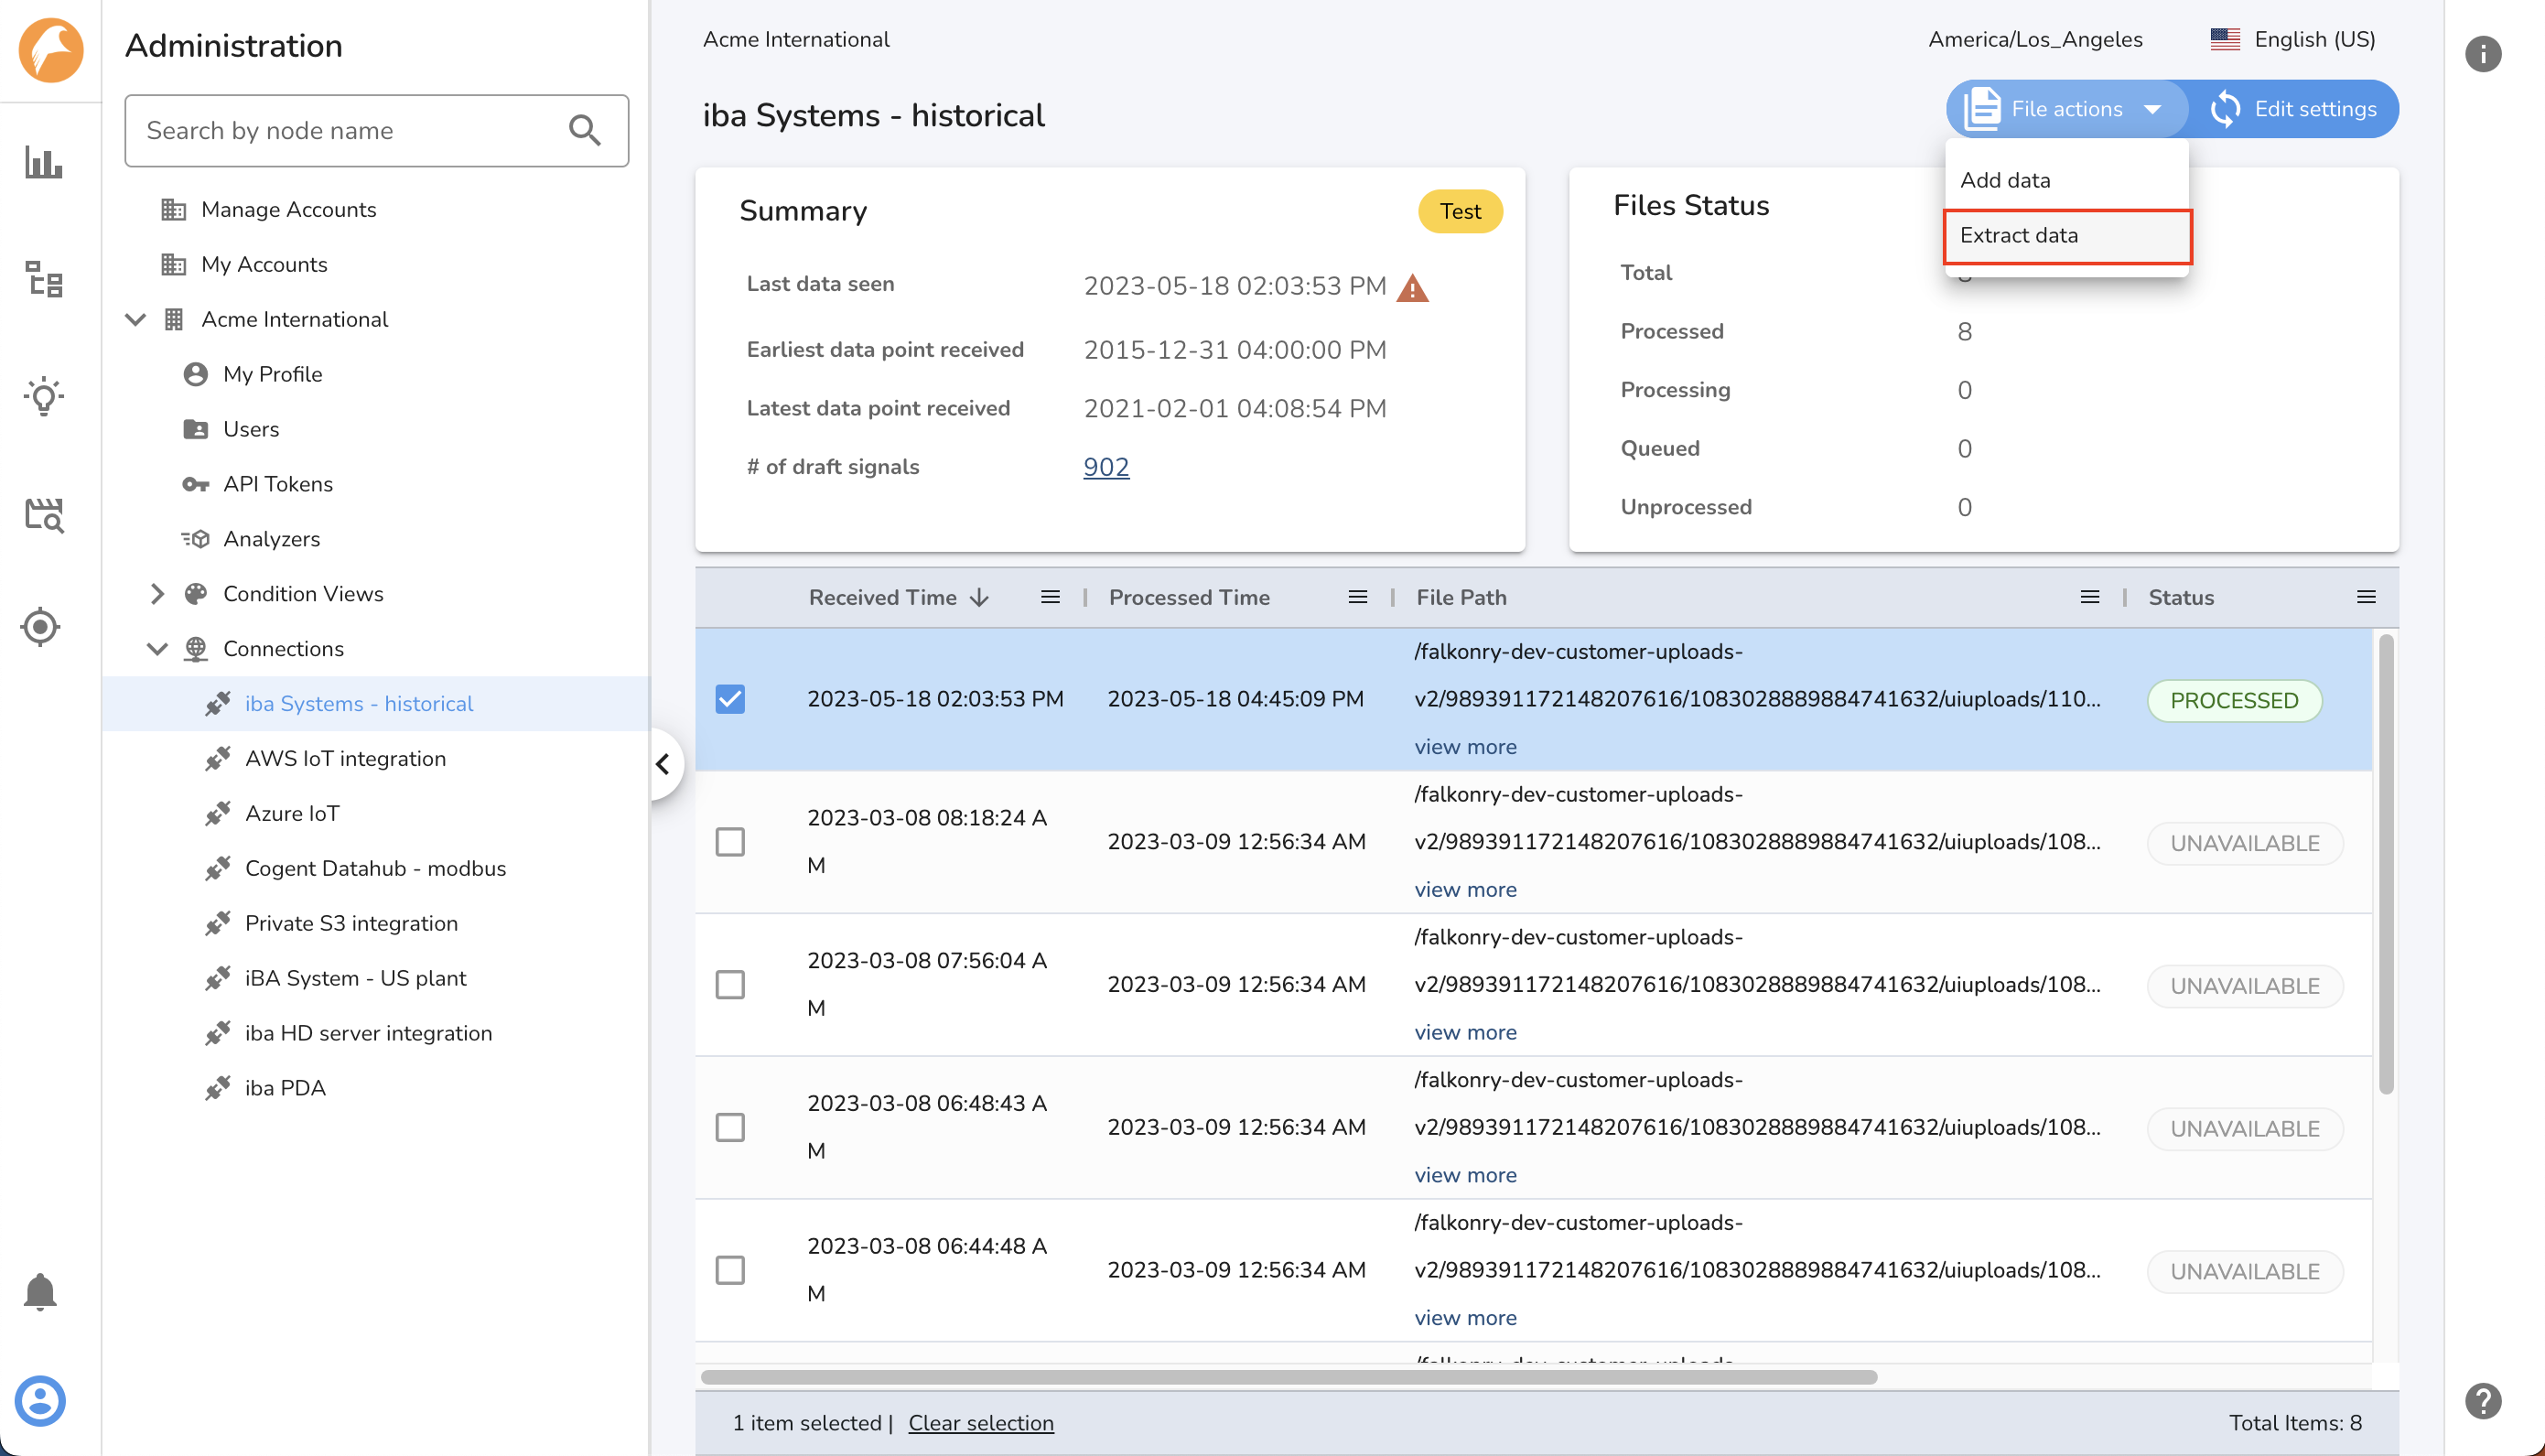
- 2. Confirm the file selection. To select all files pick All files in the view option.
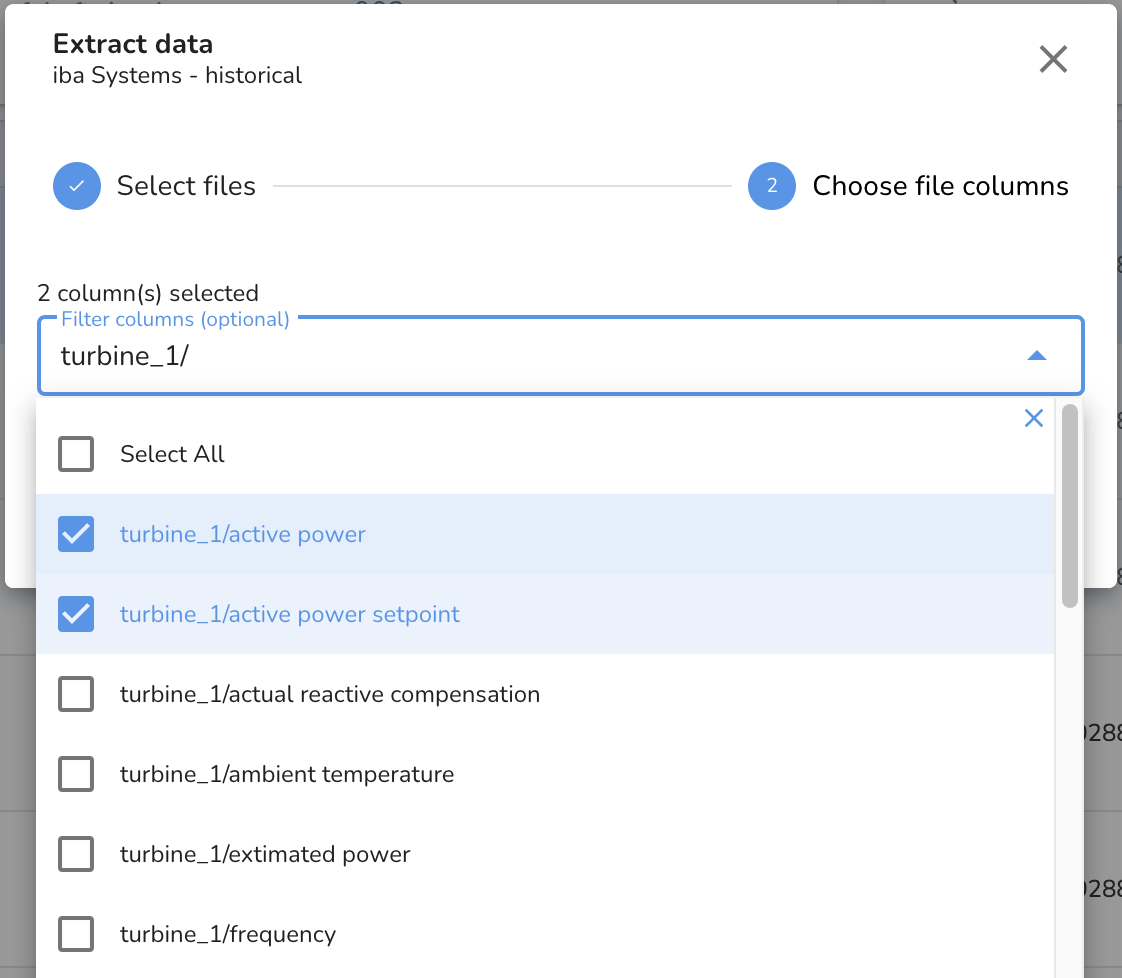
-
- 3. Choose the columns to be processed. To process all the columns in the selected files, leave the column selector empty.
-
- Trigger the DATAPROCESSOR activity by clicking the Extract button and track the status of this activity within the Activity view.
Note
Wait for the DATAPROCESSOR activity status to be marked as COMPLETED to see the data for the relevant signals.
After the historical data files are processed, the signal data can be
used for Patterns modeling and for generating model output using the
live model. You can read more about generating the model output and
running evaluation activity on historical data
here</patterns/LiveModelManagement>.
iba Systems Connection
This type of Inbound Connection is used to bring real-time data into TSI from iba Systems in the form of parquet files generated by ibaDatCoordinator v3 or higher. This data transfer option uses an AWS S3 bucket as the storage medium to transfer files. Data files received by this connection type are processed in the order in which they arrive.
File processing is tracked via Status tags. While the files get
processed, they get tagged with a status. You can read more about Status
tags here <file-connection-monitoring>.
To process files with historic data, it is recommended to use a separate
Historical Connection. This will avoid delays in live data processing.
Note
Please use ibaDatCoordinator v3 or higher for this connection.
Authentication and Security
The iba Systems Connection uses ibaDatCoordinator and an AWS S3 bucket as an integration component. This S3 bucket is hosted by Falkonry. As files are transferred into the S3 bucket, TSI starts processing the files in order of their arrival.
Secure credentials are generated during the connection creation process and are downloadable from the connections section in the TSI UI. You can use these credentials to configure ibaDatCoordinator to transfer data files into the targeted S3 bucket.
Litmus Connection
This type of Inbound Connection allows you to bring real-time data into TSI from Litmus UNS via MQTT. This data transfer option involves TSI subscribing to Litmus MQTT broker and consuming JSON formatted MQTT messages over the internet.
Authentication and Security
This connection expects Litmus UNS to be accessible over the internet for TSI to connect to it. This connection needs to be configured with Litmus MQTT broker endpoint, port, topic, client ID and security credentials when creating the connection in TSI.
The data flow is secured by username-password, managed in Litmus UNS. For TSI to reliably connect to Litmus over the internet, it is required to configure the network security with a range of whitelisted IP addresses to allow MQTT subscription requests from TSI.
Note
Please contact Falkonry Support to get the list of IP addresses to allow MQTT connection.
MQTT Connection
This type of Inbound Connection allows you to bring real-time data into TSI via MQTT. This data transfer option involves TSI subscribing to a managed MQTT broker or UNS platform. The JSON formatted messages are received by TSI as it subscribes to the MQTT broker over the internet.
Supported Data Format
| Data Type | Requirements |
|---|---|
| JSON |
|
Supported Time Format
The JSON key representing time in the data must have one of the time formats as below. The key representing time and the time format must stay the same for all the messages.
| Time Format | Example |
|---|---|
| Seconds | 1643707264 |
| Milliseconds | 1643707264380 |
| Microseconds | 1643707264380000 |
| Nanoseconds | 1643707264380000000 |
| ISO 8601 | 2022-01-31T13:30:00.123456789-07:00 |
Authentication and Security
This connection expects the MQTT broker to be accessible over the internet for TSI to connect to it. This connection needs to be configured with MQTT broker endpoint, port, topic, client ID and security credentials when creating the connection in TSI.
The data transfer is secured by certificate-based authentication. For TSI to reliably connect to the MQTT broker over the internet, it is required to configure the network security with a range of whitelisted IP addresses to allow MQTT subscription requests from TSI.
Note
Please contact Falkonry Support to get the list of IP addresses to allow MQTT connection.
ReST API
This type of Inbound Connection allows you to send data to TSI over HTTP requests. This data trasfer option allows you to build custom integration for sending data to TSI. This connection expects the signals exist in TSI and uses the TSI signal ID to reference the signal in the JSON formatted HTTP payload.
Request Payload
[
  { "time" : 1643707264380000000, "value": 45.3, "signal_id": "{{signal1_id}}" },
  { "time" : 1643707264580000000, "value": "alarm-on", "signal_id": "{{signal2_id}}" }
]
Example request
::::: tabs ::: code-tab bash
- \$ curl --location --request POST \'https://app3.falkonry.ai/api/1.2/accounts/xxxxxxxxxxxxxxx/observations\' --header \'Authorization: Bearer \<token>\' --header \'Content-Type: application/json\' --data-raw \'[
{ \"time\" : 1643707264380000000, \"value\": 45.3, \"signal_id\": \"yyyyyyyyyyy\" }, { \"time\" : 1643707264580000000, \"value\": \"alarm-on\", \"signal_id\": \"zzzzzzzzzzz\" } ]\'
:::
::: code-tab python
import requests import json
URL = \'https://app3.falkonry.ai/api/1.2/accounts/xxxxxxxxxxxxxxx/observations\' TOKEN = \'\<token>\' HEADERS = {\'Authorization\': f\'Bearer {TOKEN}\'} PAYLOAD = [ { \"time\" : 1643707264380000000, \"value\": 45.3, \"signal_id\": \"yyyyyyyyyyy\" }, { \"time\" : 1643707264580000000, \"value\": \"alarm-on\", \"signal_id\": \"zzzzzzzzzzz\" } ]
response = requests.post(URL, headers=HEADERS, data=json.dumps(PAYLOAD)) print(response.json()) ::: :::::
Note
The above API can also be used to send events data to TSI. Each event can be JSON formatted and set as the [value]{.title-ref} in the HTTP request payload.
Example:
{ "time" : 1643707264380000000, "value": "{\"status\": \"maintenance\", \"end_time\": \"2024-05-07T12:00:00Z\"}", "signal_id": "<json_signal_id>" }
Supported Time Format
The JSON key representing time in the data must have one of the following time formats. The key representing time and the time format must stay the same for all the HTTP requests.
| Time Format | Example |
|---|---|
| Nanoseconds | 1643707264380000000 |
Authentication and Security
This connection is secured by the API token. To generate an API token,
see here </cloudbase/UserManagement#api-tokens>{.interpreted-text
role="doc"}. For rotating API token, generate a new one and delete the
old one.
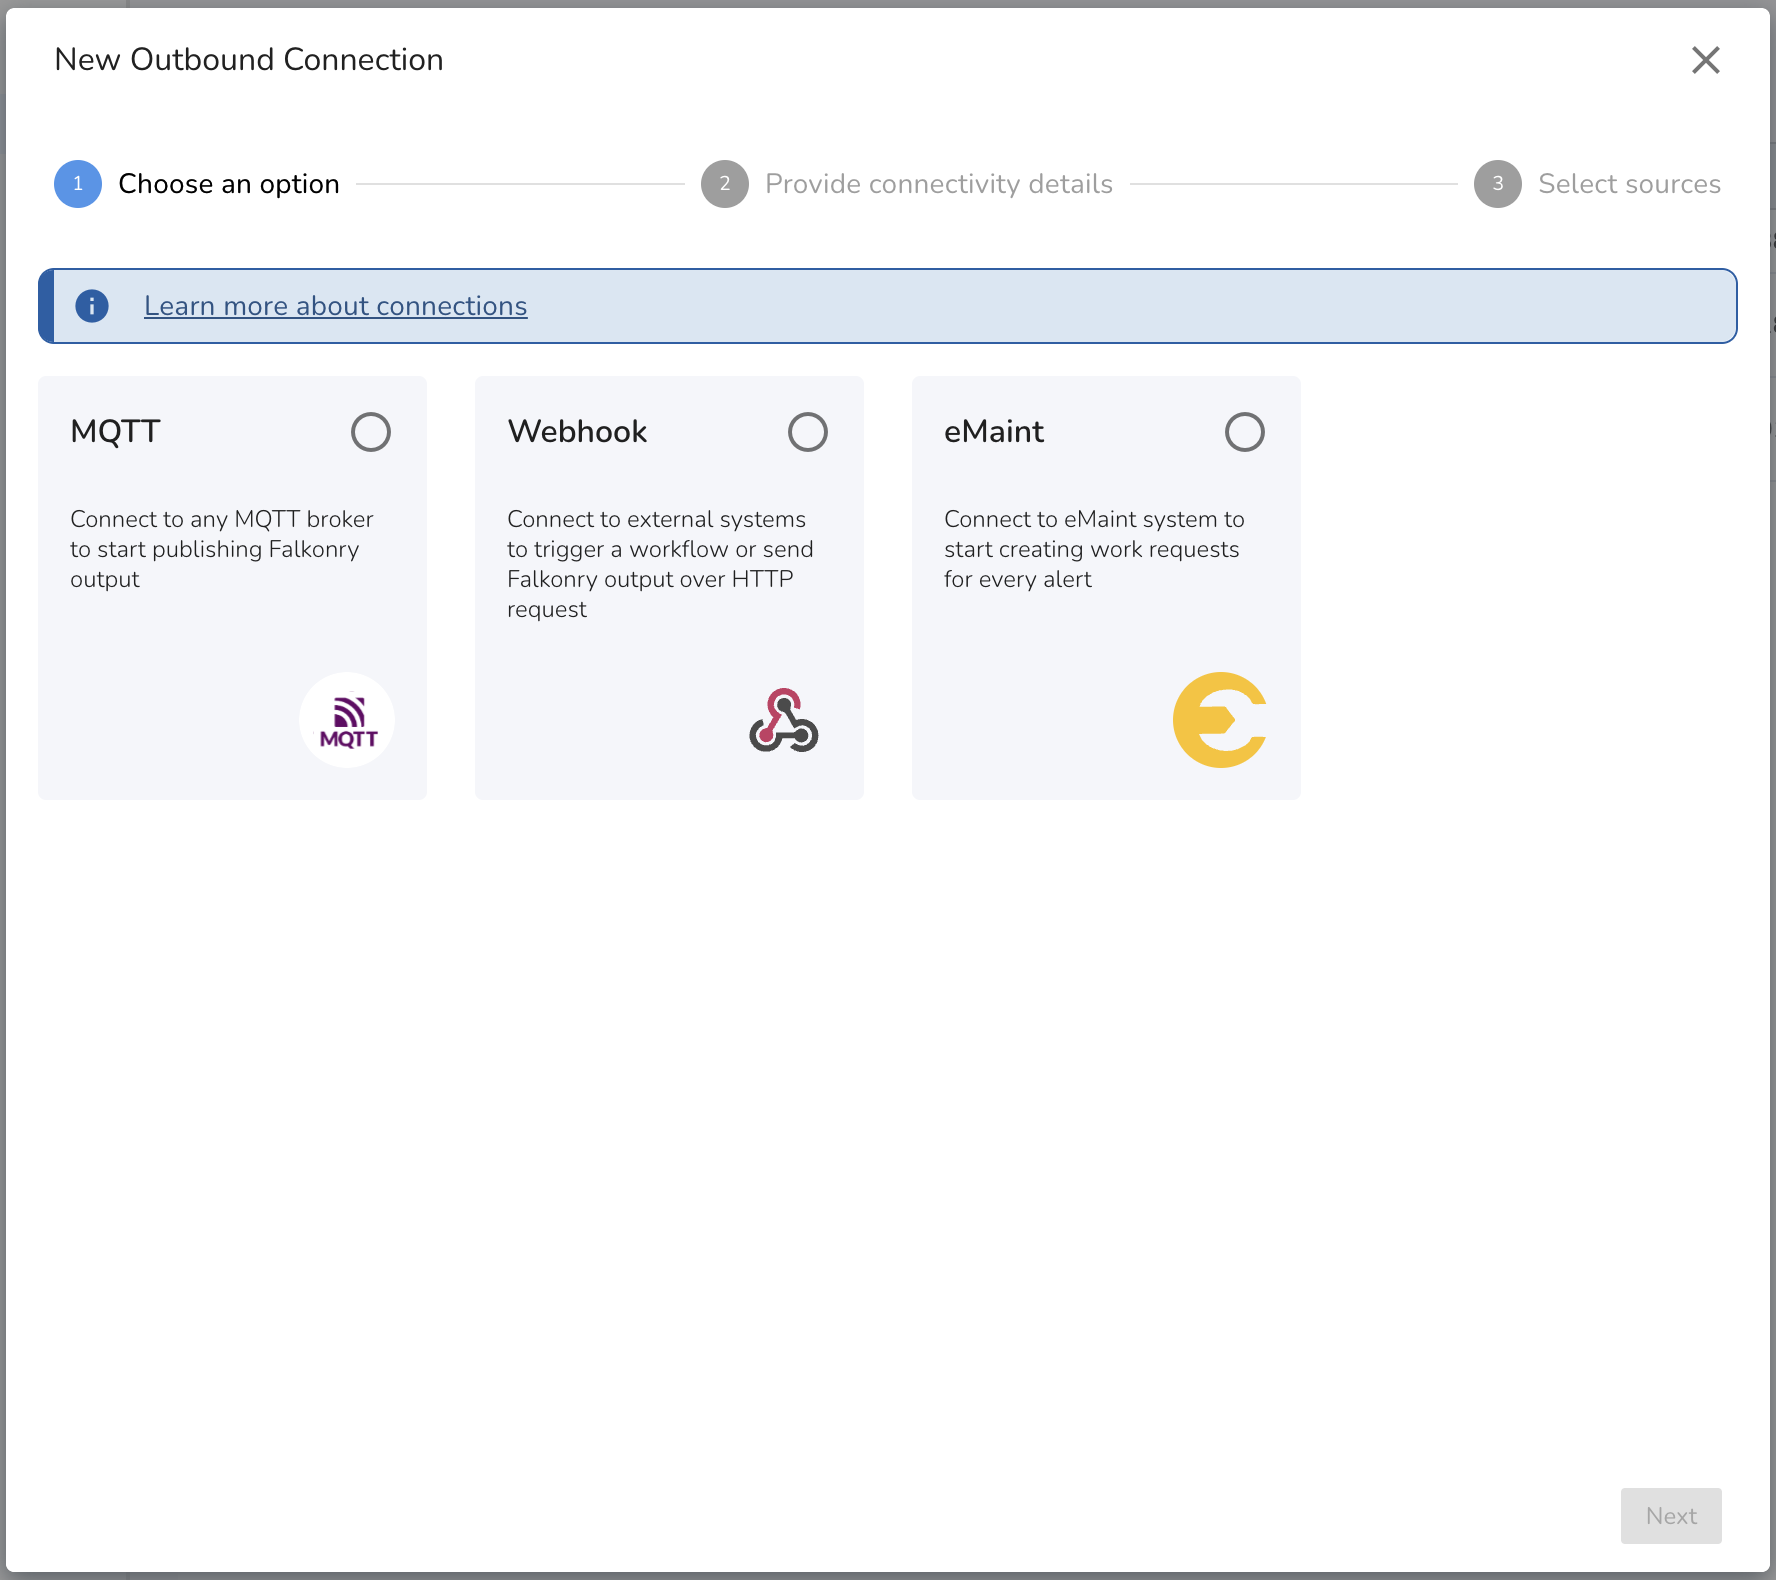
Outbound Connections
Outbound Connections are used to send the live output that TSI produces to external systems. Several types of external systems such as iPaaS, MQTT brokers and CMMS/EAM systems can be connected to Falkonry TSI via Webhook, MQTT and ReST APIs.
The output data from the Falkonry TSI gets delivered in the order it is
generated. For real time data delivery, a connection must be in
PRODUCTION status. This connection may change it\'s status to
PAUSED, in case TSI cannot connect to the external systems after
certain number of retry attempts. In such case, use the Connection UI to
see the error details and change the status back to
[PRODUCTION]{.title-ref} after the connectivity is revolved.
Note
Currently only Rules output is supported for outbound integration.
Creating a Connection
When creating an Outbound connection in TSI, review the available connection types and select the connection type supported by the external system you currently have. For transferring historical output from Falkonry TSI, use ReST APIs.
Setting up a Connection
When creating the connection use the [template]{.title-ref} section to configure the data format and the payload. The current supported format is JSON, and following properties are available to be used in the payload.
| Property Name | Purpose |
|---|---|
context.time |
Timestamp of the TSI output in UTC time (ISO format). Example: 2024-01-01T00:00:00Z. |
context.value |
Value of the TSI output. For Rules, the value can be either true or false. |
context.signal |
ID of the output signal. |
context.signalName |
Name of the output signal. |
context.tenant |
Account ID in Falkonry TSI. |
context.connection |
ID of the outbound connection. |
context.connectionName |
Name of the outbound connection. |
context.rule |
ID of the rule when integrating with Rules. |
context.ruleName |
Name of the rule when integrating with Rules. |
context.ruleDescription |
Description of the rule when integrating with Rules. |
context.<custom-property-key> |
Custom fields set as properties on the TSI assessment with prefix outbound.. Contact Falkonry Support to add additional context to the message payload. |
After the connectivity details are provided, it is required to configure the signal sources. This is where you can configure the type of TSI output you want to send to external system.
The available sources are:
| Signal Source | Signal Type | Use |
|---|---|---|
| Rules | Alerts | To send alerts generated by the selected rules. |
| Rules | Rule output | To send rule output of the selected rules. This contains the rule output each time the rule gets evaluated. The value can be true as well as false. |
The types of Outbound Connections available are as follows:
MQTT Connection
This type of Outbound Connection allows you to connect any MQTT broker with Falkonry TSI. This connection delivers live output data produced by the TSI as MQTT messages for each configured signal. The JSON formatted messages are published by TSI as it connects to the MQTT broker over the internet.
Example message template
Use below example template to receive alerts from Rules.
{
  "time": "{{context.time}}",
  "value": "{{context.value}}",
  "tenant": "{{context.tenant}}",
  "rule": "{{context.rule}}",
  "rule_name": "{{context.ruleName}}",
  "description": {{context.ruleDescription | tojson}},
  "asset_id": "{{context.assetKey}}"
}
Authentication and Security
This connection expects the MQTT broker to be accessible over the internet for TSI to connect to it. This connection needs to be configured with MQTT broker endpoint, port, topic, client ID and security credentials when creating the connection in TSI.
The data transfer is secured by basic as well as certificate-based authentication. For TSI to reliably connect to the MQTT broker over the internet, it is recommended to configure the network security with a range of whitelisted IP addresses to allow connection requests from TSI.
Note
Please contact Falkonry Support to get the list of IP addresses to allow MQTT connection.
Webhook Connection
This type of Outbound Connection allows you to trigger a webhook event in the external system. This connection delivers live output data produced by the TSI as HTTP requests for each configured signal. The JSON formatted HTTP payload are delivered by TSI as it connects to the external system over the internet. This type of connection also allows you to connect iPaaS platforms as well as trigger workflows to send an email.
Use below example template to receive alerts from Rules.
{
  "time": "{{context.time}}",
  "value": "{{context.value}}",
  "tenant": "{{context.tenant}}",
  "rule": "{{context.rule}}",
  "rule_name": "{{context.ruleName}}",
  "description": {{context.ruleDescription | tojson}},
  "asset_id": "{{context.assetKey}}"
}
Authentication and Security
This connection expects the external system to be accessible over the internet for TSI to connect to it. This connection needs to be configured with HTTP/HTTPS URI and security credentials as HTTP headers when creating the connection in TSI.
The data transfer can be secured by setting up the HTTP header based authentication. For TSI to reliably connect to the external system over the internet, it is recommended to configure the network security with a range of whitelisted IP addresses to allow connection requests from TSI.
Note
Please contact Falkonry Support to get the list of IP addresses to allow HTTP/HTTPS connection.
Zapier Connection
This type of Outbound Connection allows you to trigger workflows created by you in Zapier. This connection delivers live alerts generated by Rules as HTTP requests. Each alert is delivered as JSON formatted HTTP payload using the configured Zapier webhook URL.
Checkout this
example <../../howtos/Integrating Zapier with Rules>{.interpreted-text
role="doc"} to know how you can build an email integration with Zapier.
Use below example template to receive alerts from Rules.
{
  "time": "{{context.time}}",
  "value": "{{context.value}}",
  "tenant": "{{context.tenant}}",
  "rule": "{{context.rule}}",
  "rule_name": "{{context.ruleName}}",
  "description": {{context.ruleDescription | tojson}},
  "asset_id": "{{context.assetKey}}"
}
Authentication and Security
This connection expects Zapier endpoint to be accessible over the internet for TSI to connect to it. This connection needs to be configured with HTTP/HTTPS URL provided by Zapier for each workflow when creating the connection in TSI.
The data transfer is secured by HTTPS communication. Since Zapier webhook URL does not have a HTTP header based authentication, it is necessary to treat the webhook URL as secret.
Note
Please contact Falkonry Support to get the list of IP addresses to allow HTTP/HTTPS connection.
CMMS/EAM Connection
This type of Outbound Connection allows you to connect CMMS/EAM systems with Falkonry TSI. This connection can be used to automatically create work orders or work requests in the CMMS/EAM system when any of the Rules generates an alert. This connection uses one of our partners, Makini to establish connectivity.
Note
Please contact Makini or Falkonry Support as you plan to connect your preferred CMMS/EAM system with TSI.
Checkout this
example <../../howtos/Integrating CMMS:EAM with Rules>{.interpreted-text
role="doc"} on how you can connect eMaint with Falkonry Cloud.
Use below example template to create work order for an alert produced by TSI.
{
  "title": "{{context.ruleName}}",
  "description": {{context.ruleDescription | tojson}},
  "assetKey": "{{context.assetKey}}",
  "status": "Open",
  "createdAt": "{{context.time}}",
  "scheduledAt": "{{context.time}}"
}
Use below example template to create work requests for an alert produced by TSI.
{
  "title": "{{context.ruleName}}",
  "description": {{context.ruleDescription | tojson}},
  "assetKey": "{{context.assetKey}}",
  "userRequestedKey": {{context.userRequestedKey}}",
  "customFields": {
      "stattype": "O"
  }
}
Authentication and Security
This connection between Makini and CMMS/EAM is managed and secured by Makini. You can required to connect your preferrred CMMS/EAM system with Makini and allow Makini to perform CRUD operations, before creating this connection in TSI. The connection between TSI and Makini is secured by API token generated by Makini. This API token has an expiry of 30 days and needs to be rotated accordingly.
Note
Read
here <../../howtos/ImportingAssetsfromCMMS_EAMSystems>{.interpreted-text
role="doc"} to know how you can bring asset information into Falkonry
Cloud from various CMMS/EAMs systems.
ReST API
Signal Data API can be used to retrieve the output data from the TSI generated signals. Each output data type (predictions, confidence score, and explanation score) is referenced as Signal or Connected Source with an unique identity in TSI. The Signal or Connected Source ID can be used to retrieve the output data by performing a time range query.
Get the Connected Source or Signal ID from All Signals section in the
TSI UI and use the
Signal Data API </apis/raw_points> to
retrieve the data.
Authentication and Security
All the TSI APIs use REST (Representational State Transfer). The APIs are secured by token-based authentication.
The Authorization HTTP header is required to be specified with Bearer \<your-access-token> in each request to authenticate as a user and have the same permissions as the user itself. This access token needs to be generated via the TSI UI.
Inbound Connection Settings
The Inbound Connection supports different data types and formats originating from various data acquisition systems. To be able to accept the data and understand it, it is required to configure the connection once during the setup process. The configuration gets set as Connection Settings and it involves identifying the column or property that represents the timestamp, time format, and organization structure of the signal data. The Connection Settings are capable of understanding a simple CSV columnar structure as well as a complex structure like nested JSON objects.
The supported settings are as below:
| Setting | Description |
|---|---|
| Status | There are three statuses for a connection: |
- Test: Used to validate settings using data preview and auto-detect draft signals. Files collected for iba or file connections can later be processed via Extract Data UI action. |
|
- PRODUCTION: Continuously processes new incoming data for approved signals. |
|
- PAUSED: Stops receiving new incoming data. Data transfer requests will be blocked, resulting in access denied errors. |
|
| Transformation | - Set as Default if the data is in wide or narrow format and doesn’t require preprocessing on names or values. |
| - Set as Template if the data is complex and requires preprocessing. | |
| Time Format | This is a required setting. Set to match the format of the timestamp in the data. Supported formats: ISO 8601, Seconds, Milliseconds, Microseconds, Nanoseconds. |
| Time Identifier | This is a required setting. Set to the column or key name in the data that signifies time. |
| Signal Identifier | This is an optional setting. Set if the data is in narrow format. Specify the column or key name that signifies signal name. |
| Value Identifier | This is an optional setting. Set if the data is in narrow format. Specify the column or key name that signifies signal value. |
| Timezone | This is an optional setting. Set if the timestamp in the data lacks timezone information. Supported only for ISO 8601 time format in parquet files. |
| Signals to be skipped | This is an optional setting. Specify signals to skip in the data file as comma-separated strings. |
| Signal name prefix | This is an optional setting. Add a prefix to signal names in the data to match signals in TSI. Supported only for Default transformation with parquet files. |
| Repeat Threshold | This is an optional setting. Set if signals change values frequently. Data processor skips repeating values until the threshold is met, enabling faster processing. Accepts values in nanoseconds (0–999999999999999). Consult Falkonry before setting this value. Supported only for Default transformation with parquet files. |
| Sampling Rate | This is an optional setting. Set if signals change values frequently and repeat threshold is set. Accepts values in nanoseconds (0–999999999999999). Consult Falkonry before setting this value. Supported only for Default transformation with parquet files. |
Here are a few examples of Connection Settings for different data structures:
| # | Data Sample | Connection Settings for UI |
|---|---|---|
| 1 | Parquet or CSV Timestamp,Signal1,Signal21643781166702,2.3,5.671643781166703,3.2,5.67JSON {"Timestamp": 1643781166702, "Signal1": 2.3, "Signal2": 5.67} |
|
| 2 | Parquet or CSV Timestamp,Signal,Value1643781166702000,Signal1,2.31643781166702000,Signal2,5.67JSON {"Timestamp": 1643781166702000, "Signal": "Signal1", "Value": 2.3} |
|
| 3 | JSON {"Timestamp": "2022-01-31T13:30:00.123456789-07:00", "Signal1": 2.3, "Signal2": 5.67} |
|
| 4 | JSON [ {"Timestamp": 1643781166702000000, "Signal1": 2.3, "Signal2": 5.67}, {"Timestamp": 1643781166702000000, "Signal1": 2.3, "Signal2": 5.67} ] |
|
| 5 | JSON [ {"Timestamp": 1643781166702000000, "Signal": "Signal1", "Value": 2.3, "Quality": 219}, {"Timestamp": 1643781166702000000, ": "Signal2", "Value": 5.67, "Quality": 0} ] |
|
| 6 | JSON [ {"Signal1": [{"Timestamp": 1643781166702, "Value": 2.3}]}, {"Signal2": [{"Timestamp": 1643781166702, "Value": 5.67}]} ] |
[ {% for key,value in dataMap.items() %} {% for reading in value %} { "time": {{ reading.Timestamp }}, "sourceName": "{{key}}", "value": {{reading.Value}} } {% if not loop.last %}, {% endif %} {% endfor %} {% endfor %} ] |
| 7 | Parquet or CSV Timestamp,Machine,Signal1,Signal21643781166702000,Machine1,2.3,5.671643781166702000,Machine2,2.1,5.7 JSON {“Timestamp”: 1643781166702000, “Machine”: “Machine1”, “Signal1”: 2.3, “Signal2”: 5.67} {“Timestamp”: 1643781166702000, “Machine”: “Machine2”, “Signal1”: 2.1, “Signal2”: 5.7} |
|
Note
Parquet file format should be the preferred choice for transferring data via files to TSI. Choosing any other option like CSV or JSON file format can cause file processing delays and is recommended for testing purposes only.
Understanding the Template Transformation
The Template transformation is built using [Jinja2]{.title-ref} template language version [3.0]{.title-ref}. This provides access to the file name along with the content of the file. The template is applied to the data, line by line or object by object in sequential order.
- To access file name use: {{ contextMap.fileName }}.
- To access data use: {{ dataMap.items() }} and iterate over the keys.
The template must produce an output as shown below:
[
  {"sourceName": "{{ signal1 }}", "time": "{{ time }}", "value": "{{ reading1 }}"},
  {"sourceName": "{{ signal2 }}", "time": "{{ time }}", "value": "{{ reading2 }}"}
]
or
{"sourceName": "{{ signal1 }}", "time": "{{ time }}", "value": "{{ reading1 }}"}
Below are some common operations for reference:
| # | Operation | Syntax |
|---|---|---|
| 1 | Concat two strings with '-' | {{dataMap.line}}-{{dataMap.signal}} |
| 2 | If-else condition | {% if (key > 1000) %} ... {% elif (key > 100) %} ... {% else %} ... {% endif %} |
| 3 | If condition with OR and AND | {% if ((key != 0 or key != 128) and key2 == "value") %} ... {% endif %} |
| 4 | Iterate an array of objects | {% for t in dataMap["signalList"] %} ... {% endfor %} |
| 5 | Iterate an array of values | {% for t in dataMap["valueList"] %} ... {% endfor %} |
| 6 | Iterate keys of an object | {% for key, value in dataMap.items() %} ... {% endfor %} |
| 7 | Convert string to int | {{dataMap.value | int}} |
| 8 | Perform math operation on the signal value | {{(dataMap.value * 1000)/1000}} |
Note
Refer to Jinja2 template documentation for more details on syntax and other supported operations.